Tuesday, December 22, 2020

Thoothukudi Macaroons | Cashew Macaroons

Thoothukudi Macaroon, a unique variety of macaroon from the southern city of Tamilnadu, Thoothukudi. These macaroons are made from cashew powder in contrast to the traditional macaroon which is made from almond powder. It's widely believed that these macaroons were brought into the port city by the Portuguese sailors which was later upgraded into its current form. You can say it's an Indiansied version of European macaroons.

When I was a school goer, Appa worked in thoothukudi for a year or two and occasionally he bought these macaroons from the famous bakeries(can't remember the bakery name now) in the town and I can still remember the taste of those macaroons. It was so delicate, rich, and melted instantly when put in your mouth and in the end it left some cashew bits in your mouth. It's one of my favorite Indian bakes.

Therefore, ever since i have started baking, i attempted to bake this at home and failed miserably in the past. All it needs is three ingredients such as egg whites, sugar and cashew, hence i was like how hard it would be. But the truth is it's one of the difficult bakes that i have tried so far. With persistent efforts for years, now I can bake some decent thoothukudi macaroons. Though the shape of these macaroons are not even close to the bakery macaroons, the taste and the texture were spot on and it's exhilarating for sure !
Before moving on to the recipe, I know that many have so questions in your mind about these macaroons, so let me answer them first. 
What 's thoothukudi macaroons ?
It's an Indian version of European macaroons originated from the southern city of Thoothukudi, Tamilnadu.

Are there any substitutes for egg whites?
Traditionally it's made with egg whites only, but I have seen egg free versions using aquafaba and I'm not sure about its taste.

How to pipe such a conical shape?
  1. Make sure to beat the egg white till it reaches a stiff peak. Don't mix the egg whites vigorously after that otherwise it loses its consistency.
  2. Coming to the piping part !!  Honestly, it's a little difficult for beginners & need some practise. You should give constant pressure while piping and move your piping bag upward slowly, once you are ok with the height of the macaroons, remove it gently to have that pointy top. While baking it spread a little and the height will be reduced. 
Do these have an eggy smell?
No, since we're using only egg whites.

How long can I store these macaroons?
It stays well for 7-10 at room temperature. But I'm sure that it won't last such a long time and would be gone in a couple of days.

Now let's check out on how to make these delicious & addictive thoothukudi macaroons !


Thoothukudi Macaroons

Preparation Time : 15 mins | Cooking Time : 1 hr 20 minsServes : 20 
Recipe Category: Macaroons | Recipe Cuisine: Indian
Thoothukudi Macaroon,Tuticorin Macaroon, Cashew Macaroons,Macaroons, Indian Macaroons Thoothukudi Macaroon is an Indian version of European macaroons originated from the southern city of Thoothukudi, Tamilnadu..
Ingredients
Egg White - 2 
Sugar - 1/2 cup
Cashew - 1/2 cup
Vanilla Extract - 1/2 tsp(optional)


Procedure
First measure the cashews and add into the blender and ground into coarse powder and keep it aside.
Next separate the egg yolks and egg whites.
Keep the baking tray lined with parchment paper and pipping bag are ready. Preheat the oven at 210 F/100 C. Measure and take the sugar & then roll up your sleeve & start whisking the egg whites for making meringue.  If you're having electric whisk, use it here that will make the process so easy. Here i'm using only hand whisk and it takes me around 12-15 mins to reach the consistency.
Add a couple of tsp of sugar at a time and whisk the egg whites. 
Keep on whisking until it reaches the stiff peak consistency after around 15 mins. Now the meringue is ready. 
Add the cashew powder and the vanilla extract if you're using. Mix it well and then transfer into the pipping bag.
Start pipping the meringue in a cone shape as shown below or you can pipe small circles like french macaroons too. What's in shape, right? it tastes good either way.
Place it in the preheated oven @ 210 F/100 C and bake it for 1 hr 20 mins to 1 hr 30 mins. Once it's completely baked, it's easy to peel off from the parchment sheet and the bottom has mild color change.( In the second pic, you can see a cookie stick to the parchment paper when i checked in between for doneness :-))  
Delicious melt in your mouth  and addictive Thoothukudi Macaroons are ready. 
For more baking recipes, check my collections here 
Notes:
  • These macaroons doesn't change color.
  • Let them cool completely and store it in air tight container.
  • Depends on the size ,the baking time varies from 1 hr 20 mins to 1 hr 30 mins.

Continue Reading »

Wednesday, December 16, 2020

Hot Cocoa | Easy Single Cup Hot Cocoa

Hot Cocoa, a delicious and cozy drink made from milk & cocoa powder. Couple of years back only, I tasted my first hot cocoa from the coffee shop on a snowy day and instantly loved it and it gave such a cozy feeling when I had sipped it. I'm the person who doesn't like chocolate and never ever craved chocolate in my life so far. But somehow I started liking this drink and have been making it at home more often on winter days. You know what , certain foods are delectable only in some circumstances like this hot cocoa and i can't even think of having this on hot summer days. Do you ever feel like that ? 

Hot Cocoa and Hot Chocolate are the same ?
Both words are used interchangeably in many places. Compared to hot cocoa, hot chocolate has richer flavor and thick consistency because of chocolate in it. I personally like hot cocoa more for milder flavor.

What milk tastes best for hot cocoa?
Full fat milk is great for making hot cocoa. But you can use low fat, non-fat or dairy free milk also. Even you can use 1/2 milk and 1/2 water for a milder version.

Which sweetener is best for hot cocoa?
I have preferred to use  sugar and maple syrup for my hot cocoa. But come on, it's your drink, add whatever you like.

Tips for yummy & lip smacking hot cocoa?
  1. Use good quality cocoa powder.
  2. Add a pinch of salt bring out the flavors well.
  3. Add couple of tbsp of cream.
   

Hot Cocoa

Preparation Time : 5 mins | Cooking Time : 5 minsServes :
Recipe Category: Curry | Recipe Cuisine: American
Hot cocoa, Easy Cocoa, Single Cup Hot Cocoa Hot Cocoa, a delicious and cozy drink made from milk & cocoa powder..
Ingredients
Cocoa Powder - 1 tbsp
Maple Syrup - 1 & 1/2 tbsp
Milk - 1 cup
Salt -  a pinch
Vanilla Extract - 1/4 tsp

Procedure
In a saucepan, add the cocoa powder, maple syrup and 2 tbsp of milk. 
Whisk it together until there are no lumps. Next add the salt. And the remaining  cup of milk, mix it together and put it on heat.Bring into boil on medium flame. Switch off the flame and add the vanilla extract, give a quick stir and serve. Tasty homemade Hot Cocoa is ready. If you want, sprinkle some cocoa powder on top.
Notes:
  • You can top it with marshmallows and serve.
  • I have used full fat milk here.
  • Little salt brings out the flavor well.
  • Adjust the sweet as per your liking.
Continue Reading »

Monday, December 7, 2020

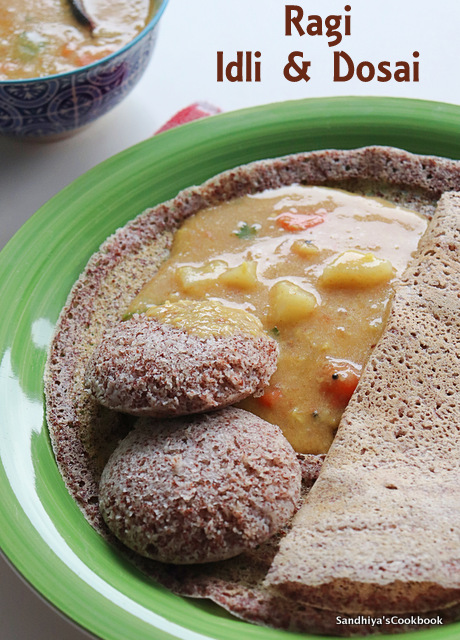
Ragi Idli and Dosa using Whole Grain | Kezhvaragu Idli and Dosai

Ragi Idli and dosa, a healthy breakfast / dinner item made from finger millet, rice and urad dal. Finger millet(Ragi/Kezhvaragu) is one of the staple and ancient grains used in many parts of India. It's a  gluten free whole grain, rich in fibre and packed with so many nutrients. Adding ragi to your diet regularly would give immense benefit to your health. 
 
I had been wanting to try the ragi idli and dosa with whole ragi grains for a very long time now. But somehow, I find that my ragi dosa recipe with flour is super easy to make and didn't bother much with whole grains. Ever since the start of the pandemic, Indian store in our place carry the ragi flour on & off .

Most of the time when we visit the store, it's out of stock, so without much choice, i had bought the whole ragi grains and made the batter for idli and dosa. As expected, it turned out so good, it tastes great with both sambar and chutney. Now I have been making this batter regularly at home for the past couple of months.
Ragi Idli and Dosa

Before moving on, to the recipe, let's see the FAQs.

How long can I store the batter ?

After fermentation, it stays well in the refrigerator for 2 or 3 day maximum. Unlike regular idli/dosa batter, it can't be stored for a long time. I highly recommend finishing the batter within 3 days.

Why can't I store it for a longer time?

Unlike regular dosa batter, millets tend to ferment faster even in the refrigerator . After around 3 days, it becomes very sour and has a stingy smell, so it's advisable to make the batter in less quantity and  finish with 3 days.

Why haven't I used the fenugreek seeds ?

Usually fenugreek seeds help to ferment the batter. In all kinds of millet batter, millet itself takes care of that job, so no need to add ferment seeds otherwise it becomes too sour easily.

Ok, now let's check out on how to make this healthy & tasty ragi idli and dosa.

Related: How to make Jowar dosai/Solla dosai


Ragi Idli and Dosa


Ragi Idli and Dosa using Whole Grain

Preparation Time : 12 hr | Cooking Time : 15 minsServes :
Recipe Category: Curry | Recipe Cuisine: Indian
Ragi idli,Ragi dosai, Ragi idli using whole grain, finger millet idli,finger millet dosai, kezhvaragu idli,kezhvaragu dosai Ragi Idli and dosa, a healthy breakfast / dinner item made from finger millet, rice and urad dal. Finger millet(Ragi/Kezhvaragu) is one of the staple and ancient grains used in many parts of India.
Ingredients
Ragi - 1 cup
Idli Rice - 1 cup
Urad dal - 1/2 cup
Salt - 1 tsp
Water - 1 to 1.5 cups(for grinding)

Ragi  Dosa

Related: How to cook millets in open pot

Procedure
In a bowl, add the ragi, idli rice and urad dal, wash it thrice and soak it with enough water for at least 8 hrs/overnight. 
In the next morning, drain the soaked water and put it in the mixie jar/grinder  along with needed water and grind into smooth batter.
Pour into a large vessel and add the salt. Mix it well with your hand.
The batter should be in free flowing consistency. Cover with lid and keep it in a warm place for 4 to 6 hrs to ferment. 
Once the batter is well fermented, mix it well with the ladle. For idli, crease the idli plate with oil and pour the batter in each mould. 
Place the idli plate on the steamer basket and steam it for 8- 10 mins. 
Remove the idli plate from the heat and let it sit aside to cool a bit, then gently remove the idli with a spoon. Soft and fluffy idlis are ready. 
For dosa, if needed add little water and adjust the batter consistency and make dosa as regular batter. 
Spongy idli and crispy dosa are ready.  Serve it with chutney and or sambar. For more breakfast recipe, check out here Ragi Idli and Dosa

Related : How to make Instant Ragi Dosai 

Notes
  • Don't over cook the idli, it becomes dry. Ragi Idli and Dosa

Continue Reading »

Monday, November 30, 2020

Capsicum Raita | Bellpepper Raita

Capsicum Raita, a simple and delicious side dish made  from curd and bell pepper/capsicum. In Tamilnadu, onion raita is quite a staple raita and it's widely served as a side dish for biryaniparotta and chapathi both in restaurants and in houses. Also, in South Tamilnadu and in Kerala, we're making "Thayir pachadi" with a lot of country vegetables like ash gourd,  cucumber and okra  which is somewhat similar to raita. 
Coming to today's recipe, here i have used a combination of yellow and orange capsicum, but you can use a single  color or any of your favorite colors. If you like capsicum flavor, then you must give this raita a try, it's simply awesome and tastes great as a side dish for all types of rotis ! Now let's check out the recipe.

Capsicum Raita

Preparation Time : 5 mins | Cooking Time : 5 minsServes :
Recipe Category: Raita | Recipe Cuisine: Indian
Capsicum Raita, Bell pepper Raita, Raita Recipe, Side dish Capsicum Raita, a simple and delicious side dish made from curd and bell pepper/capsicum.
Ingredients
Capsicum - 1/4 cup(chopped)
Green Chili - 1
Curd - 1/2 cup
Coriander leaves - few
Salt - to taste
Garam Masala - 1/4 tsp(optional)
Oil - 1/2 tsp
Mustard & urad dal - 1/4 tsp

Procedure
Chop the capsicum and green chili into small pieces. Take the curd in a bowl and add enough salt and whisk it well. Heat the pan with oil, add mustard and urad dal. Let the mustard splutters.
Then add the capsicum and green chilies with a pinch of salt. Saute till the capsicum are soft. Let it cool a bit, then add into the curd along with chopped coriander leaves. Mix it well. Tasty Capsicum Raita is ready to serve. 
Notes:
  • You can use any color of capsicum in this recipe.
  • I haven't used the garam masala, but for more flavor, you can add some garam masala while sauteing.


Continue Reading »

Monday, November 23, 2020

Butter Chicken Masala | Murgh Masala

Butter chicken Masala needs no introduction, right? It's one of the famous Indian curries around the world. It's creamy and delicious, tastes good with both rice and any rotis or flat breads. There are so many variations in this recipe and here i'm gonna share the simple home style version of butter chicken masala with basic ingredients. It's one of the most requested recipes for years now by friends and readers. I don't know why i took such a long time to share this simple recipe.Better late than never, right? So without further due, let's dive into the recipe. For any substitute ideas or doubts check out the below FAQs !! 

Why is my butter chicken not as orange as a restaurant?
The bright orange color comes from the red chili powder and tomatoes. 
  1. Using kashmiri red chili powder gives bright orange color without increasing the spice level. 
  2. Use well ripened tomatoes.
  3. To be honest, most restaurants use food color, so don't compare home made with restaurant.
What do I substitute for cream?
Cream is for extra richness and mild sweetness in the curry. So,instead of cream, you can add a little bit of milk also. 

Any tips for beginners ?
  • Don't try to achieve the bright color by adding more tomatoes, it turns the sauce more tangy.
  • I like capsicum in my chicken curry, but it's totally optional in this recipe.
  • Don't reduce the amount of butter. It gives silkiness, flavor and richness to the curry.


Butter Chicken Masala

Preparation Time : 10 mins | Cooking Time : 25 minsServes :
Recipe Category: Curry | Recipe Cuisine: Indian
Chicken Butter Masala,Butter Chicken, Murgh Chicken Masala, Butter chicken Curry, Indian Chicken Curry Butter chicken Masala needs no introduction, right? It's one of the famous Indian curries around the world. It's creamy and delicious, tastes good with both rice and any rotis or flat breads.
Ingredients
Boneless Chicken - 1/2 lb
Onion -1/2
Capsicum - 1/2 
Red chili powder - 1/2 tsp
Turmeric powder - 1/4 tsp
Garam masala powder - 1/2 tsp
Coriander powder - 1 tsp
Dried methi / fenugreek leaves - 1/2 tsp
Butter - 1 & 1/2 tbsp 
Cream - 1 tbsp
Salt - to taste
To grind
Tomato - 1 (large about 1/2 lb)
Ginger - 1/2 inch piece
Garlic - 2 gloves
Cashews - 4 

Procedure
First clean the chicken and cut into bit size pieces . In a bowl, add chicken and the half of all spices(turmeric, red chili, coriander and garam masala powder) and salt (just enough for the chicken). Mix it well and let it marinate for 20 mins.In the mean time, boil the tomato in hot water for around 5 mins and then remove the skin and  put into the blender along with all other ingredients listed under "To grind" and grind into smooth puree.Chop the onions, capsicum into small cubes. Heat the pan with 1/2 tbsp of butter.Add the onions and capsicum along with pinch of salt and saute till they are soft and keep aside.In the same pan add 1/2 tbsp of butter and add the chicken, saute it in butter for around 5-7 mins and keep it aside. In the same pan add the tomato puree and all the spices(turmeric,red chili,coriander and garam masala powder) ,salt and 1/4 cup of water. Let it simmer until all the raw smell of the spices leaves.Then add the chicken and the remaining 1/2 tbsp of butter, cover the pan and let the chicken cook thoroughly. Finally add the onion, capsicum, dried methi & cream into the curry. Mix it well and switch off the flame.Delicious and creamy Butter Chicken Masala is ready. Serve it with rice or roti. We had it with chapathi.
For soft roti/chapati, check out my recipe here  and for more chicken and non veg recipes, check out here 
Notes:
  •  The color of the curry greatly depends on the color of the tomato and chili powder. So use bright tomatoes and red chili powder for vibrant color.
  • I have used chicken breast for this recipe.
Continue Reading »