Showing posts with label Breakfast Ideas. Show all posts

Thursday, May 15, 2025

Kavuni Arisi Idli & Dosai | Black Rice Idli & Dosa

How to make Idli and dosai from the Kavuni Arisi / Black Rice 

Black Rice is also known as Kavuni Arisi in Tamilnadu which is mainly used to make sweets in Chettinad Region of Tamilnadu. Other than that, to my knowledge, i never seen anyone using the black rice for any other dishes in Tamilnadu.

Recently i have seen a lot of recipes online for making idli & dosai using the black rice, so i too got interested in trying out idli batter using the black rice. To make the batter, i have used a combination of idli rice and black rice and the result was too good. 

I didn't expect such an amazing output for the first attempt itself. The idli was so soft and spongy and the dosai also turned out  super crispy. In addition, it looks so appealing and that purple color is really eye-catching. So i was super thrilled !!  In the past three months, i made this batter for about 4-5 times and every time it turned out so good. 


Black Rice 

Black rice is rich in antioxidants and high in fiber so include them regularly to keep your diet balanced. I'm not a dietician but i strongly believe that including varieties of foods in moderation truly benefits your health. 

In addition to the health benefits, i personally love the color of this rice when it's cooked. It's so vibrant and kids would love it for sure. 

There are different types of black rice  available in the markets nowadays; some are glutinous and some are not. It's difficult to differentiate unless you're well familiar with it.  So to make the idli/ dosa batter, always use the mix of idli rice and black rice so that the idli and dosa won't be sticky. 

Making the idli/dosa batter

Black rice is a little hard to grind compared to regular idli rice so soaking it overnight helps to grind the batter smoothly without running the mixie/blender/wet grinder for a longer time.

I have used my blender to grind the idli/dosa batter, but you can use the Indian mixie or wet grinder to make the batter. 

Depending on the rice varieties, the batter color would change from mild purple to dark purple-brown. So don't worry if your batter doesn't look like mine!

For more tips on how to grind the idli batter in general or how to ferment the batter in cold temperature, do check out this post. It has tons of information and it would be really useful if you're a beginner in cooking.

Idli and Dosai

Like regular idli/dosai batter, i have used the same batter for making both the idli and dosai. Once the batter is fermented, it's good to make idli right away ! The idli would be soft and spongy. 
For the dosai, dilute the same batter with little water and make the dosai as usual, the dosai would be crispy and super delicious.

Storing the Batter

The batter can be stored in the refrigerator for up to 5 days. Once the batter is fermented, take the needed amount of batter for use and keep the remaining batter in the refrigerator immediately. 

Also don't mix the whole batter with the ladle once it's fermented. It will deflate the batter. Making idli with deflated batter would be hard. However the dosa would still turn out crispy.

Now, let's check out how to make Black Rice / Kavuni Rice idli dosa batter.


Kavuni Arisi Idli & Dosai | Black Rice Idli & Dosa

Preparation Time : 12 hrs | Cooking Time : 15 minsServes :
Recipe Category: Breakfast | Recipe Cuisine: Indian
Kavuni Arisi Idli Batter,Kavuni Arisi Idli,Kavuni Arisi Dosai,Black Rice Idli Batter,Black Rice Dosai Batter, Black Rice Idli, Black Rice Dosai Kavuni Arisi makes a soft and spongy idli as well as crispy dosa. With one batter, you can make both idli and dosai.
Ingredients
Kavuni Arisi / Black Rice - 1 cup
Idli Rice - 1 cup
Urad dal - 1/2 cup
Salt - to taste
Water - as needed for grinding & soaking

Procedure
In a bowl, add the black rice, idli rice and urad dal. Wash the rice and dal well in the water for thrice and then add enough water to soak the rice and dal. Let it soak for 6-8 hrs or overnight.
Next day, discard the soaked water and then add the soaked rice and dal in a mixer jar/wet grinder, add water as needed and grind into a smooth batter. 
Pour the batter in a large bowl(make sure that the bowl is large enough and have enough room to ferment and raise the batter) and add the salt.
Mix the salt into the batter with your hand and then cover the bowl with a lid and let it keep it in a warm place for 6-8 hrs to ferment.
Once the batter is well fermented, grease the idli plate with sesame oil and pour the batter in the idli plate and steam it for 8-10 mins.
Soft and spongy kavuni arisi idli is ready.
In the same batter , add a little bit of water to dilute and make dosai like regular dosai. Delicious Kavuni Arisi Dosai is also ready.
Serve Kavuni Arisi Idli and Dosai with Sambar and/or Chutney.

Related : Side dishes for idli/Dosai


Notes:
  • The batter stays well for up to 5 days in the refrigerator.
  • As always, take the needed batter in a separate bowl and store the rest in the refrigerator once it's fermented so that the batter stays well for a longer time.
  • I didn't use any fenugreek seed for this batter, but the idli turns out so soft.

Look how spongy the idli is !! 


Continue Reading »

Tuesday, June 7, 2022

Apple Mango Smoothie | Breakfast Smoothie Recipe

Apple Mango Smoothie, a delicious and refreshing smoothie made from the Apples and Mangoes. This Smoothie is so easy to make and very fulfilling too, so it can be served as breakfast smoothie too! 

In today's recipe, I used the store bought mango pulp for making this smoothie. However fresh mangoes also taste great for this smoothie ! I have tried making this smoothie with both fresh mangoes and canned mango pulp. Both are equally good.

When you're using canned mango pulp, make sure to add less sweetener because most of them already have added sugar in it. 

Now let's see how to make this creamy delicious Apple Mango Smoothie ! 

Apple Mango Smoothie

Preparation Time : 5 mins | Cooking Time : 0 minsServes :
Recipe Category: Smoothie | Recipe Cuisine: Indian
Apple Mango Smoothie, Breakfast Smoothie Apple Mango Smoothie, a delicious and refreshing smoothie made from the Apples and Mangoes.
Ingredients
Apple -1 
Mango - 1 (1/2 cup mango puree)
Milk -1/2 cup
Vanilla Extract -1/2 tsp(optional)
Maple syrup/ Any Sweetener - as needed

Procedure
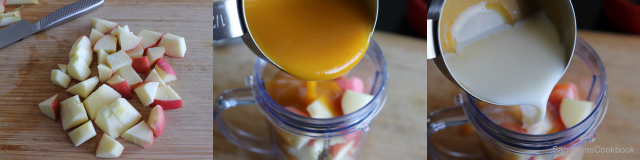
Chop the apple into small cubes. Put it in the blender jar and then add the mango puree and milk. If you're using fresh mangoes, remove the skin and cut/scoop out the mango flesh into the blender jar.


Next add the vanilla extract(if using) and maple syrup. Blend them into smooth puree.
That's it, Delicious and refreshing Apple Mango Smoothie is ready.

Related : How to make Mango Kiwi Popsicle

Notes:
  • Using less fibrous mango tastes great for this smoothie.
  • Depends on the sweetness of the apple , mango and your preference, add more or less of any sweetener.
  • I have used 2% milk for this smoothie.
  • I have used boiled and chilled milk out of habit.

Continue Reading »

Friday, December 3, 2021

Palak Poori | Spinach Poori

Palak Poori , a deep fried Indian bread made from the whole wheat flour, spinach puree and some flavorful Indian spices. 

Poori is one of the most popular Indian breakfast which is made from plain wheat flour and this palak poori is an variation to that traditional poori ! If you like poori and haven't  tried this palak poori so far, then you must give it a try ! 

It's super easy to make, delicious & that vibrant green color from the spinach is very pleasant to your eyes !


Before check out the recipe, let's see some of the FAQs about making poori

How to make Puffed up poori ?
I have a separate post on poori where i have explained all the tips and tricks to get the perfectly puffed up poori. Please check out the below link
Tips to make puffed up poori 

What's the use of adding rava into the poori?
Rava helps to keep the puffiness of the poori for a longer time so that your poori is all puffed up till you serve and it doesn't deflate immediately when it's out of hot oil.

Tips to get that gorgeous green color on the palak poori 
  • Spinach should be fresh and green, so I have used baby spinach, it has a bright green color than the regular spinach which is darker in color. 
  • Puree the spinach without any water, if it needs more liquid to make the dough, you can always add more water, but if you puree it with more water, then you may not need all spinach puree for making the dough, that means less spinach in the dough and the color also not as green as we wanted.
Ok, now let's check out on how to make this delectable palak poori/spinach poori!
 

Palak Poori | Spinach Poori

Preparation Time : 15 mins | Cooking Time : 15 minsServes : 12 
Recipe Category: Poori | Recipe Cuisine: Indian
Palak Poori, Spinach Poori, Green Poori Palak Poori , a deep fried Indian bread made from the whole wheat flour, spinach puree and some flavorful Indian spices.
Ingredients
Wheat flour - 1 cup
Rava - 1 tsp 
Oil - 1 tsp
Salt - 1/4 tsp
Spinach - 1 cup( tightly packed)
Green chili - 1 
Ginger - 1/4 inch piece
Cumin seed - 1/4 tsp
Oil - for frying

Procedure
First let's make spinach puree. Take the spinach and add into the boiling water and let it boil for a min or until it's all wilted. 
Drain the spinach and let it cool a bit. Transfer the spinach into a mixie jar  and then add the green chili, ginger and cumin seed and grind them into smooth puree.
In a large bowl, add the wheat flour, rava and salt. Mix it all together well. 
Next add the oil and the spinach puree, incorporate the spinach puree into the flour. 
Add some water into the mixie jar and use that water to make a soft and pliable dough. Let it rest for 15 mins.
Make about 12 or 13 small balls out of the dough. Roll each dough into thick disk using the rolling pin. 
Heat the oil for deep frying and then add one rolled dough at a time. Gently press the dough with a slotted spoon, it will puff up beautifully. Then flip it over the other side and cook it for about 30 secs. 
Remove from the oil and drain it on tissue paper. Tasty Palak Poori is ready to serve !

Related : How to make Potato Masala / Poori Kizhangu

Notes:
  • Use baby spinach for vibrant looking poori.
  • Don't add any water while grinding the spinach. 
Continue Reading »

Thursday, June 3, 2021

Chettinad Kuzhi Paniyaram | Kuzhi Paniyaram Batter Recipe

Chettinad Kuzhi Paniyaram, a South Indian recipe made from fermented rice and urad dal batter which is quite popular in Chettinad region of Tamilnadu and it's usually served as breakfast/dinner or even as evening tiffin along with chutneys and/or sambar. 

Kuzhi Paniyaram can be made with the leftover idli/dosa batter. I often make that way for an easier and quicker version. But when I want a really delicious paniyaram, I would make the batter especially to make both sweet and savory paniyaram.

As far as i remember, Amma never uses idli/dosa batter to make paniyaram. In our school days, she used to make this batter on weekends and make both sweet and savory paniyaram as our breakfast. In those days, I was fond of  sweet paniyaram only and never even tried those savory paniyaram.

Adding a little bit of raw rice in the batter gives such a crispy outside to the paniyaram and it totally elevates the taste of the paniyaram to a whole new level. 

Ok, now in today's recipe, i'm sharing only the savory paniyaram recipe but as i said you can use this batter for making sweet paniyaram too. 

Related : How to make sweet paniyaram / karupatti paniyaram

Kuzhi Paniyaram

Chettinad Kuzhi Paniyaram | Kuzhi Paniyaram Batter Recipe

Preparation Time : 8 hrs | Cooking Time : 20 minsServes : 4 
Recipe Category: Breakfast/ Snacks | Recipe Cuisine: Indian
Kuzhi Paniyaram Batter, Kara Paniyaram,Kuzhi Paniyaram,Kara Kuzhi Paniyaram Kara Kuzhi Paniyaram, a famous South Indian recipe made from fermented rice and urad dal batter which is usually served as breakfast/dinner or even as evening tiffin along with chutneys and/or sambar.
Ingredients
For Batter
Idli Rice - 1 cup
Raw Rice - 1/4 cup
Urad dal - 1/3 cup
Fenugreek seed - 3/4 tsp
Water - as needed (to grind)
Salt - 1 tsp
To Saute
Onion(small) - 1/2 
Channa Dal - 1 tsp
Mustard & Urad Dal - 1/2 tsp
Curry leaves - few
Salt - to taste
Oil - 1 tsp

Kara Paniyaram
Procedure
In a bowl, add idli rice, raw rice, urad dal and fenugreek seeds. Wash it thrice or until the water runs clear and then soak it with water for overnight. 
Next day, drain the soaked water &  put a batch of soaked rice and urad dal in a blender/mixie/wet grinder along with fresh water and grind into smooth batter.
Pour into a vessel and add the salt. Mix it well with your hand. Cover it with lid and let it ferment for 6-8 hrs.
For making the paniyaram, finely chop the onions, curry leaves & coriander leaves and keep it ready. Heat a kadai with oil, add mustard & urad dal, let it splutter.
Then add channa dal, onions,salt & curry leaves one by one.
 Once the batter is well fermented, take the needed batter in a separate bowl. Then add the sauted onion mixture and some coriander leaves, mix the batter well.
Heat the paniyaram pan with little oil in each hole. Pour the batter in each hole.
Cover(optional) cook it for few mins.And then gently flip into the other side with small wooden stick/skewer.
Cook till it's golden brown. Remove on to the plate.
Tasty Kuzhi Paniyaram is ready to serve ! Serve it with chutney and / or sambar.

Related : How to make Tiffin Sambar

Kuzhi Paniyaram

Related: More Chutney and Sambar Recipes

Notes:
  • Don't add more raw rice than the mentioned, it will affect the softness of the paniyaram.
  • Cook it on medium flame for even coloring on the paniyaram.
  • I have used sesame oil for making paniyaram.
  • In addition to the tempering, you can add 1 tbsp of grated coconut & carrot also for more flavor and taste
  • Adding chana dal gives nice crunchiness  but it can be omitted totally if you don't like it.Kara Kuzhi Paniyaram
Continue Reading »

Thursday, April 1, 2021

Kadalai Maavu Sambar | Besan Sambar

Kadalai Maavu Sambar, a delicious sambar that can be prepared in 10 mins with besan/bengal gram flour. It's one of the popular recipes from the road side shops across Tamil Nadu, India. In some places, it's also known as Bombay sambar and honestly i don't know the reason !  

In our home, ST is a big fan of kadalai maavu sambar and often asks to make this sambar as a side dish for idli and dosa. Making this sambar from scratch would hardly take 10 mins so by the time of preparing the dosa / idli , this sambar will be ready. 

This kadalai maavu sambar is a tiffin sambar and tastes great with all types of dosa varieties and idli varieties but not great for rice ! 

Related : How to make Lunch  Sambar

Kadalai Maavu Sambar


Kadalai Maavu / Besan 

A couple of tbsp of besan/ kadalai maavu is enough for making this sambar for 2 to 3 people. Don't tempt to add more flour otherwise the sambar would be like porridge consistency and doesn't taste good. 

For 1 tbsp of flour, it requires 1 cup of water for free flowing sambar and 1 tbsp of flour is enough for making sambar for one person. So keep this as guidance and add more or less of flour & water as per your need and liking. 

Sambar powder 


Sambar powder is the key to making this sambar. If you have followed me for a while, you might know that sometimes I make sambar without any sambar powder. 

But for this sambar recipe, the flavor and taste depend greatly on the sambar powder. So use your favorite brand or home made sambar powder. I have used my homemade sambar powder.

My home made sambar powder doesn't have much chili in it ! If your sambar powder is spicy then reduce the amount of red chili powder in the recipe.


Tips for beginners to make delicious kadalai maavu sambar

  • Make sure that the onions and tomatoes are soft before adding the besan mixture 
  • If you have cooked toor dal/ moong dal, add a tbsp or two to enhance the taste.
  • Boiling the sambar for at least 5 mins is important to get rid of the raw smell of the spices.
  • Adding a little amount of ghee truly elevates the taste and flavor. But it's totally optional.Besan Sambar


>

Kadalai Maavu Sambar

Preparation Time : 5 mins | Cooking Time : 15 minsServes :
Recipe Category: Sambar | Recipe Cuisine: Indian
Kadalai maavu sambar, Besan Sambar, 10 mins sambar, Tiffin Sambar, Kadalai Maavu Sambar, a delicious sambar that can be prepared in 10 mins with besan/bengal gram flour.
Ingredients
Kadalai maavu / Besan / Bengal gram flour - 2 tbsp
Onion - 1/4 cup(thinly sliced)
Tomato - 1/2 
Green chili - 1 
Water - 2 cups
Turmeric powder - 1/4 tsp
Red chili powder - 1/2 tsp
Sambar powder - 3/4 tsp
Salt - 1/2 tsp(or to taste)
Oil - 1 tsp
Cumin seed - 1/2 tsp
Mustard & urad dal - 1/4 tsp(each)
Curry leaves - few
Coriander leaves - few
Ghee - 1/4 tsp(optional)


Kadalai Maavu Sambar
Procedure
First cut the onions into thin slices, tomatoes into small pieces & slit the chili and keep everything ready. In a bowl, measure and add the besan and turmeric powder.Kadalai Maavu Sambar Recipe Step by Step Pic 1
Next add the red chili powder, sambar powder and salt.alai Maavu Sambar Recipe Step by Step Pic 2
Add 1/4 cup of water first and make a thick paste and then add the remaining water and mix it well and keep aside until use. If the mixture has some lumps, you can filter it once.alai Maavu Sambar Recipe Step by Step Pic 3
Heat a kadai with oil, add the mustard, urad dal and cumin seed. Let the mustard and cumin splutter.alai Maavu Sambar Recipe Step by Step Pic 4
Then add the onions, chili and curry leaves with a pinch of salt. Saute for a min and then add the tomatoes, give a quick stir.alai Maavu Sambar Recipe Step by Step Pic 5
Add 1/4 cup of water and let it cook till the onions and tomatoes are soft.alai Maavu Sambar Recipe Step by Step Pic 6
Next add the besan mixture, mix well and bring to a boil. Keep the flame in medium and let it boil for 5 mins or until the raw smell goes off.alai Maavu Sambar Recipe Step by Step Pic 7
Finally add the chopped coriander leaves and ghee(if using) and switch off the flame.alai Maavu Sambar Recipe Step by Step Pic 8
Tasty Kadalai maavu sambar is ready. Serve it with idli or dosa. 


Kadalai Maavu Sambar
Notes:
  • This sambar tends to thicken a bit after it cools down.
  • Highly recommend to use cumin for tempering in this recipe. It gives great flavor.
  • Before coming into boil, stir the sambar often to avoid sticking at the bottom.
Continue Reading »