Showing posts with label Bread. Show all posts

Thursday, July 17, 2025

Bread Upma with Vegetables | Easy Tiffin Recipe

Bread Upma, a delicious and easy to make tiffin item with the leftover bread slices. It's one of my favorite ways to use the leftover bread. I usually make this as an evening tiffin along with some tea. Trust me, this combo is awesome and tastes heavenly. You can make this as breakfast or as dinner too.

Though i call this recipe as Bread Upma, it tastes more like Veg Kothu Parotta. So if you like kothu parotta and want an easy fix or Indian flavored bread recipes then i'm sure that this recipe is for you! Do give it a try and let me know how you like it.


Bread 

You can use any type of savoury bread for this upma. I have used the good old white sandwich bread for today's recipe. But in the past i used whole wheat and other types of breads also and it tasted equally good. 

Vegetables

Personally i like to use capsicum/bell pepper for this upma. Bread and capsicum really go together well. The capsicum flavor truly elevates the taste of this upma. So i highly recommend to use the capsicum.

In addition to the capsicum, i usually add the some carrots and peas. Here in the recipe, i have used frozen peas. If you're using dried peas, make sure to soak and cook till it's soft before adding into this upma.

Ok, Now let's check out how to make this delicious bread upma. 

Bread Upma with Vegetables

Preparation Time : 5 mins | Cooking Time : 15 minsServes :
Recipe Category: Tiffin | Recipe Cuisine: Indian
Bread Upma, Bread Upma with vegetables, Kothu Bread Bread Upma, a delicious and easy to make tiffin item with the leftover bread slices.
Ingredients
Bread Slices - 4
Onion(small) - 1
Tomato(small) - 1
Carrot (small) - 1
Capsicum - 1/2 cup(chopped)
Frozen Peas - 1/4 cup
Ginger Garlic Paste - 1 tsp
Turmeric powder - 1/4 tsp
Red chili powder - 1/2 tsp
Garam Masala - 1/2 tsp
Salt - to taste
Oil - 2 tsp
Coriander leaves - a few

Procedure
First cut the onion into thin slices, carrot, capsicum and tomato into small pieces. Heat the pan with oil, and add the sliced onions.

Once the onions are translucent, add the ginger garlic paste and saute till it's aromatic then add the carrot, capsicum, peas and  tomatoes. 
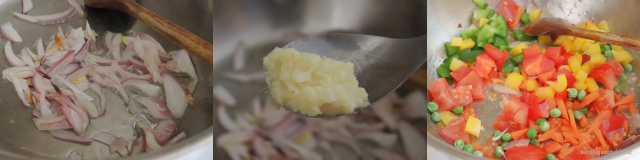
Saute the veggies in the oil for about a min and then add the spices(turmeric, red chili and garam masala powder) and salt. Give a quick mix and then cover the pan with the lid and cook the veggies. No need to add any water, the water from the tomatoes is enough to cook the veggies.
In the mean time, cut the bread into small pieces. Once the veggies are cooked, open the lid, add the bread pieces, mix it well so that the masala coats the bread pieces well. Finally add the chopped coriander leaves and then switch off the flame. 
Delicious Bread upma is ready. Serve it with onion raita and some lemon wedges. 

Related: How to make Semiya Upma

Notes:
  • Tastes good as it is but serving with onion raita elevates the taste to another level.
Continue Reading »

Friday, July 4, 2025

White Bread | White Sandwich Bread

White Bread, the good old fashioned bread made without any preservatives. This is my go-to white bread recipe that yields such a soft bread. It tastes so much better than any store bought bread. 

I have been baking whole wheat bread for years at home. But i never tried my hands on this classic white bread until a year ago. Ever since i had started baking this white bread at home, it's become our family favourite. My kid loves this bread so much and eats as it is without anything on it.

If you're looking for an easy yet fool-proof recipe for white bread, then look no further, here it is ! Do give it a try and i'm sure that you love how incredible it is.

All purpose flour

First thing first, to make  bread you need the flour. Here for this recipe, i'm using the unbleached all purpose flour. 

I have tried this bread with a couple of brands of all purpose flour including the Walmart brand and i didn't find any noticeable difference in the taste and texture of the bread.  So go ahead and use whatever you have  in your home. 

Yeast

Next, to make the bread, you need the yeast. I switched to instant yeast a long time ago for all my baking that needs the yeast because it's so easy to use and you don't need to worry about proofing the yeast.

If you're a beginner in baking, i highly recommend to use the instant yeast over the dry yeast. So far i never experienced the proofing failure in using the instant yeast. 

Tips for beginners 

  1. Don't tightly pack the measuring cups with the flour. Spoon the flour into the measuring cup while measuring the flour. Too much flour makes the bread so dense.
  2. Depends on the quality of the flour, you may need 1 to 1& 1/4 cups of water. Start with 1 cup and if needed add more. 
  3. Kneading the dough is highly important to make soft bread. For kneading the dough, you can use either the dough machine or simply your hands. In this recipe, i have used my hands for kneading and it still yields perfect bread loaf. So don't worry if you don't have a dough kneading machine, still you can make this bread without any compromise in taste and texture :-)
  4. Make sure to mix the sugar in the flour before adding the yeast in the flour. Sugar helps to grow the yeast and makes the dough proof. Instead of sugar, you can also use honey.
  5. Make sure to use the lukewarm water to make the dough. It helps to activate the yeast fast.
That's it ! Now let's check how to make this incredibly delicious white bread.


White Bread | White Sandwich Bread

Preparation Time : 2 hrs | Cooking Time : 40 minsServes :
Recipe Category: Bread | Recipe Cuisine: English
White Bread, White Sandwich Bread White Bread, the good old fashioned bread made without any preservatives.
Ingredients
All purpose flour - 3 cups
Sugar - 1 tbsp
Salt - 1 tsp
Instant yeast - 2 tsp
Water - 1 to 1&1/4 cups
Melted Butter - 2 tbsp + 1 tsp

Procedure
In a large bowl, measure and add the flour(don't press the flour while measuring ), next add the sugar and salt. Mix it well with the flour.
Then add the yeast, mix it well with the flour and make a well in the center of the flour.
Add the water(make sure that the water is lukewarm) and butter(2 tbsp). 
Mix it all together with the spatula. Once it all comes together as a single mass, transfer the dough into the counter top.
Start kneading the dough with the kneel of your palm , fold and then knead. Repeat the same for about 10 mins. After 10 mins, you can able to stretch the dough thinly without tearing and see through it. It's called window pane test and the dough should pass it or else knead little more.
Place the dough in a lightly greased bowl and then apply a little bit of melted butter on top of the dough.  Cover the bowl with a lid and set it aside in a warm place for about 50 mins to 1 hr.
After 1 hr, the dough should be doubled. Punch the dough to release the air and then transfer the dough on to the counter top. Roll the dough into a rectangle(8*12 approx) with a rolling pin.
Next start rolling the dough from one side to the other and then pinch the edges so that it sticks together.
Place the dough in a loaf pan and keep it aside for another 30-40 mins. In the meantime, preheat the oven @350 F.
Once the dough is proofed again into double. Apply a little bit of butter on the top and bake it in the preheated oven for 35-40 mins. After 40 mins, take the loaf pan from the oven and place it on a wire rack. 
Once the bread is cooled  down a bit. Cut into slice and enjoy a warm slice of  bread with bread. Yep! That's my way of treating myself for making the homemade bread :-)

Related:How to make Whole Wheat Bread


Notes:
  • It stays well for 2-3 days at room temperature.
  • You can also freeze this bread. It freezes well and tastes fresh once thawed.


Continue Reading »

Friday, March 12, 2021

Irish Soda Bread | Mini Irish Soda Bread

Irish Soda Bread, a traditional bread from Ireland and it's one of the common breads made in Irish households all over Ireland. This  mini Irish Soda Bread is a perfect bread to bake at instant without yeast and no need to wait for proofing the dough.  

Traditional Irish Soda Bread needs only four ingredients like flour, buttermilk, baking soda and salt. All the other ingredients like eggs, butter, raisins or any other dried fruits are all added to enhance flavor and taste.

Compared to the yeast breads, this Irish soda bread is a little dense but the taste and flavor are amazing. The buttermilk used in this recipe truly elevates the bread flavor to the whole new level.
Irish Soda Bread

This mini Irish soda bread is perfect for two people however this recipe can be easily doubled and quadrupled as you need. I have been making this bread for a while now and i really love how quickly it comes together and how versatile this bread is. 

This Irish soda bread can be made as savory or as sweet. For savory versions, skip the raisins and reduce the sugar quantity to 1/2 tbsp. Savory Soda bread makes a nice accompaniment to the meal or as sides for the soup.

Adding raisins makes the bread mildly sweet and makes it suitable for breakfast or even as a snack. I really love my soda bread with a cup of tea for the evening. Don't know about the tradition on how to eat this bread, but trust me with a cup of Indian chai, it tastes so good. 

Irish Soda Bread
Before moving on to the recipe, let's answer the most common questions about the Irish Soda Bread.

Why is it called as Irish Soda Bread? 

Most commonly, breads are made with yeast as a leavening agent. But Irish Soda bread has baking soda as a leavening agent so in order to differentiate from the rest of the breads, it's known as "Soda Bread" and this bread is quite popular in Ireland, so it's known as "Irish Soda Bread" for the rest of the world. 

Any substitute for Buttermilk ?

No, Buttermilk is the key ingredient for this soda bread. The acidity in the buttermilk reacts with soda and it helps to raise the bread.
If you don't have buttermilk, take a 1/2 cup of milk and add 1 tsp of lemon juice and rest it aside for 10 mins. Once it seems curdled, whisk it well and use it as the recipe mentioned.

Irish Soda Bread


Does baking powder work for this recipe?

Again No !! This recipe works only with baking soda !

How long can I store the Irish Soda Bread ?

It stays well for up to 5 days in the refrigerator. For more days, you can freeze the bread!


Any other tips of beginners 

  • Don't knead the dough like other bread dough. Once it all comes together, immediately shape them and it's good to go in the oven.
  • Preheat the oven before starting mixing the dough because the baking soda starts to act quickly, so it's better to get the oven ready ahead. 
  • Making a cross on the dough helps to get that rustic look on the bread. 
Ok, let's check out on how to make this super quick Irish Soda Bread
  Irish Soda Bread
 

Mini Irish Soda Bread

Preparation Time : 10 mins | Cooking Time : 40 minsServes :
Recipe Category: Bread | Recipe Cuisine: Irish
Irish Soda Bread, Mini Irish Soda Bread, Soda Bread with raisins, Raisin Soda Bread, Soda Bread Irish Soda Bread, a traditional bread from Ireland and it's one of the common breads made in Irish households all over Ireland.
Ingredients
All purpose flour - 1 cup
Buttermilk - 1/2 cup
Sugar - 1 tbsp
Cold Butter - 1 tbsp
Salt - 1/4 tsp
Baking soda -1/4 tsp
Raisins - 2 tbsp

Irish Soda Bread
Procedure
First preheat the oven at 375 F. In a bowl add the flour, sugar and salt.Irish Soda Bread Step by Step Picture
Next add the baking soda and mix it well together. Irish Soda Bread Step by Step Picture
Then add the cold butter and mix it with the flour well with your hands until the butter is well incorporated into the flour.  The flour should look like crumble.Irish Soda Bread Step by Step Picture
Next add the raisins and buttermilk. Mix it well with your hands until it all comes together. Irish Soda Bread Step by Step Picture
Transfer the dough onto  the working surface, sprinkle some flour to avoid sticking to your hands and make it as round. Grease the baking pan/ cast iron pan with butter. I have used 5 inches cast iron pan.Irish Soda Bread Step by Step Picture
Transfer the dough to the cast iron pan and make a cross on the top of the dough with a sharp knife. Place it in the oven and bake it for 35- 40 mins or until the top turns golden brown and tapping the bread makes a hollow sound.Irish Soda Bread Step by Step Picture
Transfer the bread into the cooling rack and let it cool completely. Cut and serve ! Irish Soda Bread Step by Step Picture
Delicious Irish Soda Bread is ready.  Check out more Baking Recipes !
Irish Soda Bread
Notes:
  • Cut the needed butter into small pieces and keep it in the freezer. It would be easy to mix it with the flour
  • Keep an eye on the oven around 35 mins because every oven is little different.
  • While measuring flour, don't pack the flour down and don't tap the measuring cup. Always spoon the flour and add into the cup.
  • You can make this bread without raisins too. 
Irish Soda Bread


Continue Reading »

Thursday, October 1, 2020

Garlic Cheese Pull Apart Bread | Garlic Cheese Bombs

Garlic Cheese Pull- Apart Bread/Garlic Cheese Bombs, a soft, buttery and flavorful buns that makes a great side dish for any meal. Making soft and flavorful garlic cheese breads at home are not that hard, and can be easily made from scratch with the basic pantry ingredients. 

As days are getting shorter and temperature starts to drop here , I have been making soup a lot for our meals and these cheesy garlic buns are one of my favorite sides to serve along with soup. 

Whenever I share baking goods on my blog, I get so many dms from the followers( who are so new to baking)asking me to share the tips on how to start baking and achieve the results like bakeries. I'm not a professional baker and haven't learned through proper training so far, so all my learning about baking is through various books and online tutorials. 

Still I'm learning so many new things about baking and I'm no way near giving guidance for the beginners. But on every baking post, I'm trying to share as much information as possible, so even the beginners can succeed in their first attempt.  All you need is some passion , patience and willingness to try on repeat mode. Continuous practise eventually leads to excellence in any field , so why not baking, right??  Ok, before moving on to the recipe, let's check out all the basic FAQ !!


Can I use garlic powder instead of garlic cloves ?

Yes, you can use garlic powder in the sauce and also for extra flavor, you can add 1/2 tsp in the dough. Personally i like the fresh garlic flavor, so used the same here in the recipe

Related: Homemade Veggie Pizza from the scratch 

Can I store the bread for later use ?

Yes, you can do it. But I recommend serving it as fresh as possible for better taste and texture. The flavors are amazing when it's out of the oven. Also the cheese is so stretchy when it's either hot or warm

What cheese works best for these buns?

I like to use Mozzarella cheese for its stretchy nature, so i highly recommend mozzarella cheese for this buns.

Why are my buns not soft ?

There are many reasons for hard buns/bread. Here i'm sharing few of the basic things to take care of soft buns
  • Yeast should be active and make sure to check the  expired date on the yeast before using them. If you're using active dry yeast, make sure to activate the yeast first and then mix it with all other ingredients.
  • The liquid content in the dough is crucial to get soft buns. If the dough is a little sticky, don't panic, knead for 5-10 mins on the counter, it will become soft and shiny
  • Proofing is key to get soft buns. Make sure the dough is doubled before proceeding further. It takes 1.5 to 2 hrs depending on the room temperature. 
  • Finally don't give up if you're not successful in your first attempt. Keep on trying, if i can get it, so do you.

Garlic Cheese Pull Apart Bread

Preparation Time : 2 hrs | Cooking Time : 20 minsMakes :
Recipe Category: Curry | Recipe Cuisine: Indian
Garlic Bread, Garlic Bun, Garlic Cheese Buns, Garlic Cheese Pull apart buns,Garlic Cheese pull apart bread,Garlic cheese bread, Garlic Cheese Pull- Apart Bread, a soft, buttery and flavorful buns that makes a great side dish for any meal. Making soft and flavorful garlic cheese breads at home are not that hard, and can be easily made from scratch with the basic pantry ingredients.
Ingredients
All purpose flour - 1 cup
Instant yeast - 3/4 tsp
Warm Milk - 1/4 cup + 2 tbsp
Sugar - 1 tsp
Salt - 1/4 tsp
Butter - 2 & 1/2 tbsp
Mozzarella cheese - 8(1 inch size piece)
Garlic - 5 cloves 
Coriander leaves - few 

Procedure
Keep all the ingredients be ready. First add the warm milk in a bowl  and then add the yeast and sugar.
Mix it all well together and then add the salt & 1 & 1/2 tbsp melted butter. Mix it all together.
Next add the flour and mix it until it all comes together as a dough.
Then transfer the dough on to the working surface & knead for 8 -10 mins or until the dough is smooth and shiny. 
Place it in the bowl and apply a bit of olive oil on top & cover it with cling wrap and set aside for 2 hrs or until the dough is doubled.Once the dough is doubled, punch out the dough to escape the gas and divide them into 8 equal sized dough. 
Take a piece of dough and stretch it a bit and place a piece of mozzarella cheese in the center.
Pull the dough from the side and cover the cheese. Keep the dough in the center of the palm as shown in below pic and roll into smooth ball. 
Place the dough in a baking tray. Do the same for all the dough balls, cover again with cling wrap and set aside for 20- 30 mins or until it's doubled.
Preheat the oven at 400 F. After 30 mins ,remove the cling from the baking pan and bake it on the preheating oven for 20-22 mins.
Now let's make the garlic butter sauce. In a bowl add the butter and minced garlic, microwaved it for 30 - 40 secs and keep it aside. After around 18 mins of baking, take the baking pan out of oven.
Brush the top with the garlic butter sauce and place them again in the oven and bake for 5-8 more mins.
This step is totally optional. In the leftover butter garlic sauce, add a tsp of freshly chopped coriander(parsely or whatever the fresh herbs you have) and mix it well. Once the buns are out of oven, brush the top with the remaining butter garlic sauce for more flavor.
That's it!!! Fluffy, pillowy, aromatic and delicious Garlic Cheese Pull-Apart Buns are ready. 
For all my baking recipes, check out my collections 
Notes:
  • Add more or less of fresh herbs as per your liking.
  • Knead the dough until it's smooth and shiny, it helps to get soft bun
  • Once the buns are cooled, the cheese is bit hard like in pizza, so microwave it for 10-15 secs before serving.


Continue Reading »