Showing posts with label Curry. Show all posts

Thursday, August 19, 2021

Vadai Mor Kuzhambu | Buttermilk Curry with Masala Vada

Vadai Mor Kuzhambu, a delicious South Indian style buttermilk curry with masala vadai soaked in it. Mor Kuzhambu is a traditional South Indian buttermilk curry made with varieties of vegetables like okra, ash gourd and many more. 

But in our home, while we grew up, this vadai mor kuzhambu is the only variation that Amma used to make and I absolutely loved it back then and still do ! So far I have never made mor kuzhambu without masala vadai whether the curry has vegetables or not. 

If you haven't tried mor kuzhambu with vadai, then do give it a try ! It's absolutely delicious with steaming hot rice ! 
Vadai Mor Kuzhambu
Can I use urad dal vadai / ulundu vadai / medhu vada in this curry?
Yes, you can ! I have seen many recipes using urad dal vada. But in our home we only used masala vadai.  So I'm more inclined to masala vada than the urad dal vada. 

Can I use buttermilk instead of curd ? 
Even though the curry name has buttermilk in it(Mor means buttermilk in tamil), it's usually made with thick curd whisked into thin buttermilk. But if you already have buttermilk, you can very well use that instead of curd.


Vadai Mor Kuzhambu

Preparation Time : 1 hr | Cooking Time : 15 minsServes :
Recipe Category: Curry | Recipe Cuisine: Indian
Vadai Mor kuzhambu, Buttermilk curry with masala vada, Paruppu vadai Mor kuzhambu Vadai Mor Kuzhambu, a delicious South Indian style buttermilk curry with masala vadai soaked in it.
Ingredients
Onion (sliced ) - 2 tbsp
Tomato - 1/2 
Turmeric powder -1/4 tsp
Salt - to taste 
To Grind 
Toor dal - 2 tsp
Coconut - 3 tbsp
Cumin seed - 1/2 tsp
Red chili - 4 (adjust to your taste)
To Temper 
Coconut oil - 2 tsp
Fenugreek seed - 1/4 tsp
Mustard & urad dal - 1/4 tsp
Curry leaves - few  

Vadai Mor Kuzhambu
Procedure
Soak the toor dal in 1/2 cup of water for 1 hr. Then add the soaked dal and other ingredients listed under "To Grind" into a mixie/ blender jar and grind into smooth paste by adding the needed water and set aside until use.

Heat a pan, add the coconut oil and temper the ingredients listed under "To Temper" one by one and then add the sliced onions & saute till the onions are translucent. 
Next add the roughly chopped tomatoes and give a quick stir. Then add 1 cup of water. 
Next add the dal-coconut paste and turmeric powder. Mix it well and then add the enough salt for the curry.
Bring into boil and then simmer the curry for a few mins until it turns slightly thick. Take the curd in a bowl and whisk it smoothly without any lumps. 
Keep the heat in the lowest possible setting and add the whisked curd, give a quick mix  and switch off the flame. 
Transfer the curry into a another bowl and add the masala vada. Let it soak for 5-10 mins and it's ready to serve. 
Tasty Vadai Mor Kuzhambu is ready to serve . Serve it with hot rice ! 

Related : How to make Crispy Masala Vada 

Vadai Mor Kuzhambu
Notes:
  • Adding water into the kadai before adding the coconut masala helps to avoid the masala sticking to the bottom of the pan.
  • Because of toor dal, the curry tends to thicken quickly so adding enough water ahead is essential. 
  • Don't add the dal more than the mentioned quantity otherwise the curry would be so thick.
  • Instead of red chili , you can use green chili too for vibrant yellow color curry
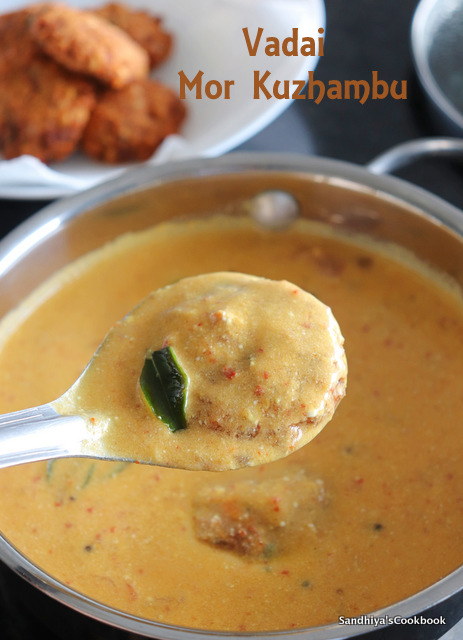
 Vadai Mor Kuzhambu

Continue Reading »

Tuesday, October 6, 2020

Karuveppilai Kuzhambu | Curry leaves Kulambu

Karuveppilai Kuzhambu, a spicy, tangy and delicious  tamarind based curry with curry leaves as the main ingredient. Curry leaves is known as "Karuveppilai in tamil and it's extensively used in south indian cooking and health care especially for hair growth. Eating a few raw curry leaves daily would benefit your hair growth in a tremendous way and also it's believed to postpone the greying of hair.  


Ok, now coming to the recipe, I like curry leaves flavor a lot and use them daily in tempering sambar, chutney and all side dishes. Apart from that, whenever I have excess curry leaves, I would make curry leaves chutney or podi to store. 

Curry leaves podi makes an excellent side dish for idli and dosa and comes handy on a busy day when I'm pressed for time in the early morning. This Curry leaves kulambu is my recent favorite and I tried it for the first time a couple of months back only and already made it for a handful of times. It's so flavorful and tastes great with hot rice and drizzle of ghee.  Now let's check out how to make this yummy curry leaves curry.

Karuveppilai Kuzhambu

Preparation Time : 10 mins | Cooking Time : 30 minsServes :
Recipe Category: Curry | Recipe Cuisine: Indian
Karuveppilai,Curry leaves, Kuzhambu,Curry,Gravy,Karuveppilai Kulambu,Curry leaves Kuzhambu Karuveppilai Kuzhambu, a spicy, tangy and delicious tamarind based curry with curry leaves as the main ingredient. Curry leaves is known as "Karuveppilai in tamil and it's extensively used in south indian cooking.
Ingredients
Tamarind - a small lemon size 
Garlic - 10 
Red chili powder - 3/4 tsp
Turmeric powder - 1/4 tsp
Coriander powder - 1 tsp
Salt - to taste
To Temper
Oil - 1 & 1/2 tbsp
Mustard and Urad dal - 1/2 tsp
Curry leaves - few
To roast &  grind
Curry leaves - 1/2 cup(tightly packed)
Onion -1/2
Tomato - 1(small)
Garlic - 4 
Cumin seed -1/2 tsp
Fenugreek seed - 1/4 tsp
Coconut - 1/4 cup 
Oil - 1/2 tsp

Procedure
First let's roast and grind the masala. Chop the onions and tomato into small pieces and keep everything for roast to ready. Heat the kadai with 1/2 tsp of oil, add the fenugreek and cumin seed, let it splutter and then add the onion and garlic. Saute till the onions are translucent.
Next add the curry leaves and saute till it shrinks and then add the tomatoes and coconut. Cook till the tomatoes are soft and let it cool a bit.
Soak the tamarind in 1 cup of water for 30 mins. Then transfer the roasted ingredients into mixie jar and grind into smooth paste by adding water little by little.
In an another kadai, heat the oil for tempering and then temper the ingredients listed under "To Temper" and then add the garlic and the curry leaves paste.
Extract the juice from the soaked tamarind and add into the kadai. Next add the spices(turmeric, red chili and coriander powder) and salt. Mix it well. Adjust the consistency of the kuzhambu by adding more or less of water by your liking.
Let it comes to boil and simmer it until the oil floats on the top.
Tasty Karuvepillai Kuzhambu is ready. 

Related: How to make Curry leaves Podi

For more curries and veggies, check out my collections
Notes:
  • Depends on how vibrant the curry leaves are, the kuzhambu color changes.
  • Adjust the spice level according to your taste. The given quantity is on little spicer side.
  • Make sure to cook the curry till the oil floats on the top for great taste
 
Continue Reading »

Wednesday, August 5, 2020

Poondu Kuzhambu | Garlic Kulambu with Coconut

Poondu Kuzhambu, a delicious tamarind based curry made with garlic. It's one of my favorite kuzhambu/curry to make when there are no veggies at home or the veggies that i have in the refrigerator are not suitable for any particular curry. The garlic alone will make the kuzhambu/curry so flavorful and tastes so great with hot rice. In today's recipe, i have used coconut masala in the curry for more flavor and taste. If you're looking for curry without any coconut, do check out this onion garlic kulambuJump To Recipe

I have had this post in drafts for a couple of days and unable to add recipe schema to my post because of the new change in the blogger interface . Recipe schema is nothing but a piece of code recommended by Google to show rich search results. I have been thinking for a while to switch from blogger to wordpress but out of convenience, i'm stick to the blogger. But the latest update on the new interface really made me  reconsider my choice here.

To add a recipe schema, instead of using any third party plugins, i have been adding all the required property values on my own in every post. But now with the new interface update, when switching from html to compose editor, all the manually added content in html editor has vanished. Without a recipe schema, i don't want to publish the post. So raised the issue and also asked for help in the community to figure this out. Still waiting for a response.

In the mean time, i have switched back to the old interface for posting this recipe. Hopefully before they remove the old interface completely, i will figure this out. For all non-bloggers, it may seem too technical, sorry for that. Now let's check out how to make this delicious poondu/garlic kuzhambu

Poondu Kuzhambu | Garlic Kulambu with Coconut

Preparation Time : 10 mins | Cooking Time : 20 minsServes :
Recipe Category: Curry | Recipe Cuisine: Indian
Poondu Kuzhambu, Garlic Kulambu,Garlic kulambu with coconut,kara kuzhambu, puli kulambu Poondu Kuzhambu, a delicious tamarind based curry made with garlic.
Ingredients
Garlic - 8 to 10 cloves
Pearl onion - 1
Tomato -1(small)
Tamarind - small gooseberry size
Mustard & urad dal- 1/4 tsp
Fenugreek seed - 1/4 tsp
Curry leaves - few
Salt - to taste
Red chili powder -1/2 tsp
Coriander powder - 1 & 1/2 tsp 
Turmeric powder -1/4 tsp
Oil - 1 tbsp
To grind
Grated coconut - 3 tbsp
Peal onion - 2 
Garlic pods - 1 cloves
Cumin seed- 1 tsp

Procedure
Soak the tamarind in a 1/2 cup of water for 20 mins, peel the onion & garlic and chop them roughly into pieces, tomato into small pieces.  Put all the ingredients listed under "To grind" and grind into smooth paste by adding couple of tbsp of water and keep it ready.
Heat the oil in a kadai, add fenugreek seed, mustard & urad dal, let the mustard splutter, then add the onion,garlic and curry leaves.Saute the garlic in oil for 2-3 mins. 
Next keep the flame in low and then add the spices(turmeric, red chili & coriander powder),saute them in the oil for few mins. Make sure to not get burnt.
Then add the tomatoes, give a quick mix. Next add the coconut paste and salt and mix it all well together
Extract the tamarind juice from the soaked tamarind and add into kadai and add more water to your preferred consistency.
Let it boil until the raw smell goes off and oil floats on the top. Switch off the flame.
Delicious Poondu Kuzhambu is ready. We had with rice and spinach kootu

Related:How to make poondu kulambu/ garlic curry without coconut


For more curries and veggies, check out here 
Notes:
  • Keep the flame in low when adding the spices, otherwise it will be burnt easily.
  • Adding spices in the oil and sauteing gives "Arachivitta(freshly ground spice) Kuzhambu" effect.
  • Adding the spices in the oil gives enhanced flavor to the kuzhambu.
  • Boil the curry till the consistency you prefer.
Continue Reading »

Wednesday, May 6, 2020

Rajma Masala | Red Kidney Beans Curry

Rajma masala, a healthy and delicious curry prepared from red kidney beans.There are so many variations in this curries, but the recipe that i'm sharing today, is the basic rajma masala that can be prepared easily with the pantry staple ingredients without any special spice masala.  

Rajma chawal is the famous north indian dish where rice is served with this red kidney curry. But i prefer to have this curry with rotis /chapati more than rice. 

Though we're from South Tamilnadu, at least twice in a week, i make chapati/roti for our lunch and would like to pair with different side dish every time. I'm easily bored with same side dish for chapati !! So tried to learn as many curries as possible from all parts of India that goes well with roti/chapati. 

Out of my many north indian curries trials, this rajma masala, palak curry, chana masala, kofta curry are few of our favorites and you can see them in my kitchen regularly. But when it comes to rice, i'm more authentic and sticks to my root, hardly even change the combo that i grew up eating. 

Coming to the rajma masala recipe, like me, if you're using dried rajma, make sure to soak at least 8 hrs or overnight for best result and cook it in pressure cooker for 4 to 5 whistles or  until it's super soft. Well cooked red kidney beans will help to thicken the curry.
 

If you prefer even more thickness, you can mash some of the red kidney beans and add into the curry. However i don't like mashed beans much, so didn't mash red kidney beans in my curry here. But have seen many north indian friends do that on their rajma masala. So it's really up to your preference. Now let's check out how to make these delicious and healthy rajma masala.


Rajma Masala | Red Kidney Beans Curry

Preparation Time : 8 hrs | Cooking Time : 20 minsServes :
Recipe Category: Curry | Recipe Cuisine: Indian
Curry,Rajma masala, Red kidney beans curry, indian curry, side dish for roti, Rajma masala, a healthy and delicious curry prepared from red kidney beans.There are so many variations in this curries, but the recipe that i'm sharing today, is the basic rajma masala that can be prepared easily with the pantry staple ingredients without any special spice masala.
Ingredients
Red Kidney Beans - 1/2 cup 
Onion(small) - 1
Tomato - 2 
Ginger - 1/2 inch piece
Garlic - 3 cloves
Oil - 2 tsp
Cumin seed - 1 tsp
Turmeric powder - 1/4 tsp
Red chili powder - 1/2 to 3/4 tsp
Coriander powder - 1 tsp
Garam masala - 1/2 tsp
Salt - to taste
Coriander leaves - few

Procedure
Soak the red kidney beans overnight, drain the soaked water and add into pressure along with fresh water and salt.Pressure cook for 4-5 whistle or until it's soft. In the mean time, chop onion, tomato, ginger & garlic into small pieces.Heat the kadai with oil, add the cumin seeds, let it splutters then add the garlic and ginger saute till they are aromatic.Then add the onions with little bit of salt and saute till they are translucent, then add the tomatoes.Next add the spices(turmeri,red chili,coriander & garam masala powder ) and salt(enough for curry alone). Cook till the tomatoes are mushy and the raw smell of the spices are gone.Then add the cooked red kidney beans along with cooked water and if needed add more water and bring into boil. Cover the kadai with lid and cook it for 5-8 mins.Finally add some coriander leaves and switch off the flame.Tasty Rajma masala is ready. Serve it with rice or chapati. For more roti and curries recipe, check out here

Notes:
  • Make sure to cook the beans till they are soft, it gives creaminess to the curry.
  • Don't throw the bean cooked water, it has all the flavors, so add it into the curry.
  • The given quantity of spices is for medium heat.Adjust the seasoning  as per your liking.
  • For more flavor, you can add 1/2 tsp of garam masala powder too
Continue Reading »

Tuesday, April 7, 2020

Baingan Bharta | Smoked Indian Eggplant Curry

Baingan Bharta, a delicious side dish made from the eggplants and it's quite popular all over Indian sub continents. Traditionally the eggplants are fire roasted then minced and added into the spicy onion tomato masala. 

Currently in our place, we're having only class top cooking stove and there is no provision for direct fire cooking at this time, so i have been using the oven to roast the eggplants until it's bit charred on the top. 

I haven't tasted the baingan bharta until i tried on my own, so can't compare the traditional way  with oven roasted way, but i can assure that this curry is so good with wonderful flavor. You have to trust me on this because these are the words from one who had great aversion on eggplant once. 

Right from childhood, i had this great aversion of eggplant/brinjal. Though i have been using it in my cooking, the eggplants are eaten by ST only, not me once, finally can overcome my aversion with this curry around 4 months back. 

For ST lunch box only, i had prepared this curry for first time, after packed, left with some, gave it a try and kind of like it and now it became the regular side dish for our rotis. Every one who knew my food preference actually surprised to see me eating baingan bharta now, still don't know that i can eat eggplants in any other forms!! 

Ok,thank you for reading my eggplant aversion story, now let's check out how to make this delicious curry.

Baingan Bharta | Smoked Indian Eggplant Curry

Preparation Time : 10 mins | Cooking Time : 50 minsServes :
Recipe Category: Curry | Recipe Cuisine: Indian
Baingan Bharta, Eggplant, Curry, Side Dish For Chapathi, Best Baingan Bharta,Smoked Eggplant Curry, Brinjal Curry, Baingan Bharta, a delicious side dish made from the eggplants and it's quite popular all over Indian sub continents.
Ingredients
Eggplant(medium size) - 1 
Onion(small) - 1
Tomato - 2 
Ginger Garlic paste - 2 tsp
Oil - 1 tbsp
Cinnamon - 1 inch piece
Cloves - 4 
Cardamon -1 
Cumin seed - 1/2 tsp
Turmeric powder - 1/4 tsp
Red chili powder - 1/2 to 3/4 tsp
Coriander powder - 1 tsp
Garam masala - 1/2 tsp
Salt - to taste
Dried kasthuri methi - 1/2 tsp
Coriander leaves - few
Cooked Peas - 1/2 cup(optional)

Procedure
Preheated the oven @ 450 F . Line the baking tray with parchment paper and then wash eggplant, pat dry well and apply oil evenly on the eggplant and bake it for 25-30 mins or until the top browns a little.
Let it cool a bit and then remove the eggplant skin and chop them into fine pieces.Cut the onions and tomatoes into small pieces.Heat the oil in a kadai, add cinnamon, cloves and cardamon into it and fry for 30 secs.Then add the  onions and  saute till onions became translucent. 
The add the ginger garlic paste, saute till it's aromatic and then add the tomatoes.
Saute till the tomatoes are mushy and then add the spice powder(turmeric, red chili, coriander and garam masala powder) and salt. Saute the masala till it's aromatic and the raw smell is gone.
Then add the eggplant ,give a good mix and add the required water.
Let it bring into boil and cover cook for 10 mins or until everything comes together.
Finally add the cooked peas, kasthuri methi & coriander leaves and switch off the flame. 
Tasty and healthy Baingan Bharta is ready.Serve it with your favorite roti. We had it with Palak Roti and for other roti varieties, check out here.
Notes:

  • Make sure that the eggplant is well cooked in the oven, the skin should peel off easily from the eggplant,that's the sign of well cooked.
  • Depends on the oven and eggplant size, cooking time varies. 
  • Currently i have stock of yellow peas only, so used it. But usually green peas is used or you can totally ignore the peas.
  • It's mildly spicy, add more or less of spices as per your liking.
Continue Reading »