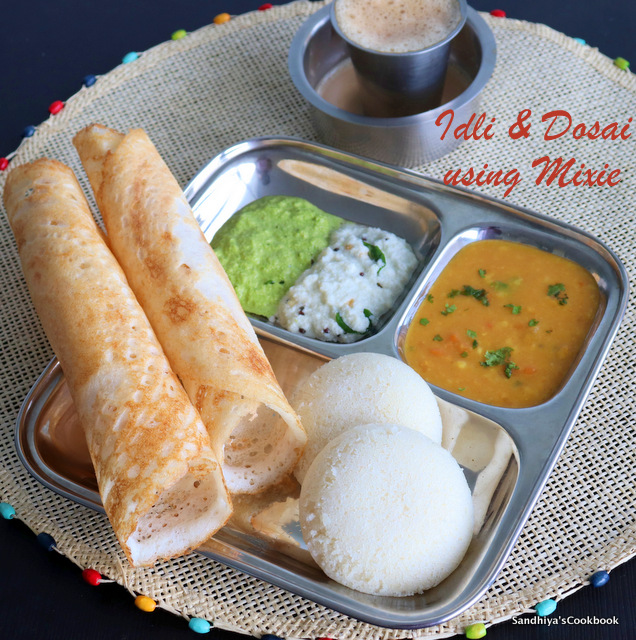
Idli and dosai are the integral part of Tamil Nadu breakfast menu and it's also one of the healthiest breakfast in the world. Whatever the world claims now as good for your health like probiotic rich, gluten free, vegan and steamed food, idli ticks every one of the checklist.
For me, more than healthy food, Idli is the most delicious and comforting food in the world. In Tamil Nadu, still people prefer idli as the first solid food for their babies. With all that being said, let's see how to make this super food. The key to make soft and fluffy idli is the batter, if you make the idli batter perfectly, everything else is icing on the cake.

Back in India, we use a wet grinder to make the idli and dosa batter, but when you live abroad and move frequently, carrying a wet grinder with you is not at all possible all time. So I stick with my Indian mixie to make batter. Compared to a wet grinder, making fluffy idli batter using mixie/blender needs little more attention and tricks.
Next, the fermentation process. The batter should be fermented well and this is again a tricking thing especially when you are in a cold place. Currently I'm living in Canada, before that I lived in Colorado, Michigan, hence with my personal experience, I have learned a few things about how to ferment batter when the temperature is below freezing outside. So here i'm gonna share all the tips and tricks so far i have learned on how to make perfect idli & dosa batter using mixie / blender in extreme cold weather.

- If you're using mixie / blender, then soaking-time of rice and dal is very important. Longer hour soaking helps to grind the batter easily without running the mixie / blender for a longer time. Long running of mixie /blender generates heat and it will affect the fermentation process. Also a long hour of soaking helps to ferment the batter quickly.
- For grinding the batter in mixie / blender, you need cold water because mixie / blender tends to get heated very quickly which affects the batter temperature, we don't want that to happen, so cold water helps to keep the batter at room temperature while grinding.
- If you're using blenders like ninja or similar one, then cold water is not necessary to grind because it doesn't get heat easily.
- While grinding dal, don't add water all at once, otherwise the batter would be running instead of fluffy. Add water little by little to get that fluffy consistency.Once the dal batter is smooth, don't stop grinding immediately, add water little by little and grind it for couple more run. It gives you that fluffy batter. In Tamil, we use to say "ponga ponga araikurathu".
- The rice batter shouldn't be super smooth like dal batter, it should have bits of rava like consistency. See the pictures in the step by step instructions to understand more.

- To ferment the batter, it should be kept at room temperature for 8 hrs/overnight. If you live in a cold place like me, keep the batter in the oven with lights on. What should i do if my oven has no light / it's broken ? It happened to me one time :-) . Heat the oven at 350F for 10 mins, switch off the oven and keep the batter, don't open the oven door in between.
- Even if you follow all these steps and the batter doesn't turn out properly, don't lose hope, some times, the rice and dal quality affects the batter, so use good quality rice and dal. If the tap water is hard and has high salt, don't use it, use filter water for grinding. Using hard water gives you that pale color in the idli instead of pure white.
- If you're a beginner, give it a try a couple of times to get that perfect fluffy batter. Still for me, when I move to a new place, it takes a couple of times to get that perfect batter. Like I said earlier , it takes time to find the right brand of rice and urad dal in a new place, identify the correct spot in your oven to place the batter, so it ferments perfectly without under/over done. Like I always say, if i can make it, you can also :-)

Now let's see the FAQs about idli and idli batter.
What is Idli Rice ?
Idli rice is a short grain parboiled rice and it's used exclusively for making idli and dosa. You can easily find the idli rice in all Indian stores. Nowadays, even Walmart carries idli rice in many stores.
Other varieties of rice don't work for this recipe !
What's the proportion of idli rice and dal for idli batter?
This is the most common question that many of my readers ask. In our family we have been using a 4:1 ratio of idli rice and urad dal for years and it yields perfect soft idlis.
Too much dal in the batter makes the idli soft but it's not spongy and would be flat. Too little dal makes the idli hard.
What brand of idli rice and dal am i using to make idli batter?
This is another common question that I have been faced with when i'm sharing my idli platter pictures on social media. Honestly, I never stick to any particular brands of idli rice and urad dal mainly because of our frequent moving to new locations.
Whatever is available in the place, I try to make the best out of it. So try with whatever you can find. All the tips that i have shared here are learned on trying out various brands :-)

How to get super white idli?
Whenever i share my breakfast idli platter on IG or any social media, i get this question ! So let me share what i know from my experience !
- Make sure to use filtered water for grinding the idli, the hard water makes the idli pale yellow color.
- If you're using more than 1:4 proportion of dal and rice, then the idli wouldn't be as white as mine. More dal in the batter yields a pale yellow color idli.
- Too much of fenugreek seeds also cause pale yellow colour. So when the outside temperature is normal, i skip the fenugreek seeds too.
- Overall, the quality of the rice, dal, water and the proportion play a major role in getting super white idli.
What are the other ingredients added to make soft idlis?
I would say that rice and dal are the only two ingredients needed to make perfect soft and spongy idlis.
Fenugreek seeds are used for flavor and quick fermentation. Since i've been living in cold places for years now, i'm using fenugreek seeds now but back in India, our family usually don't use the fenugreek seeds
Poha and cooked rice are some of the common ingredients used to enhance the softness of idli. But I have never used them so far in my idli batter.
My breakfast idli platter collage :-)

Why does the idli batter get too sour after fermentation?
The main reason is the over-fermentation. Keep the batter outside for longer hours to ferment makes the batter too sour.
In general, we know that the batter is fermented when it's risen well. But if your batter is too thick and looking for well risen batter as a sign of good fermentation then most probably you end with too sour batter when it's risen.
The key of well risen batter is the batter consistency before fermentation. Make sure to keep the batter a little watery(check the step wise pics for understanding) so that when it's risen, the batter will light, airy and have the right amount of sourness.
This is how the batter should look after fermentation

How to ferment the idli batter in cold places ?
This is one of the other common questions that i get whenever i share my idli/batter recipes since i'm currently living in Canada which you know is one of the coldest places in the world. So here are my tips to ferment the idli/dosa batter
- So far, i have been keeping my batter in the oven with the lights on for 8-10 hrs and it works like a charm every time.
- Depending on your oven-light voltage, the fermenting hrs might vary a little bit.
- If your oven doesn't have light, then preheat your oven at 350 F for 10 mins and then switch off the oven and place the idli batter inside the oven & keep the door closed, the residual heat from the oven will help to ferment the batter.
- Another method is to keep a kettle of boiling water in the oven with its pouring cap open along with the batter inside the oven, the hot steam from the kettle helps to ferment the batter. Instead of a kettle, you can also use any heavy pot with a small opening.
- What to do when you don't have an oven, then keep the batter near the heater vent which obviously many have in cold places. The hot air from the heater vent is idle for fermenting.
- Finally if you're having instant pot, then place the batter in the instant pot with yoghurt mode on for 8 hrs, that will give you perfectly fermented batter.
Any important tips for beginners in Idli batter making ?
Yes :-) Depending on the quality of urad dal, it may yield more or less batter. So here is the one tip from Amma that helped me when I was new in cooking.
"For soft idli, after grinding, the urad dal batter should be equal or a little more than the rice batter"
- When you try any new brands of urad dal or rice, for your initial batter making, after grinding roughly measure the rice batter and urad dal batter separately and it will give you an idea on what proportion of rice and urad dal should be soak for the next time.
- If the urad dal batter is less than the rice batter, then soak little extra urad dal next time and vice versa.
- Though i have said "4:1 ratio of idli rice and urad dal", sometimes, urad dal may not yield so much batter. In such a case, follow this tip :-)
Now let's check out on the recipe !

How to make Soft Idli Recipe | Idli Batter Recipe | Fermentation Tips
Preparation Time : 20 hrs | Cooking Time : 15 mins | Serves : 6-8
Recipe Category: Breakfast | Recipe Cuisine: Indian
Recipe Category: Breakfast | Recipe Cuisine: Indian
Ingredients
Idli Rice - 4 cups
Urad dal - 1 cup
Fenugreek Seed - 1 tsp
Salt - 2 tsp
Water - 2 & 1/2 - 3 cups
Idli Rice - 4 cups
Urad dal - 1 cup
Fenugreek Seed - 1 tsp
Salt - 2 tsp
Water - 2 & 1/2 - 3 cups

Previous night itself, measure and take the rice in a bowl, urad dal and fenugreek in a bowl, wash them thrice and add water to soak them. Keep it in the kitchen counter over night. Keep the water required for grinding in the refrigerator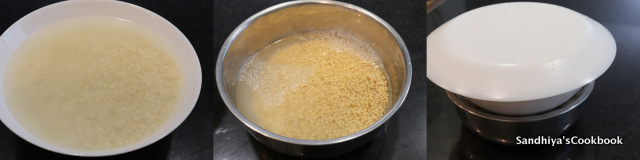

Next morning, discard the soaked water and first add the urad dal and fenugreek seed in the mixie jar.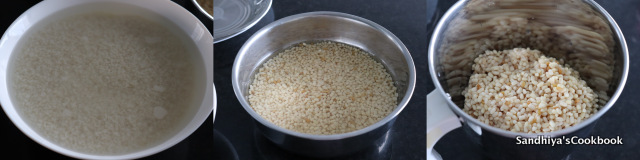

Take the cold water from the refrigerator and add just enough to cover the dal and grind into smooth batter. 

In between once or twice, scrape the sides and add couple more tbsp of water and grind them into thick paste like as shown below. Transfer the batter into large vessel.

In the same jar(no need to wash them) add half of the soaked rice and add water just enough to cover the rice and grind into fine but not so fine paste,that means if you take the batter in hands and rub it in between the fingers, there might be tiny bits like rava. That's the correct stage of rice batter. 

Pour the rice batter into the dal batter. Grind the remaining rice batter and add into the dal batter. Next add salt and mix the batter using your hands.

Once all the rice batter and dal batter mixed together throughly, scrape the sides and cover it with lid, place it in the oven with light on for 6-8 hrs to ferment.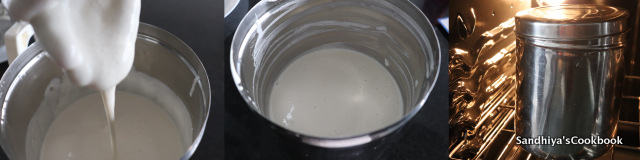

After 8 hrs, see how much the batter have risen, mix it with laddle well.

Take the needed batter into another bowl and keep the remaining in refrigerator for later use. Now for idli, you can use the batter straight away, pour the batter in idli mold. 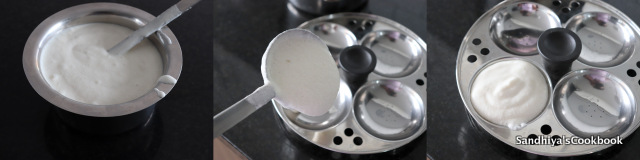

Place it on idli steamer and steam it for 8-10 mins.

Once it's cooked, remove from the flame and let it rest for 2 mins. 

Then take it out from the mold with spoon and soft idlis are ready to serve. For the dosa, in the same batter, add little water and mix it well.

It should be in easily pourable consistency. Pour the batter in the dosa batter and spread it evenly. Drizzle some oil on the edges and on the top, Crispy dosa is ready.

Serve with sambar and/or chutney/s. We had with idli sambar, coconut chutney and coriander chutney.

Notes:
- Depends on the weather conditions, fermenting time varies.
- If you're making idli after refrigerate the batter, make sure to bring the batter into room temperature, otherwise the idlis won't be soft.
- Always take the needed batter in a separate bowl and keep the remaining in the refrigerator immediately.
- For dosa, add more water to the required batter only, don't add water to the whole batter.
- The batter stays well up to 7 days in refrigerator, I haven't tried storing the batter more than a week.
- With the same batter, you can make paniyaram also.