Showing posts with label North Indian. Show all posts

Friday, January 5, 2018

Rava Dhokla | White Dhokla | Rava Steamed Cake

Rava Dhokla, a steamed savory cake made from the semolina/rava and a few Indian Spices. Though i have prepared khaman dhokla regularly as our snack for tea time, this rava dhokla is totally new to me until i tried on my own a month before. I have seen this dhokla recipe in blogsphere a lot and i don't know why i haven't tried such a simple and tasty dish so far.
When i had tried this as a snack for evening tea, it became a instant hit in our home.Before trying, I had a doubt that this dhokla may not be as soft as khaman dhokla and i was completely wrong, it turned out so soft and tastes equally good in its own way.
Like Khaman dhokla, it can be prepared ahead for a get together or a party and it stays soft for few hours, if needed, warm it in microwave for few secs just before serving.To get a soft dhokla, make sure that the eno salt is fresh and active. Other than that, it's so simple and can be prepared in a jiffy.


Rava Dhokla

Preparation Time : 30 mins | Cooking Time : 10 minsServes :
Recipe Category: Snack | Recipe Cuisine: Indian
Rava Dhokla,White Dhokla, Rava Steamed Cake, Semolina Dhokla Rava Dhokla, a steamed savory cake made from the semolina/rava and a few Indian Spices.
Ingredients
Rava - 1 cup
Curd - 1 cup
Water - 1/4 cup(approx)
Lemon juice - 2 tsp
Eno salt - 1/2 tsp
Salt - to taste
Sugar - 1 tsp
Ginger - 1/2 inch piece
Green chili - 2
To Temper
Oil - 1 tsp
Mustard & urad dal - 1 tsp
Asafoetida powder - 1/8 tsp

Procedure
First take the ginger and green chili, put it in mixie/blender jar and grind into coarse mixture & keep it aside.
Take the rava in a bowl, add the curd, ginger&chili paste, salt & sugar.
Mix it well, then add the water and make it as thick batter.
Cover the bowl with lid and let it aside for 30 mins. Take the eno salt.
Measure and add the eno salt & lemon juice, now it became frothy.
Mix it all well together. Now take the pan and greased it well with oil and pour the rava batter into it.
Steam it in the steamer for 8-10 mins.
Or cook until the tooth pick inserted in the center comes out clean.
Flip the pan upside down on the plate and tap gently, the dhokla will easily come out, then cut into desired shape.
Let it cool a bit, in the mean temper the ingredients listed under "To Temper" and add it on the top.
Tasty Rava Dhokla is ready !Serve it with green chutney

Related:How to make Vada Pav


Notes:
  • Adjust the amount of green chili & ginger according to your taste.
  • Instead of grinding the chili and ginger, you can chop them finely also.
  • Even you can steam it in pressure cooker/pan without whistle.
  • Depends on the curd thickness and water content in it, you may need more or less amount of water 
  • I don't have dhokla plate, so used my baking tray.


Continue Reading »

Thursday, October 13, 2016

Kulcha Recipe | Kulcha in Stove top | Indian Flat Breads

Kulcha, the most famous indian flat bread, it's more like naan but without yeast.Kulcha can be made in tandoori oven or in stove top too, but i usually make them in stove top and everytime it turns out so soft and delicious.
There are lot of variations in kulcha, here i'm sharing the basic recipe, with this as base, you can make any type of stuffed kulcha easily.If you haven't tried the kulcha in home before, give a try to this easy method and you would me amazed by the texture and taste of this kulcha.

Kulcha

Preparation Time : 2 hrs for resting | Cooking Time : 20 minsMakes :
Recipe Category: Flat bread | Recipe Cuisine: Indian
Ingredients
Maida/All purpose flour - 11/2 cup
Curd - 2 tbsp
Oil - 1 tbsp
Baking Powder - 1/4 tsp
Baking Soda - a generous pinch
Sugar - 1 tsp
Salt - 1/4 tsp
Water - 1/4 cup(approx).
Sesame seed - as needed
Oil/Butter

Procedure
Take baking powder,baking soda,salt and sugar in a bowl, mix it well. Add curd and oil and whisk it vigorously.Then add water and mix well it well. Now add the flour and knead it till it becomes like a soft dough.Keep it aside for 2 hrs, then make small balls out of the dough. Dust the surface and roll into thick disc, sprinkle some sesame seeds on the top and press it with rolling pin to keep intact.Heat the tava, grease with butter or oil , place the rolled kulcha, cook it for few mins on medium flame, once you see the bubble on top, flip it and cook it other sides too.Once both sides have brown spots, remove it from tava and serve it with your favorite curry.Soft Kulcha is ready.

Notes:
  • Let the dough rest for minimum 2 hrs.
  • Sour curd gives best result.
  • Sesame seed is optional, if using,you can use either white or balck.

Continue Reading »

Thursday, August 11, 2016

Pav Bhaji | Pav Bhaji Masala | Home made Pav Bhaji Masala

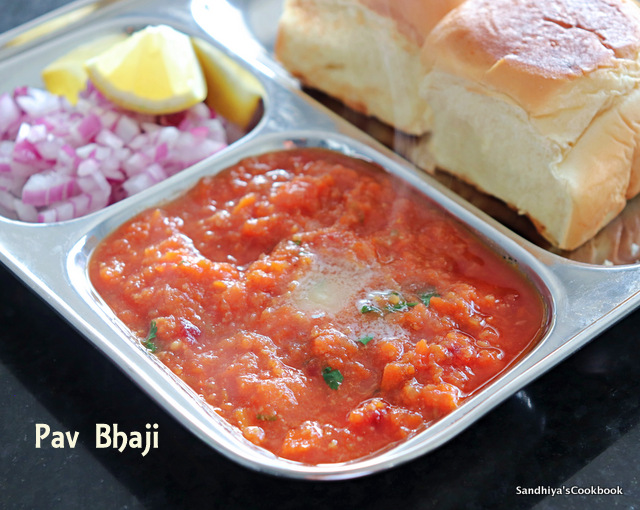
Pav Bhaji is a famous street food from the Indian City, Mumbai. Pav Bhaji is a combo dish and it has pav (soft buns) and bhaji( mashed & spiced vegetables). 

Bhaji is the marathi word used to refer to vegetable based dishes. Hence the word Pav Bhaji refers to the curried vegetables served along with pav bread and as well as the combo in terms of the context. 

All the north Indian street foods were introduced to me when i was in chennai for work. Before that I never knew about pav bhaji back in my hometown, Tirunelveli. Initially I thought that the combination of bread with some vegetable curry is a weird combo, all those thoughts were gone, when i had first tasted this. The slight sweetness from the bread goes very well with the spicy masala, surely it's my kind of food.
Pav Bhaji
After marriage, I started to make pav bhaji frequently at home ,at least twice in a month. One time, during my parent visit to our home in Bangalore, I made pav bhaji for dinner. To my surprise, even Appa liked it very much although he didn't like many of the famous north Indian dishes like Naan, roti or any kind of  paneer dishes. 

After that he kept on insisting me to make this whenever he visits me or me visits my parents house. Honestly I feel elated when people start to like certain dishes because of my cooking. Anyone with me? 

Ok, Now coming back to the recipe, there are so many different ways you can prepare the pav bhaji, some prefer to grate the vegetable instead of chopping and saute till it becomes mushy. But i've been making pav bhaji using pressure cooking vegetables for years now and it tastes so awesome. 

Although I never tried any other way of making pav bhaji, I can assure that this is the one of the tastiest pav bhaji that can  be made in very less time. 


Pav Bhaji

Is Pav Bhaji masala / Spice mix is essential to make the pav bhaji?


No, Not at all. I have made the pav bhaji so many times with garam masala for flavor and never felt any difference in the taste. So, if you're not making pav bhaji at home frequently, then no need to buy a pack of pav bhaji masala. Garam masala works well equally.

Check out the video recipe for making Pav Bhaji


What vegetables can be added in Pav Bhaji ?


Personally, I like to add more vegetables in my pav Bhaji. Potatoes, carrots, cauliflower, peas & capsicum are the most common vegetables used in the street food carts. 

Depending on the amount of vegetables added in the pav bhaji, the taste and the color differ mildly. I would highly recommend adding capsicum for pav bhaji because of its flavor. 

And, to get bright red color, instead of using  kashmiri chili powder, i like to add a small piece of beetroot. But don't add too much that will affect the flavor.

Ok, now let's check out on how to make this famous street food, Pav Bhaji.
Homemade Pav Bhaji

Pav Bhaji

Preparation Time : 10 mins | Cooking Time : 25 minsServes : 3 
Recipe Category: Curry | Recipe Cuisine: Indian
Pav Bhaji, Pressure cooker Pav Bhaji, Indian Pav Bhaji, Tasty Pav Bahaji, Easy Pav bhaji, Street food Pav Bhaji Masala is a famous street food from North India.Using pressure cooker, you can make the delicious bhaji in minutes and it tastes awesome.
Ingredients
Potato - 2
Carrot - 1
Peas - 1/4 cup
Cauliflower florets - 1/2 cup
Capsicum - 1
Cabbage - 1/2 cup(sliced)
Tomato - 2 
Beetroot - 1(small)
Red chili powder - 3/4 tsp
Coriander powder - 1 tsp
Pav Bhaji Masala/Garam Masala - 1 tsp
Turmeric - 1/4 tsp
Salt - to taste
Butter - 2 tbsp
Onion  & lemon - for serving
Butter - 1 tsp(serving) 

Mumbai Pav Bhaji
Procedure
Wash and cut all the vegetables(Potato,Carrot,Peas,Cauliflower, Capsicum,Cabbage,Beetroot) & tomato in to small pieces.Put all the vegetables & tomato into the pressure cooker with enough water(1 cup approx),put on lid and weight and cook for 3 whistle or until all the veggies are cooked softly.How to make Pav Bhaji-Step-1
Once the pressure from the cooker automatically released, open the lid, remove the vegetable stock from the vegetables(don't discard it, gonna use it later).Mash the vegetables with masher well.How to make Pav Bhaji-Step-2
Now keep it in flame & add the vegetable stock(if needed add more water) and all the spices(turmeric,red chili,coriander, garam masala powder).How to make Pav Bhaji-Step-3
Add enough salt and mix well. Bring the masala to boil and add the butter 1/2 tbsp at a time, once it melts and incorporate with masala, add another 1/2 tbsp.Same way add all the butter.How to make Pav Bhaji-Step-4
Once all the butter is incorporated,keep the flame in medium and cook for 8-10 mins, after that the masala becomes thick , finally garnish with coriander leaves & switch off the flame.How to make Pav Bhaji-Step-5
Serve it along with butter toasted pav bread ,onions & lemon wedges. 
Notes:
  • Usually i use all the vegetables mentioned in the ingredients list.
  • If you're not having all vegetables , still you can make it with the available vegetables in your pantry.Potatoes, peas & capsicum are the must.
  • I love to add beetroot especially for the color.
  • It's a bit difficult to mash the beetroot with masher even after cooking too, instead you can pulse the beetroot alone once and add with remaining veggies.
  • Mash the vegetables more or less as per your preference texture.
  • I used garam masala powder here.
  • Instead of butter, you can use oil too, but butter gives richness to the masala & i highly recommend it.
Pav Bhaji


Continue Reading »