Showing posts with label Steamed food. Show all posts

Monday, February 25, 2019

Samba Rice Puttu | Samba Arisi Puttu | Puttu recipe

Samba Arisi Puttu is a delicious steamed cake from the samba rice flour and coconut. Samba rice is a variety of rice grown mainly in south India, it has reddish color and distinct taste & aroma compared to regular white rice and also it's believed to be more healthier than the normal rice.

This samba rice puttu is my personal favorite puttu among all the puttu(rice puttu, rava puttu, ragi puttu) we make at home. Samba rice has that unique color and flavor, that makes the puttu more delicious and flavorful.So if you haven't tried this puttu before, do give it a try, i'm sure that you would love this unique taste and aroma.

Still we're in the process of transition into new place, so for the past few months, we have been traveling continuously and i hardly find time to cook anything. Mostly we're having the food prepared by family members and i'm quite enjoying this no cooking & cleaning time. 

Even if i cook at my mil's or mom's place, it's difficult to shoot food photos since usually i take lot of time to shoot the final phots and that's not possible when every one waits for me to have food. But today morning, somehow i had prepared everything earlier for this puttu and took the photos as quick as possible since it's been really long time since i have posted a recipe here and now tada, here i'm with the post.


Samba Rice Puttu

Preparation Time : 10 mins | Cooking Time : 7 minsServes :
Recipe Category: Breakfast/Snacks | Recipe Cuisine: Indian
Ingredients
Samba Rice flour - 1/2 cup
Grated Coconut - 1/4 to 1/3 cup
Coconut Water/Water - as needed
Salt - 1/4 tsp
Sugar,ghee & banana - as needed for serving.

Procedure
Take the samba rice flour, measure and put it in a bowl, add the salt.
Mix it all well together, then add coconut water little by little and mix it well with the flour.
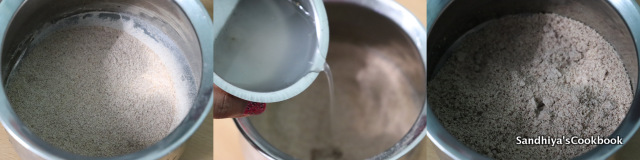
The flour should be hold the shape when you press it with your fist  and again it should be crumble when you crumble it with your fingers . That's the right way to check the consistency of the flour. And also make sure that there is no lump in the flour.
Now take the Puttu Kuzhal(Puttu maker). Add the small plate with hole(it comes with puttu maker itself) in to it. First start off with the 1 or 2 tbsp of grated coconut.
Next add the flour for about 1&1/2 inch thickness.Repeat the process and finish off with grated coconut on the top. Cover the puttu maker with the lid.
Place the puttu maker in the cooker instead of weight and steam it for 5- 7 mins. Tasty Samba Rice Puttu is ready.
Drizzle some ghee on top and serve it with sugar and banana.
Notes:
  • I have used coconut water from one coconut and for the remaining i have used regular water.
  • Depends on your preference, you can more or less of grated coconut.
  • To get the perfectly shaped puttu, the amount of water used is very important. For me it takes around 1/4 cup of 1/2 cup of flour.
  • If the amount of water is less, then the puttu will not hold the shape and also it's very dry.
  • Remove the lumps , while mixing the flour.
  • Once you washed the puttu maker, wipe the inside of the puttu maker with tissue paper/kitchen towel, before adding flour. It helps to avoid the flour sticks to the maker, so that you will get perfectly shaped puttu.
  • Once you mix the flour with water, immediately steam it, if you make large quantity, do it in batch. It will avoid the flour to become dry.
  • If you dont have puttu maker, steam it in idly pot.
  • I used store bought flour, if you are using fresh home made flour,it doesn't require this much water.

Continue Reading »

Thursday, April 5, 2018

Baozi | Veg Baozi | Chinese Steamed Bun | Breakfast recipe

Baozi , a soft and delicious stuffed steamed bun from china. It's usually served as breakfast and also it's one of the popular street foods in china. These Chinese Steamed buns can be made with various fillings including vegetables, meats and so on. 

While browsing through Instagram, these baozi pictures from symmetry breakfast really caught my attention and immediately I noted down the dish name in my todo list. Later when I chose to make breakfast around the world as a theme for the first week in this mega marathon, I thought this could be ideal breakfast to give it a try.

Related: How to make Chinese Spring roll

Honestly, I was skeptical of making steamed buns with yeasted dough since I hadn't tried anything steamed with yeasted dough and also hadn't tasted this baozi  before, so  wondered how it would taste. Out of curiosity, I had given a try on this steamed bun and it turned out so delicious and pillow soft. 

While making the dough itself, I knew that it's gonna be delicious, all because of the flavor from the sesame oil. Never used sesame oil with APF before, i knew that this oil would go well with rice flour, but i never guessed that it could give such an amazing flavor to the APF. Truly, the flavors from ginger, soy sauce and sesame oil together are really out of the world, now I know why this dish is so popular !!!
By looking at the ingredient list and the procedure, you may think that this dish is similar to momos/dumplings, but it's not. It has a unique texture because of the yeasted dough and also it tastes good even when it's cooled unlike dumplings (it becomes chewy when it's cooled down). 

I had a few leftovers from the morning and in the evening microwaved it for 30- 40 secs before serving and it taste as good as in the morning. Before check out the recipe, if you like to know what i have shared on the past 3 days under International Breakfast, here they are 
Day 1 - Mysore Masala Dosa from India
Day 2 - Mani pittu from Srilanka
Day 3 - Mofo Gasy from Madagascar


Baozi(Chinese Steamed Bun)

Preparation Time : 40 mins | Cooking Time : 20 minsServes :
Recipe Category: Breakfast | Recipe Cuisine: Chinese
Baozi, Chinese Steamed Buns, Veg Baozi Baozi , a soft and delicious stuffed steamed bun from china. It's usually served as breakfast and also it's one of the popular street foods in china.
Ingredients
For Bun
All purpose flour - 1 cup
Instant Yeast - 1/2 tsp
Baking Powder - 1/2 tsp
Sugar - 1 tbsp
Salt - 1/8 tsp
Sesame Oil - 1/2 tbsp
Luke warm Water - 1/4 cup
For Filling
Cabbage - 1/2 (small size)
Spring onion - 2
Ginger - 1 inch piece
Sugar - 1 tsp
Salt - 1/4 tsp
Soy Sauce - 1 tsp
Sesame oil - 1 tsp

Procedure
First let's make dough for the bun.In a bowl, add flour, yeast,baking powder,sugar & salt. Mix it well. Then add the oil and mix it with your hand until the oil incorporated into flour well. Add the lukewarm water.

Make a soft and pliable dough. Cover it with cling wrap and keep it in warm place for 40  minutes to 1 hr. Now for the filling ,shred the cabbage finely.

Heat the water in the steamer and bring into boil, place the cabbage in the steamer basket and cook it for just 1 to 1&1/2 mins.

In the mean time, chop the green onions and finely shred the ginger and keep it ready. After 1&1/2 mins, remove the cabbage from heat and let it cool a bit and then squeeze the water from the cabbage as much as you can.

Place it in a bowl and then add the green onions & ginger. Add the soy sauce.
Next add the oil, sugar & salt and give a good mix.
After the dough is doubled, gently punch it down and take the dough from the bowl & place it on the working surface. Cut the dough into 4 equal pieces.
Take a piece of dough and roll into 4 inch thick disc with the rolling pin(if needed use the flour for dusting). Place 1/4 of the filling in the center.
Start pleating the dough on the edges as shown in the pic below and seal the end together. Place it on the parchment lined steamer basket.
Steam cook the bun for 10-12 mins on medium flame. Gently remove the buns from the parchment paper  and it's ready to serve.
Serve hot with soy sauce.
Notes:
  • While rolling the dough, make sure that the center is thicker than the edges, it really helps to pleat the edges easily.
  • The main reason for steam cooking the cabbage ahead is to remove the excess water from the cabbage. Otherwise the bun would be soggy.
  • Once the bun is steamed, it's very soft to handle immediately. Give it a rest for few mins before removing from the steamer basket.
  • Highly recommend to use sesame oil in the dough and filling. It gives great flavor to the bun.
  • This buns would be doubled after steamed, so leave enough space in the steamer basket.
     
Continue Reading »

Wednesday, January 3, 2018

Kanchipuram Style idli | Kanchipuram Idli | Breakfast Recipe

Kanchipuram Idli, a famous seasoned idli from the city of Kanchipuram, Tamilnadu. It's served as offering (prasadam) in one of the vishnu temple at kanchipuram.  It's so flavorful and tastes absolutely divine ! 

The actual batter recipe of kanchipuram idli is slightly differ from our regular idli batter and i have tried it a few times before and we all loved it in our home. But when i'm too lazy to prepare separate batter for this idli, i would prefer this method using idli batter. 


Kanchipuram Idli

Related: How to make Idli Batter for soft and fluffy idli

Though it's not the traditional kancheepuram idli, it tastes almost the same and nowadays I often prepare this idli more than the regular idli. It's so easy to make and the flavor from the cumin and pepper along with ghee takes this dish to a new level. Sometimes I feel like I don't need any side dish for this idli and have it as it is. 
Kanchipuram Idli

You can make this idli in one large pan and cut them like cake & serve. But personally I love to make them in tumblers and small bowls.They are so cute and also make the breakfast/dinner more interesting !!! 

And also whenever I have banana leaves in my hands, I use them as lining for my tumblers, it helps to unmold easily and also i like the flavor of banana leaf in the idli. But if you don't like the banana leaf flavor, better leave it out and use ghee to grease the dish.

Kanchipuram Idli

Kanchipuram Idli

Preparation Time : 5 mins | Cooking Time : 20 minsServes :
Recipe Category: Idli | Recipe Cuisine: Indian
Kancheepuram idli, Kanchipuram idli, idli recipe Kancheepuram Idli, the famous seasoned idli (steamed rice cake) from the city Kancheepuram,Tamilnadu.
Ingredients
Idli Batter - 2 cups
To temper
Crushed pepper corns - 1 tsp
Cumin seed - 1 tsp
Asafoetida powder - 1/8 tsp
Ghee - 1 tsp
Curry leaves - few

Kanchipuram Idli
Procedure
Take the batter in a bowl, then heat the pan with ghee and add then temper the ingredients listed under "To Temper" and add into the batter.Kanchipuram Idli Step by Step Pictures
Mix the tempering with the batter well. Now take small size tumblers or any bowl.Kanchipuram Idli Step by Step Pictures
Cut the banana leaf into stripes and take each stripes, roll into cylinder and place inside the tumbler.Do the same for all tumblers.Kanchipuram Idli Step by Step Pictures
Fill the 3/4 of tumblers with the batter and place it on the steamer plate.Kanchipuram Idli Step by Step Pictures
Steam it for 12- 15 mins or until the tooth pick inserted into center comes out clean.Kanchipuram Idli Step by Step Pictures
Let it cool a bit and then flip the tumblers, the idli will comes out cleanly from it, remove the leaf and it's ready to serve.Kanchipuram Idli Step by Step Pictures
Serve warm as it is or slice them. Taste best with chutney and/or sambar.

Related : Variety of side dishes for idli 

Kanchipuram Idli
Notes:
  • Idli batter should be thick for this recipe 
  • Using ghee for tempering will give wonderful flavor.
  • Instead of using tumblers, you can use the regular idli plate.
  • If you don't have the banana leaf, then grease the sides with ghee, it helps to avoid sticking of idli to the tumblers.
  • Depends on your taste, you can add more or less of pepper and cumin seed.
    Kanchipuram Idli
Continue Reading »

Friday, August 18, 2017

Ragi Kozhukattai | Ammini Kozhukattai | Vinayagar Chathurthi Special

Ragi Kozhukattai, a simple yet healthy steamed dumplings made from finger millet flour. 

As we both are very much fond of ragi recipes, in our home i often prepare dosaputtu,kanji(congee) with ragi and this kozhukattai is the new addition to that list. 

I make them either as pidi kozhukattai and serve with chutney for our breakfast or as ammi kozhukattai for our evening snack and in both ways it's scrumptious.
As Vinayagar chathurthi is less than a week away, I thought that posting this recipe is appropriate  for this season, so I prepared this yesterday for our evening snack and clicked new snaps to post here. 
Unlike rice flour kozhukattai, this doesn't shoot your glucose level, that makes it as very diabetic friendly, so if you're worrying about what to make on vinayagar chathurthi for the elders in home who have diabetes, try this ragi kozhukattai and surprise them.I'm sure that they do enjoy this kozhukattai.


Ragi Kozhukattai

Preparation Time : 10 mins | Cooking Time : 15 minsServes :
Recipe Category: Snacks | Recipe Cuisine: Indian
Ragi Kozhukattai, Ragi Ammini Kozhukattai Ragi Kozhukattai, a simple yet healthy steamed dumplings made from finger millet flour.
Ingredients
Ragi Flour - 1/2 cup
Boiling Water -1/4 cup + 2 tbsp
Salt - to taste
Sesame oil - 1/2 + 1/2 tsp
Mustard & urad dal - 1/2 tsp
Curry leaves - 2 
Grated Coconut - 1 to 2 tbsp
To dry roast and grind
Red chili - 1
Chana dal - 1 tsp
Urad dal - 3/4 tsp


Procedure
Heat a kadai, add the flour and roast till it becomes aromatic. Take off from the heat and let it cool a bit.
Add salt and sesame oil(1/2 tsp) into flour and mix it well.
Add the boiling water and mix it well with ladle. Once it comes together, keep the ladle aside & mix with your hands to make the dough.
Now pinch a small amount of dough and roll into balls. Do the same for the remaining dough.
Grease the idli plate/steamer plate with sesame oil and place the rolled dough on the plate and steam it for 8-10 mins.
In the mean time, dry roast the ingredients listed under "To dry roast and grind"  and grind into coarse powder.
Heat a another kadai with 1/2 tsp of oil, add mustard, urad dal & curry leaves, let the mustard splutters, then add the spice powder and roast it in oil for 2mins in low flame.
Then add the kozhukattai and mix it well. Finally add the grated coconut, give a good mix and switch off the flame.
Tada, Healthy and tasty Ragi Kozhukattai is ready.

Related : How to make Sweet Mani Kozhukattai 


Notes:
  • Roast the flour till it becomes aromatic, that gives nice flavor to the kozhukattai
  • While roasting the flour make sure that the color of the flour doesn't get change.Keep the flame in medium.
  • Once the kozhukattai is cooked, it looks shiny outside.
  • Depend on how much spice you want, you can add more or less spice powder.
  • You can make the spice powder in bulk and store in airtight container and use whenever needed.
  • Use boiling water to make dough.


Continue Reading »

Monday, February 13, 2017

Beetroot Idiyappam | Heart Shape Idiyappam | Breakfast recipes

Beetroot idiyappam, a variation in the regular idiyappam by adding beetroot juice to the idiyappam dough. Beetroot juice give an appealing dark pink colour to the idiyappam. 

Always i have love-hate relationship with the beetroot, i'm so much in love with the colour of beetroot,but the same time, i couldn't stand the strong earthy taste of the beetroot.So i always  prefer the way to subside the earthy taste of beetroot by adding smaller quantity of it in pav bhaji,kurma or in baking goods,that way the beetroot taste is not predominant in the recipes, at the same time, you can achieve the beautiful colour on the food.

I got this idea when i saw the recipes of beetroot poori and later i tried poori,idiyappam and puttu with beetroot, out of all, idiyappam & puttu  are my personal favorite and i'm 100% sure you couldn't find any difference in taste other than the color change.

As this color is more suitable for the coming valentine's day, i have tried my best to create the heart shape to make it even more special and i'm happy the way it turned out.  Now let's check out on how to make beetroot idiyappam.


Beetroot Idiyappam

Preparation Time : 10 mins | Cooking Time : 15 minsServes :
Recipe Category: Breakfast | Recipe Cuisine: Indian
Beetroot Idiyappam, Beetroot string hoppers, Beetroot rice noodles Beetroot idiyappam, a variation in the regular idiyappam by adding beetroot juice to the idiyappam dough.
Ingredients
Rice Flour - 1 cup
Beetroot(grated) - 1/3 cup
Water - 1 to 11/4 cup
Sesame oil - 1 tsp
Salt - to taste

Procedure
Put the grated beetroot in a mixie/blender jar and add 2 tbsp of water and grind into smooth paste.
Strain the juice and discard the extract and measure the juice,we need 1 cup of liquid,so for the remaining add water to the juice and make it as 1 cup .
Pour the juice into the sauce pan,add salt and sesame oil and bring into boil.
Once it comes to boil,switch off the flame. Take the flour in a bowl and add this beetroot juice and mix it with spatula/slotted spoon vigorously until it becomes a single mass.
Take the idiyappam maker and fill it with dough. Grease the steamer plate with sesame oil and keep it ready.
Squeeze the dough as concentric circles in the steamer plate and steam it for 8-10 mins.
That's it.Beautiful looking & healthy beetroot idiyappam is ready.

To make heart shape
Take the foil paper and squeeze the dough in heart shape on the foil paper. To steam it, i placed two small tumber in the steamer and place the steamer plate in inverted position.
Then place the foil on the steamer plate and cover it with lid as shown below and cook it for 8- 10 mins.
Heart shaped idiyappam is ready.Serve it with grated coconut and sugar/jaggery powder.

Notes:
  • The color of the idiyappam depends on the color of beetroot juice and also how much beetroot you used.
  • The heart shape  one is made with 1/4 cup of beetroot for 1 cup of flour and the round ones are made  with 1/3 cup of beetroot for 1 cup of flour, so you can see the slight color change in the idiyappam.
  • I'm 100% sure that you don't get that earthy smell of beetroot in the idiyappam.
  • Instead of using steamer plate, you can use the idli plate too.
  • Depends on the flour, you many need 3/4 to 1 1/4 cup of liquid, as i have known that my rice flour needs 1 cup of liquid, i just used 1 cup to boil. But if your flour is new or you're not sure , to be on safer side, boil 11/4 cup of water.
Continue Reading »