Showing posts with label Burfi. Show all posts

Friday, December 30, 2022

Kaju Katli | Cashew Burfi

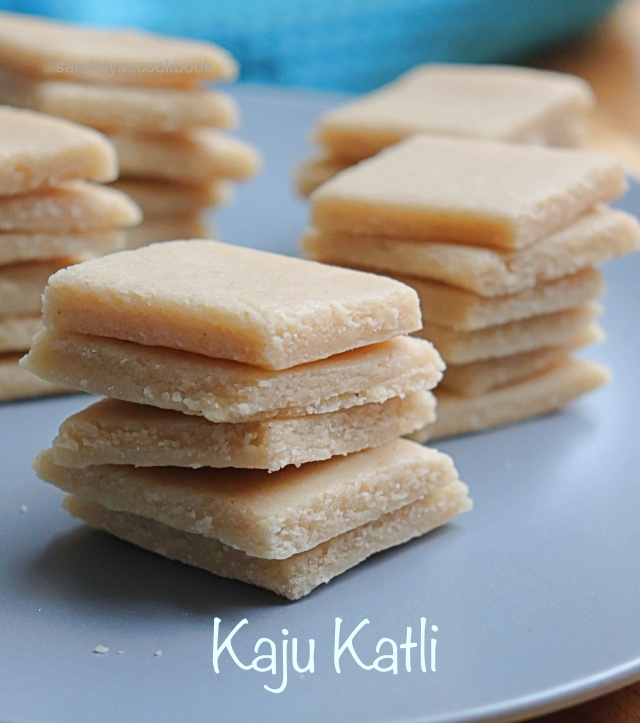
Kaju Katli, a delicious and rich fudge made from cashew nuts and sugar. Kaju Katli is a Hindi word where Kaju means "Cashew nuts" and Katli means "Slice/Burfi". It's one of the most famous desserts/ sweets to prepare on any festive occasion all through North India.

As I'm a South Indian, i was not aware of this sweet in my childhood days. During my working days in Chennai, we got a diwali gift hamper every year from the company. That's where i first saw this sweet and initially i thought it was milk sweet/burfi based on its look. 

After tasting a piece, i loved it instantly. It was so rich and at the same time had very subtle sweetness making you want to eat more and more. 


After marriage , i have tried this sweet many times at home. For me, it takes a while to get that perfect taste and texture. Though it needs only two ingredients and the recipe looks so simple, there are few minute things to take care of to get that perfect delicious kaju katli.

From my experience of cooking all these years, i find that the less ingredient recipes or the basic foods are the most difficult one to nail.  Do you ever feel it ?


Ok, now let's talk about the key ingredient for kaju katli!
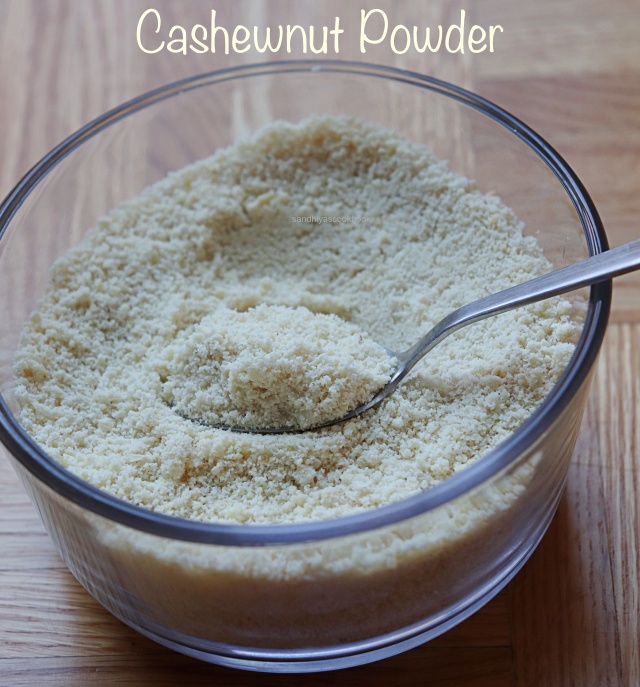
Cashew nut powder 

I personally like to make my own cashew nut powder for this katli. To make the cashew nut powder at home, here are the few things to take care of .
  1. Make sure to use the good quality cashew nuts whether it's whole or split.
  2. If you store the cashew nuts in the refrigerator/freezer, bring them to room temperature before powder it.
  3. Use a dry mixie/blender jar to powder it.
  4. Don't run the mixie/blender for a longer time, the cashew nuts will start leaving the oil.It ruins the recipe.
  5. If you find a lot of little granules of cashew nuts after grinding, make sure to sieve it once. I always do this for smooth kaju katli.
  6. You can make the cashew nut powder ahead of time and store it in airtight container. I usually get it ready the previous night itself. So when the day i'm making the kaju katli,it's so much easier.

Now let's talk about the next important thing in getting perfect kaju katli !
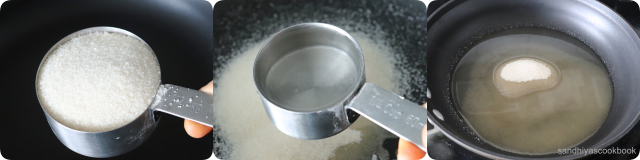
Sugar Syrup

  • For soft and melt in your mouth kaju katli, you need a thin thread single consistency sugar syrup
  • Dip your fingers in the water, take a little bit of sugar syrup in between index finger and thumb, when you move your fingers a little apart, it forms a single thread. And at the same time, when you move your fingers apart like more than 1/2 inch apart, then the string breaks. That's the perfect sugar consistency of making kaju katli.
  • Once the sugar syrup starts to boil, keep the flame low-medium, so it will be easy to reach the correct sugar consistency.

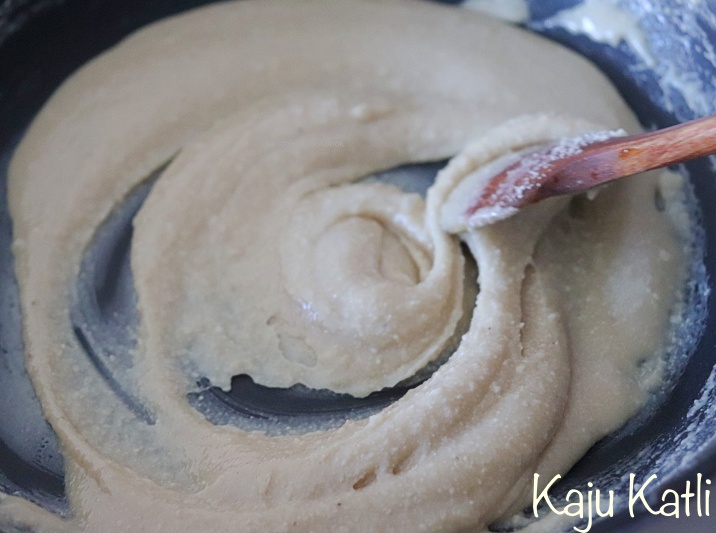
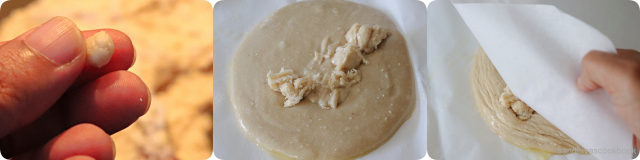
Correct Stage to switch off the heat 

  • When the whole mixture becomes thick, take a little bit of cashew mixture on a separate plate. Dip your fingers in the cold water and then take cashew mixture and roll it in between your fingers. When you can roll non-sticking ball, then kaju katli is ready and it's time to remove from the heat.
  • Make sure to dip your fingers in cold water because the mixture sticks to the warm hands.
  • Also when you pour the mixture on the butter paper, the last bits of the mixture starts to thicken. That's also the indication of a perfect stage! See the step by step pic for more understanding
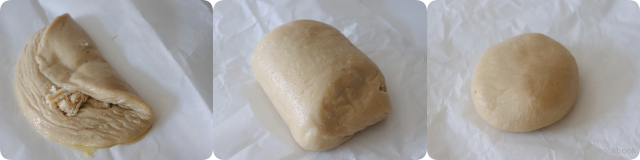
Kneading the dough

  • For smooth kaju katli, kneading the cashew mixture is really important.
  • Once you pour the cashew mixture in the butter paper, immediately start kneading the mixture with the help of butter paper. Don't touch it with your hands immediately since it's super hot.
  • When the mixture is hand bearable, you can knead with your hands and make a smooth ball.

Shaping Kaju Katli

  • Let  the mixture come to room temperature before start shaping.
  • In case, the mixture is dry and not smooth enough to roll with a rolling pin, then add a tbsp of warm milk and start kneading again till it's smooth.
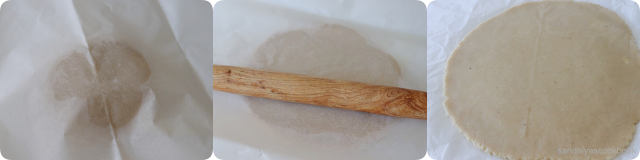
  • Place the mixture in between the butter paper for easy rolling.
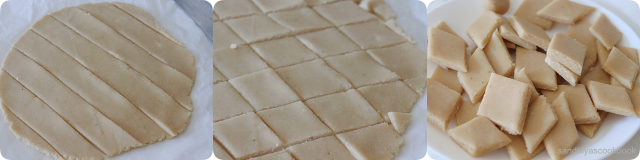
  • Cut into desired shape as you like.
I believe that i have shared all the tips to get perfect kaju katli. If you have any other questions, do leave it in the comment section,I will try my best to answer.

My little one turned one a couple of days ago! I had saved this post in my draft for a while to post on his birthday :-) But with our exhausting trip to India including winter storm, staying at hotel, missing connecting flights twice, waiting for hours at airport, travelled almost half of the world for three days before reaching the destination and finally lost our both check-ins luggage, i have no energy to turn on the laptop to click the publish button.

Despite all the hurdles, we had a great celebration on his birthday and finally after a week, we got our luggage. Such a roller roaster trip, it was ! 

Ok, enough with the long story! I wish everyone a very Happy New Year ! See you all in the next year with more interesting recipes. 


Kaju Katli | Cashew Burfi

Preparation Time : 10 min | Cooking Time : 20 minsServes : 20 
Recipe Category: Curry | Recipe Cuisine: Indian
Kaju Katli, Cashew nuts Burfi, Cashew Burfi Kaju Katli, a delicious and rich fudge made from the cashew nuts and sugar.
Ingredients
Cashew - 1 cup
Sugar - 1/2 cup
Water - 1/4 cup
Ghee - 1/2 tsp

Procedure
Measure the cashew and add it in the blender/mixie jar and powder it nicely.

It should be like fine rava. Then sieve it once to avoid big pieces of cashews and keep it ready. At this stage, you can store in airtight container for later use too.
Next add the sugar and water in a non-stick pan and turn the heat on medium flame.
Let the sugar melts completely and boil it till it reaches the fine single thread consistency.
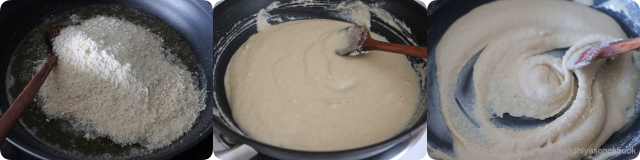
Add the cashew nut powder, keep the flame in low and stir it continuously.
Cook till it's thick. To check whether it's ready, dip your hand in water and take a little bit of the cashew mixture and roll it. If you're able to roll it without sticking, then it's time to turn off. Transfer the mixture on to the ghee greased butter paper. Gather the butter paper around the mixture.
 And start kneading the cashew mixture until it's smooth ball. 
Then place an another butter sheet over it and roll it with rolling pin till the thickness of the katli you need.
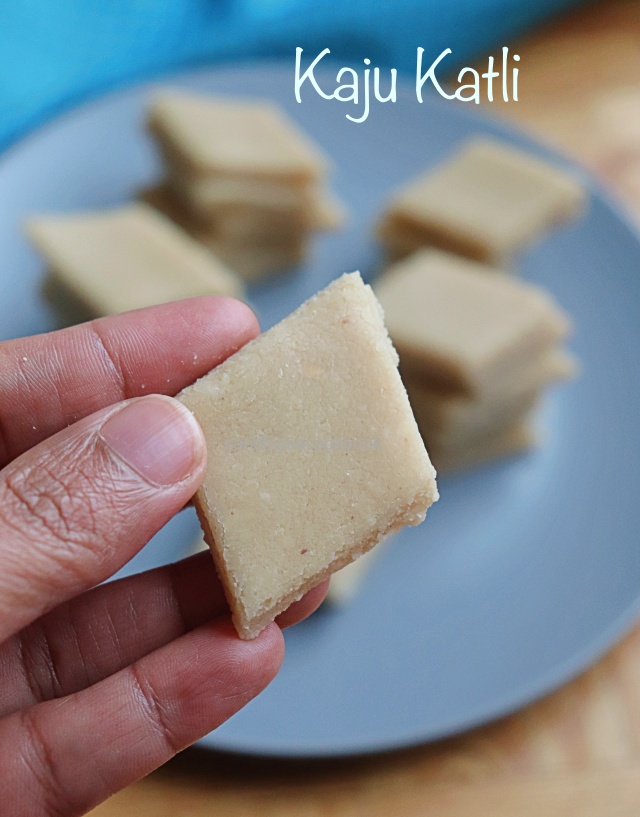
Cut the kaju katli into desired shape. I cut it in the traditional diamond shape here.
That's it, Delicious and rich Kaju Katli is ready!
Notes:
  • Make sure to powder cashew nuts finely for smooth kaju katli.
  • I would highly recommend to use the non-stick pan to avoid sticking at the bottom.
Continue Reading »

Friday, January 1, 2021

Khoya Burfi | Mawa Burfi | Easy Indian Sweets

Khoya Burfi, a classic North Indian sweet which is mainly made for festive occasions.It's delicious, perfect to make at the last minutes with just a couple of ingredients. I tried these khoya burfi a couple of times before and every SINGLE time it turned out so delicious and rich. If you're looking for some easy milk based sweet to make for any special occasions, I would recommend to give a try on these burfis. 

Though i have made these burfis in large quantities, today i'm sharing the recipe for very small quantity just enough for 2 to 3 people serving.  But you can easily double or triple the recipe as you like. 

Related : How to make Gajar Ka Halwa / Carrot Halwa

Before moving on to the recipe, let's check out some basic FAQs

Is the store bought khoya good for this recipe?
Yes, absolutely ! I tried both store bought and homemade for this burfi. Both turned out perfectly fine.

Why are my burfis chewy?
The burfis might turn chewy because of over cooking. So switch off the flame once it all comes together.

Happy New year to all. Wish you all a happy and healthy new year ahead !


Khoya Burfi | Mawa Burfi

Preparation Time : 2 mins | Cooking Time : 10 minsServes :
Recipe Category: Sweet | Recipe Cuisine: Indian
Milk sweet, Burfi, Mawa Burfi, Khoya burfi, Indian sweet Khoya Burfi, a classic North Indian sweet which is mainly made for festive occasions.It's delicious, perfect to make at the last minutes with just a couple of ingredients.
Ingredients
Khoya -1/2 cup
Powdered Sugar - 3 tbsp
Rose essence - few drops
Pistachios & silvered almonds - 1 tbsp 
Ghee - 1/2 tsp

Procedure
Heat the pan with ghee, crumble the khoya and add into it. Saute it in ghee for 2 mins.Then add the powdered sugar & rose essence.Add the half of the nuts and mix it a good. Remove from the heat when it's all come together and pour into the tray and level the top.Add the remaining nuts on the top and let it cool completely. Slice and serve.Yummy Khoya Burfi is ready. For more sweet recipes, you can check out my collections 

Related: How to make maida burfi/Halkova


Notes:
  • Keep the flame in low for entire cooking. Otherwise the khoya will be burnt easily.
  • For quick settings, keep the burfi in refrigerator for 20-30 mins.


Continue Reading »

Monday, November 9, 2020

Maida Burfi | Halkova | Diwali Sweets

Maida Burfi/ Halkova, a delicious fudge made from maida/all purpose flour, ghee and sugar. Looking for a super easy & no fail burfi recipe for this diwali? Then this maida burfi is for you !! I had already shared maida burfi recipe in which sugar syrup is prepared to make the burfi. But the recipe that i'm sharing today doesn't need sugar syrup,so no need to worry about single string consistency of syrup, this recipe is so easy to make perfect burfi and works like a charm every SINGLE time. 
The maida burfi made from sugar syrup has chewy texture whereas  this maida burfi has melt in your mouth texture just like besan ladoo or moong dal ladoo. Personally I like this burfi more than the burfi made with sugar syrup because of its texture !! Ok, before moving to the recipe, let's check out the FAQs !!


What is Maida Burfi / Halkova ?
A delicious fudge made from maida/all purpose flour, ghee and sugar.

What are the other flavors I can use in this burfi?
Apart from cardamom and rose flavor, the vanilla and pistachio flavors also taste good. 

Can I reduce the amount of ghee ?
No, the burfi needs the mentioned amount of ghee for melt in your mouth texture. 

Any substitute for ghee?
Commercially, vanaspati/dalda/shortening is used in this recipe,so ghee is the best alternative already !

Any tips for beginners ?
  • Make sure to let the roasted maida cool down(it's so important) completely before adding sugar. Otherwise the whole mixture would become watery and unable to set. 
  • Make sure to roasted the flour well otherwise it tastes raw
  • This is one of the recipes that you have to follow the measurements religiously. That's the key to get a perfect and tasty burfi.
  • If you're a beginner, then I would recommend trying this burfi with a single flavor on the first try. It would be a lot easier.
 

Maida Burfi | Halkova

Preparation Time : 15 mins | Cooking Time : 10 minsServes : 20 
Recipe Category: Sweets | Recipe Cuisine: Indian
Maida Burfi, Burfi, APF Fudge, Halkova,Diwali recipe, Maida burfi with powder sugar Maida Burfi/ Halkova, a delicious fudge made from maida/all purpose flour, ghee and sugar.
Ingredients
Maida / All purpose flour - 1 cup
Ghee - 1/2 cup
Powdered Sugar - 1/2 cup
Cardamom  powder - 1/8 tsp
Rose essence - a few drop(optional)
Pink food color - a few drop(optional)

Procedure
Add the ghee in a pan and let it melt completely, then add the maida.
Keep the flame in medium and roast the maida till it's fragrant. 
It takes around 8-10 mins. Remove from the flame and let it cool completely(this is so important).  If you're going for two flavors, then divide the dough into two equal parts.
Keep one part of the dough aside. And in the remaining dough, add 1/4 cup of sugar and the cardamom powder.
 First mix it with spatula and then use your hand to come together the dough as single mass. 
Grease the pan with ghee and add this maida dough and smooth the surface evenly with spatula.
To the other part of the dough, add the sugar, rose essence and pink food color. Mix it well together until all comes together. 
Transfer the maida dough into greased bowl and smooth the surface on the top.
Let it set aside until it's firm to touch(For faster setting, keep it in refrigerator for 30 mins). Then slice into desired size as you like.
Tasty Maida Burfi / Halkova is ready.
Notes:
  • Make sure to cool the roasted maida before proceeding further.
  • Apart from cardamon and rose flavor,  other flavors like vanilla, pistachio can also be used.
  • If you're using food color, take time to mix it well with the flour. 
Continue Reading »

Monday, December 17, 2018

Double Layered Coconut Burfi | Coconut Burfi with Milk Powder

Double Layered Coconut Burfi, a delicious and easy to make burfi with coconut and milk powder. I have a vivid memory of eating coconut burfi from the petti kadai(small shop) during my school days.

In those days, these coconut burfi and porivilangai(roasted chana dal ladoo) were my favorite after lunch snacks and those were 50 paise/ piece then. In petti kadai, the coconut burfis were in two colors (white & pink) and I have a long term wish to make them at home.
Instead of making them in two colors separately, I thought of making them in layers, but I'm not sure about the flavors that go into that petti kadai coconut burfis, I remember only the colors, not the flavors. It's really a  long time since I have. 

Therefore, I went with my favorite flavors, cardamom for white layer and rose essence for pink layer and also I have added a small amount of milk powder(I'm sure that this was not included in the petti kadai burfi recipe) for extra richness and taste. To my surprise, it turned out so soft and delicious. 
Before checking out the recipe, here is a quick update[as of Dec 18], we're moving to the new place again, those who know me personally would have known that how many times we have moved since we got married, sometimes, it kinda feels like a modern nomadic life. 

As much as we like to move to new places, at times, it's kind of tiresome to start from scratch again & again. Is anyone related to it ??? So, coming to the point, since we're moving, there will be a lack of post for a while until I get my own kitchen again. Meantime, enjoy your time here. Merry Christmas and Happy New Year to all. 

Double Layer Coconut Burfi

Preparation Time : 10 mins | Cooking Time : 20 minsMakes : 12 
Recipe Category: Sweet | Recipe Cuisine: Indian
coconut burfi, Double layer coconut burfi, Double Layer Coconut Burfi, a delicious and easy to make burfi with coconut and milkpowder.
Ingredients
For Cardamom Layer
Coconut flakes(unsweetened) - 3/4 cup
Milk Powder - 1/4 cup
Sugar - 1/2 cup
Cardamom - 2(crushed)
For Rose Layer
Coconut flakes(unsweetened) - 3/4 cup
Milk Powder - 1/4 cup
Sugar - 1/2 cup
Rose essence - 2 drop
Pink food color(gel) - 1 drop(optional)

Procedure
First let's make the cardamom layer, take the sugar in a pan, add water just enough to cover the sugar and let it melt completely. 
Let it boil until the sugar syrup reach one string consistency, then add the coconut flakes and milk powder.
Mix it well without any lumps and then add the crushed cardamom.
Cook till the coconut mixture leaves the sides of the pan and then transfer the mixture into the ghee greased/ lined tray and flat the top with the ghee greased spoon/spatula.
Next let's make the rose layer, take the sugar in a pan, add water just enough to cover the sugar and let it melt completely. 
Let it boil until the sugar syrup reach one string consistency, then add the coconut flakes and milk powder.
Mix it well without any lumps. 
Then add the rose essence and food color into it and mix it well. 
Transfer the mixture on top of the cardamom layer and smooth out the surface on the top. Let it cool a bit and cut into squares.
Let it cool  completely and store it in air tight container. Delicious Coconut Burfi is ready.

Related : How to make Maida Burfi


Notes:
  • Instead of doing it in batches, you can make it in one shot and in the end divide the mixture into half and add the different flavoring into each one. 
  • If you're doing like me, make each layer separately, then you have to super quick in making the second layer before the first one sets. Other wise the layers cannot stick together. 
  • While making the second layer, keep the first layer near the stove itself, that way it won't set immediately.
  • Milk powder gives richness to the burfi.
  • You can add upto 1/3 cup of milk powder for this burfi.  
  • I have pulsed the coconut once in a mixie for fine texture. But it's optional.
Continue Reading »