Showing posts with label Festival Food. Show all posts

Tuesday, September 8, 2026

Thengai Poornam Kozhukattai | Coconut Kozhukattai

Thengai Poornam Kozhukattai, a delicious and easy to make kozhukattai with sweet coconut filling. If you're pressed for time and don't have time to make elaborate poornam(filling) for your mothagam/kozhukattai, then this kozhukattai would be your saviour.

If you haven't tried this kozhukattai before, do give it a try on upcoming vinayagar chaturthi and i'm sure that you would be amazed by its taste and flavor.


It's one of the kozhukattais that i grew up eating a lot. Back in the days, Amma never used jaggery as sweetener for Thengai Kozhukttai. Always she used a couple of tbsp of sugar and generous amount of crushed cardamom. Grated coconut along with sugar and cardamom itself is simply amazing and i remember that i would have finished half of the filling before making the kozhukattai :-)
Also whenever Amma makes idiyappam for breakfast, she would have made a few of these kozhukattais or Thengai pidi kozhukattai as a last batch for our mid-morning snacks.  

Coconut

For this recipe, i would highly recommend to use the freshly grated coconut/frozen grated coconut. Desiccated coconut won't work for this recipe.

Sugar

Here i have used simple white sugar because that's what i grew up eating and making it the same way brings so many good memories :-) But you can use raw sugar or any kind that you like.

Once the kozhukattais are cooked, the sugar melts completely, creating a homogeneous coconut stuffing so you won't taste any raw sugar at all.

Cardamom

Coconut and cardamom are the match made in heaven. So for any coconut based sweet, i like to add cardamom and for this recipe a generous amount of cardamom would elevate the taste and flavor so much.

Ok, now let's check out how to make this delicious Thengai Poornam Kozhukattai 


Thengai Poornam Kozhukattai | Coconut Kozhukattai

Preparation Time : 10 mins | Cooking Time : 10 minsServes :
Recipe Category: Curry | Recipe Cuisine: Indian
Thengai Poornam Kozhukattai,Coconut Kozhukattai Thengai Poornam Kozhukattai, a delicious and easy to make kozhukattai with sweet coconut filling.
Ingredients
For Outer Layer
Rice flour - 1/2 cup
Sesame oil - 1/2 tsp
Salt - a pinch
Boiling water - a little less of 1/2 cup
For Stuffing
Grated coconut - 3/4 cup
Sugar - 1/3 to 1/2 cup
Cardamom powder - 1/4 tsp

Procedure
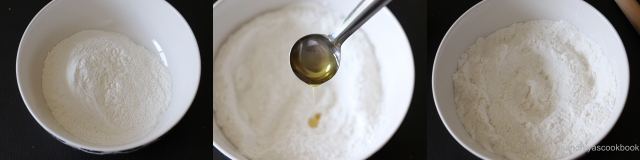
First let's make the dough, take the flour in a bowl, add sesame oil and salt. Give a good mix. 
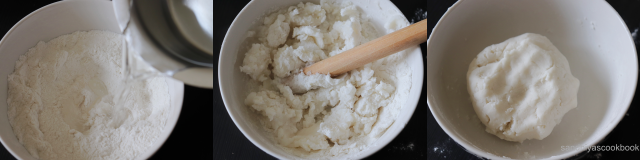
Pour the hot water into the flour and make a soft dough. Keep it aside for 5 mins.
Next for the stuffing, add all the ingredients listed under "For Stuffing" in a bowl and mix it all together. That's it, Coconut stuffing is ready.

Now let's shape the kozhukattai. Take a small portion of dough and make a smooth ball. Flatten the dough into a small disc on a greased banana leaf/ parchment paper. 
Add a spoonful of coconut stuffing on one side of the dough and then fold the parchment paper and press the edges of the kozhuttai gently so that it sticks together. Then remove the kozhukattai from the parchment paper and place it on the greased steamer basket. 
Steam the kozhukattais for 5-7 mins in a medium flame.
Delicious Coconut Kozhukattai is ready.

Related : How to make Peanut Kozhukattai

Notes:
  • Sesame oil gives great taste to the kozhukattais, so i highly recommend to use the sesame oil.
  • Don't overcook the kozhukattai otherwise, the cracks would appear on top of the kozhukattai.


Continue Reading »

Saturday, August 29, 2026

Coconut Almond Burfi | Coconut Burfi

Coconut Almond Burfi , an easy to make delicious sweet with just a handful of ingredients. It was one of my recent experiments at my kitchen and it turned out way more delicious than i had expected. 

In the past, i used to make coconut burfi with only freshly grated coconut. But here in Ottawa, i can source desiccated coconut more easily than the good-quality fresh coconut. So i have been experimenting with desiccated coconut  in place of fresh coconut in my cooking. Some dishes have turned out well, while others have been big flops.

This Coconut Burfi is one of the huge hits and it tastes as good as the burfi made with fresh coconut. So if you're looking for some easy to make sweet with desiccated coconut, do give this a try and I'm sure that you would be impressed by the taste and the texture of these burfis.

Desiccated Coconut

Here in this recipe, i have used the un-sweetened and fine desiccated coconut. You can also use the coconut flakes that are available in the market. But make sure that you pulse that coconut flakes once before using it in this recipe. Fine coconut makes it easier to cut the burfis into desired shapes.
Also, if you're using the sweetened desiccated coconut, make sure to reduce the sugar a little bit otherwise it would be too sweet. 

Almond Flour

Adding almond flour in this burfi makes it so rich and improves the taste and texture of the burfi overall. I have a recent obsession of using almond flour in my cooking so i tried to incorporate it in many of my sweets. If you have been following me for a while, you might already know this :-)


Flavouring Agent

Cardamom goes really well with any coconut sweets so i have used the cardamom powder. In addition to that i have used a few strands of saffron for that exotic flavor. You can use both of them like me or any one of those too. 
Additionally, if you like vanilla flavor with coconut, you can also use the vanilla essence. 

Ok, now let's check out how to make this delicious coconut almond burfi.


Coconut Almond Burfi

Preparation Time : 2 mins | Cooking Time : 20 minsServes : 24-28 pieces  
Recipe Category: Sweet | Recipe Cuisine: Indian
Coconut Burfi, Coconut Almond Burfi, Thengai Burfi description.
Ingredients
Desiccated Coconut - 1 & 1/2 cups
Almond Flour - 1/2 cup
Sugar - 1 cup
Water - 1/4 cup
Cardamom powder - 1/2 tsp(crushed)
Ghee - 1 tsp
Saffron - a few strands(optional)

Procedure
Heat a thick bottomed pan, add the sugar and water, let the sugar melt and come to boil.


Let the sugar syrup boil until it reaches the one string consistency. Then add the desiccated coconut and almond flour.
Mix it all well together. Within a few minutes it all comes together and then adds the ghee.
Next add the cardamom powder(here i was using some crushed cardamom seeds) and saffron(if you're using) . Mix it all well and then transfer the mixture into a ghee creased pan/plate.
Smoothen the top with the back of  the spoon. Rest it for 5 mins and then cut into desired shape.
Delicious Coconut Burfi is ready. Cool it completely and then store it in airtight container.

Related: How to make Khoya Burfi

Yummy it is !!


Notes:
  • Cut into desired when the burfi is warm itself and then let it cool down completely 
  • It stays well for up to 15 days at room temperature.

Continue Reading »

Tuesday, August 29, 2023

Thengai Payasam | Arisi Thengai Payasam

Thengai Payasam, a delicious sweet recipe prepared with coconut and a little bit of rice. It's one of the payasam that i have learned recently and love it very much. 

When i came across this recipe online, i instantly knew that i would love this payasam because i'm such a huge fan of coconut based dishes. As expected, i love this payasam. Though the recipe has very basic ingredients but somehow they all work together and make such a spoon licking delicious payasam.

If you love coconut  flavor as like me or simply you want a different payasam recipe to satisfy your sweet cravings, then i would highly recommend to give a try on this amazing Thengai Payasam.


Coconut

For this payasam, i have used the fresh coconut. But you can use the frozen grated coconut that are available in the market. Whatever you are using, make sure that the coconut is fresh because that's key for the taste and the flavor in this payasam. 

Rice 

Adding rice gives the thicker texture to the payasam. Basmati rice flavor really elevates the flavor and taste of the payasam.  But i tried this payasam with regular cooking rice too in the past and it tastes equally good. 

Jaggery 

The color of the payasam solely depends on the jaggery color. Use paagu vellam or yellow colored jaggery for the vibrant color payasam. I have used brown colored jaggery so the color is a bit dull.

Like many payasam, this one too tends to thicken when it's cooled down, so switch off the flame when it's a bit runny than the required consistency.

Ok, now let's check out on how to make this delicious payasam.


Thengai Payasam | Arisi Thengai Payasam

Preparation Time : 5 mins | Cooking Time : 20 minsServes :
Recipe Category: Sweet | Recipe Cuisine: Indian
Thengai Payasam, Coconut Payasam, Arisi Thengai Payasam Thengai Payasam, a delicious sweet recipe prepared with coconut and a little bit of rice.
Ingredients
Grated Coconut - 1/4 cup
Basmati Rice - 1 tbsp
Jaggery - 1/4 cup
Milk - 1/4 cup
Water - 1 cup
Cardamom powder - 1/4 tsp
Ghee - 1 tspCashew - 5 

Procedure
Heat the pan, add the coconut and rice, roast till they are aromatic. Let it cool a bit.


Add it in the mixie jar and grind into coarse mixture. Next in a sauce pan, bring the water into boil and then add the coarse coconut-rice mixture. Let it cook till the rice is soft.
In the mean time, in an another sauce pan, add the jaggery and a couple of tbsp of water, heat it until the jaggery melts completely. Strain the jaggery syrup and keep it ready.
Once the rice is well cooked, add the jaggery syrup and boil it for a couple of minutes.
 Next add the milk and give a quick stir. In an another pan, fry the cashew in ghee .
Finally add the cardamom powder, fried cashew, give a gentle mix and switch off the flame.
Delicious Thengai Payasam is ready.

Related:How to make Paruppu Payasam

Notes:
  • I have used Basmati rice in this payasam, but any cooking rice works fo this recipe.
  • Instead of dairy milk, coconut milk can also be used.

Continue Reading »

Sunday, August 9, 2020

Vella Seedai | Sweet Seedai | Seedai Recipe

Vella Seedai/Sweet Seedai, a delicious and crunchy deep fried snack made from rice flour and jaggery. Though we don't have the custom of celebrating krishna jeyanthi at home, i had prepared a wide variety of snacks and sweets for last year krishna jeyanthi festival. 

This sweet seedai is one among them and that was the first time that i had tried my hands on vella seedai and really loved the flavor, mild sweet and crunchiness of the seedai. Although i make seedai/uppu seedai at home often, making vella seedai  is a very rare sight at my kitchen for various reasons !! But every time when i make this sweet seedai, i enjoy it to the core.

Now coming back to the recipe, it's so easy to make with the basic ingredients in a few minutes. So if you're looking for some easy sweet recipe for coming gokulashtami, do give this vella seedai a try.  

Here are few other famous krishna jeyanthi special recipes, if interested check it out.

And for whole collections of festive recipe, check out hereNow let's check out on how to make this sweet seedai.


Vella Seedai | Sweet Seedai

Preparation Time : 20 mins | Cooking Time : 20 minsServes :
Recipe Category: Snacks | Recipe Cuisine: Indian
Vella seedai, Sweet Seedai, Tamilnadu Sweet, Gokulashtami recipe Vella Seedai/Sweet Seedai, a delicious and crunchy deep fried snack made from rice flour and jaggery.
Ingredients
Rice flour - 1 cup
Urad dal flour - 1 tbsp
Grated Coconut - 2 tbsp
Sesame seed - 1 tsp
Butter - 2 tsp
Jaggery - 1/4 cup
Water - 1/4 cup
Oil - to fry

Procedure
Take rice flour, urad dal flour, sesame seed, coconut in a bowl. In a pan, add the jaggery and water and let it melt completely.
In the mean time, mix the dry ingredients in the bowl well and add the melted butter into it and mix it thoroughly with the flour. Once the jaggery melts completely, strain it and add into the flour.
Mix it well, then add the needed water and make a smooth and non sticky dough.
Take a small pinch of dough and roll into balls. Heat the oil for frying. 
Once the oil is heated, add the rolled seedai in batch and cook in low flame until it becomes brown on top evenly.Remove from the oil and put it on tissue paper.
Tasty and crunchy Seedai are ready. Once it's completely cooled, store it in airtight box. 
Notes:

  • No need to check for sugar syrup consistency. Once it all melted, it's good to use.
  • Crush the jaggery using hand motor & pestle / mixie before making jaggery syrup, it helps to melt easily.
  • The oil temperature should be low throughout the cooking process.
  • Add a pinch of dough into the oil, it should raise up slowly , that 's right temperature to fry this seedai.
  • If the oil is too hot,the outside would be browned easily and left with inside uncooked.
  • While frying the seedai, always stand at the safe distance from the hot oil. 
  • While rolling seedai, don't put too much pressure and don't roll too tight, it might lead to bursting of seedai while frying.
  • I have used white sesame seed here, but you can use black sesame seed also.


Continue Reading »

Friday, September 20, 2019

Maa Vilakku | Edible Rice Flour Lamp | Festive food

Maa Vilakku, an edible flour lamp made from raw rice flour and jaggery. Maa vilakku is mainly offered as prasadam in Amman Kovil(temple) throughout tamilnadu. I have fond memories associated with maa vilakku. 

During our childhood days, we went to sankaran kovil( a small town in south tamilnadu and also it's my mom's native place ) for Aadi thabasu(ஆடித்தபசு) festival in Gomathi amman temple there. Mostly all my cousins and their family would be there at my aachi's(grandma's) house and it was kind of a get-together at that time. 

One of my periamma( Mom's sister) makes maavilakku every year(and still she's doing it ) for the aadi thabasu festival without fail. Not one or two, at least 21 maavilakku she would have made in those days single handedly, later we all went to the temple, lit the maa vilakku in front of the Gomathi amman sannathi and did the pooja. Once we reached the home we had our share of maa vilakku, it was so tasty and I still have the lingering memories of that taste. 
Also i have the memory of Amma making them whenever we visit irukkankudi mariamman temple. Last year itself i asked Amma on how to make this maa vilakku and tried, but i was not fully satisfied with the outcome. 

This year before coming to Canada, my MIL told me that she had the long pending wish for making maa vilakku at a nearby Amman temple and would like to do that before my travel. Since i was traveling in the next few days, my mom and dad were also there with me,so Amma & MIL together made the maa vilakku and i had the chance to observe the details for making the perfect maa vilakku.

Later on one Aadi Velli,i tried my hands on it & it turned out super good in terms of both taste & texture. To me, Maa vilakku should be firm when broken into small pieces. Neither sticky nor crumbly. Glad that i learned to make perfect Maa Vilakku. Ok, thanks for reading my story, now let's check out on how to make them. It can also be offered as prasadam on auspicious days like  "Puratasi Sani", "Aadi Valli", "Karthigai Deepam" , "Thai month" and so on.

Maa Vilakku | Edible Rice Flour Lamp

Preparation Time : 3 hrs | Cooking Time : 0 minsMakes :
Recipe Category: Sweet | Recipe Cuisine: Indian
Maa Vilakku, Edible flour lamp, Puratasi Sani, Aadi Velli,Karthigai Deepam,Sweet Maa Vilakku, a edible flour lamp made from raw rice flour and jaggery. Maa vilakku is mainly offered as prasadam in Amman Kovil(temple) throughout tamilnadu.It can also be offered as prasadam in auspicious days like  "Puratasi Sani", "Aadi Velli", "Karthigai Deepam" , "Thai month" and so on.
Ingredients
Raw Rice - 1/2 cup
Jaggery - 1/4 + 2 tbsp
Cardamon - 2
Ghee - 1 tsp + extra for lighting.

Procedure
First take the rice in a bowl, wash it thrice or until the water runs clear. 
Then add enough water to cover the rice and soak it for 2 hours. After 2 hours drain the water and spread it on thick paper / kitchen towel to absorb the excess moisture for 30-40 mins.
The rice shouldn't be soaking wet but at the same time you can feel the moisture when you hold it in your hand, that's the correct stage for making the flour. Put the rice in the mixie jar and grind into smooth powder. If needed sieve it once for fine texture. 
Add the jaggery into it and pulse it couple for times to get it together. Transfer to the plate.
Powder the cardamon seed and add it. Next add the ghee and mix it all together.
Gather the flour and make it as round. Place it on the plate that you're gonna to lit the maavilakku. Using your thumb to make the impression in the center to pour the oil/ghee.
Place kumkum on the maa vilakku, then place thread in the center and pour the ghee/oil.
Now your maa vilakku is ready to lit. 
Notes:
  • Crush the jaggery roughly into coarse powder with hand motor and pestle before put it in the mixie for easy and even mixing with the flour.
  • Make sure that the  rice is neither too dry not too wet before making the rice flour.
  • If your maa vilakku ends up too loose and doesn't hold shape, you can add couple of spoon of regular rice flour. That will affect the taste slightly but saves the maa vilakku.
  • If the flour is too dry to hold the shape, add more ghee to form the shape.
  • Don't use the water to shape the maa vilakku, the shelf life would be reduced.
  • In this method, you can make the maa vilakku previous night itself and keep it in room temperature for next day pooja.
  • Excess consumption of maa vilakku aids to upset stomach or pain since everything is raw in this recipe


Continue Reading »