Showing posts with label Ghee. Show all posts

Thursday, March 5, 2020

Shankarpali | Shakarpare | Sweet Diamond Cuts

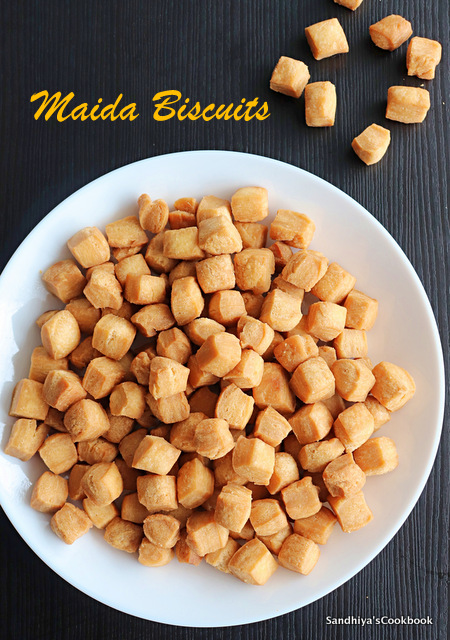
Shankarpali / Shakarpare,  a crispy and lightly sweetened deep fried snack made with a very few basic ingredients.  It's a traditional snack made for Diwali and Holi festival in North India.These cute little cubes are so easy to make for any festive season and it's extremely addictive !

Back in the days, some sweet stalls in our home town Tirunelveli had the special mixture which had a tiny size of these sweet diamond cuts along with other mixture ingredients. 

I was so fond of that without knowing the actual name(we used to call this as "kattam" means block in tamil because of its shape) and used to pick that alone from mixture and ate without touching the rest of the mixture :-). Shakarpare


Still the fondness doesn't get reduced but the only difference is that now i'm making them at my kitchen instead of buying from the store. It's so easy to make at home but little time consuming because of shaping and frying them in low flame. 

Trust me, it is all worth your time, so much better than the store brought and it's super addictive!! Now let's check out on how to make these delicious sweet diamond cuts. 

Shakarpare

Shankarpali | Shakarpare | Sweet Diamond Cuts

Preparation Time : 20 mins | Cooking Time : 20 mins | Serves : 4 to 6 
Recipe Category: Sweet | Recipe Cuisine: Indian
Shankarpali,Shakarpare,Sweet Diamond Cuts,sweet Shakarpare, ghee,maida,sweet,indian sweet,holi sweet,diwali sweet hankarpali / Shakarpare,  a crispy and lightly sweetened deep fried snacks made with very few basic ingredients. It's traditionally made for diwali and holi festival in North India.
Ingredients
Maida/ All purpose flour -1 cup
Ghee - 2 tbsp
Sugar - 2 tbsp
Hot Water - 2 & 1/2 to 3 tbsp*
Baking soda - a pinch
Oil - for frying
* Up to 3 tbsp of water is needed for a cup of flour.
Shanakarpali
Procedure
In a bowl, add the ghee and sugar, cream it together, then add 2 tbsp of hot water and mix it well.
Let the sugar dissolve, it takes around 2 mins, then shift  the flour and baking soda into the bowl.
First mix it with spoon and then if needed add the remaining remaining 1 tbsp of water(i have used 3 tbsp of water totally), use your hand to knead a  soft pliable dough. Divide the dough into 4 equal parts.
Take a piece of dough ball and roll into thick disc and cut into small squares with sharp knife. Do the same for the remaining dough.
Heat oil for frying, add the squared dough and fry till it's golden brown. Drain them on tissue paper.
Delicious and crispy Shakarpali/Shakarpare is ready to munch. Let it cool completely and store it in airtight container. 

Related : How to make Savory Diamond CutsShakarpare
Notes:

  • Depends on the quality of the flour, you may need 2 to 3 tbsp of water.
  • Keep the flame in low medium for even browning.
  • For the given quantity of sugar, shakarpali has very mild sweet. If you want more sweet, you can add extra 1 tbsp of sugar.
  • Keep it in airtight container for retain the crispiness.
  • Make sure the water is hot for quick melting of sugar.
    Shakarpare


Continue Reading »

Monday, September 30, 2019

Mango Kesari | Mango Sheera | Mambazham Kesari

Mango Kesari, a quick to make sweet from semolina and mango pulp. Kesari is the most favorite sweet in our home, often made for evening tea along with some savory snacks. 

To me, Amma makes the best kesari in the world, her kesari literally melts in the mouth like butter. I still clearly remember  that in my school days, whenever there was a small function in any one of our close relative's houses, they would ask Amma to make kesari. 

Yep, her kesari was/is so famous in our family circle. Seeing her making this often at home makes it easier for me to perfect it very easily.

Ever since I heard about this mango kesari, I would like to  give it a try, but when it comes to fresh mango, I hardly have any self control to not eat the mangoes. Many times, I had bought the mangoes for trying out some sweet/dessert, but ended up eating as it is :-) 

So this time, I thought of making the mango kesari using mango pulp that's available in the can. To my surprise, the kesari turned out  so good and kept on licking the spoon :-) . Moreover, to make this kesari, you no need to wait for mango season, the readymade mango pulp works as good as fresh ones for this kesari.

Mango Kesari | Mango Sheera | Mambazham Kesari

Preparation Time : 5 mins | Cooking Time : 10 mins | Serves : 2 
Recipe Category: Sweet | Recipe Cuisine: Indian
Mango Kesari, Mango Sheera, Mambazham kesari Mango Kesari, a quick to make sweet from semolina and mango pulp.
Ingredients
Rava/Semolina - 1/4 cup
Mango pulp - 1/4 cup*
Water - 1/4 cup
Sugar - 1/3 cup
Ghee - 1 tbsp
Cardamom - 1
* Fresh and CAN Mango pulp can be used in this recipe

Procedure
Heat a pan with ghee, add the rava and start roasting in low flame.
In the mean time, heat 1/4 cup of water in a sauce pan and add the mango pulp into it. Let it comes to boil.
Once the rava is aromatic, add the mango pulp + water into the rava and mix it vigorously, with a min, the liquid would be all absorbed and became a thick mass.
Next add the sugar and mix, let the sugar melts completely. 
Cook till the mixture become thick.Powder the cardamom seeds and add into the kesari. Mix it well and switch off the flame.
If you like, add some chopped pistachios on the top.
Finger licking kesari is ready to serve. 

Related : How to make Mango Kiwi Popsicle

Related : How to make Mango Kiwi Popsicle

Notes:

  • You can easily double or triple this recipe.
  • Rava : liquid ratio is 1:2, you can add more or less of mango pulp as per you liking and adjust the water as required.
  • If you're using fresh mango, make sure to use the mango variety which is sweet and has less fibre.
  • Instead of pistachios, you can use the roasted cashews too.
  • The liquid and the rava both should be hot while mixing together, that way it wont be any lumps.
  • While adding liquid into the rava, it sizzle and splatter a lot, keep safe distance from the stove and use long spatula to avoid the splattering on hands.
  • The given quantity make 2 small servings.
  • If you're using fresh mangoes, depends on the mango sugar, add more or less of sugar.
Continue Reading »

Tuesday, August 27, 2019

Rava Coconut Ladoo | Rava Ladoo | Ladoo Recipe

Rava Coconut Ladoo, a delicious and easy to make ladoos with semolina and coconut. Rava ladoo is one of ST's favorite sweets and the only sweet he asks me to make often. So far,apart from the regular rava ladoo, I have tried quite few variations like making them using condensed milk and  sugar syrup without ghee. Each one has its unique taste & texture.

And this rava coconut ladoo is my recent favorite in this rava ladoo series. In general, I love anything with coconut in it and coconut gives nice aroma and taste to this ladoo. If you like me who loves coconut, give this method a try next time when you make rava ladoo.

While making this ladoo, make sure to roast both rava and coconut until they are aromatic, that makes a lot of difference in both taste and texture wise. So far I have made this ladoo for a handful of times and in every time, the amount of ghee needed varies slightly plus or minus 2 tsp of ghee. 

Therefore add ghee little by little and stop when it starts holding shape, even if it doesn't hold shape after using all the ghee, you can add more ghee or simply use a couple of tsp of warm milk or water. Milk actually reduces the shelf life of the ladoo, so if you're making this ladoo in large quantities, I would recommend sprinkling a couple of tsp of warm water to hold the shape. It doesn't affect the taste at all. Now let's check out how to make this delicious rava coconut ladoos.

Rava Coconut Ladoo Recipe

Preparation Time : 10 mins | Cooking Time : 15 mins | Serves : 8 
Recipe Category: Sweet | Recipe Cuisine: Indian
Rava Ladoo, Rava Coconut Ladoo, Easy Ladoo Recipe, Indian Sweet, Diwali Sweet,Semolina Ladoo,Semolina Sweet Rava Coconut Ladoo, a delicious and easy to make ladoos with semolina and coconut.
Ingredients
Rava/Sooji - 1/2 cup
Grated Coconut - 2 tbsp
Sugar - 1/3 cup
Cardamom powder - 1/4 tsp
Ghee - 2 to 3 tbsp 
Cashew - 5

Procedure
Heat a tsp of ghee in a frying pan, add rava and start roasting the rava.
Roast until the rava is aromatic, remove from the heat and transfer to the plate, in the same plate, add the grated coconut.
Roast till it slightly started to changes to its color, remove from the heat and transfer to the plate. Now add the remaining ghee in the pan and heat it.
Broke the cashews into pieces and add into it. Roast until it becomes golden. Switch off the flame. In a mixie jar, add the sugar and powder it.
Next add the rava and coconut into it and pulse it couple of time until it all mix together.
Transfer into the bowl, add the cardamon powder and the ghee along with roasted cashews.
Mix it all together and start making ladoos. 
Yummy Rava Coconut Ladoos are ready. For more yummy sweet recipes, check out here.

Related : How to make Boondi Ladoo 

Notes:
  • No need to powder the rava, just give a couple of pulses until it all mix together.
  • The ghee should be hot, so that it holds the ladoo in shape well.
  • If the ladoo shape doesn't hold well, you can add a couple of tsp of boiled milk/warm water.


Continue Reading »

Tuesday, October 10, 2017

Nei Urundai | Moong Dal Ladoo | Pasi Paruppu Laddu

Nei Urundai/ Pasi Paruppu Ladoo, an easy and tasty ladoo made from moong dal,sugar and ghee. It hardly takes 15 mins from the start to end for the given quantity and also ideal for making in large quantity to distribute for friends and family on this diwali season.

When i heard the name "Nei Urundai", i thought that it requires lot of ghee to make this ladoo and avoided to try it for so long and even i don't know that it's made of pasi paruppu(moong dal) until i prepared on my own. 

A few weeks before, when i had prepared the list of diwali sweets to make on this year, this ladoo popped up in my head and immediately searched on my drafts  for the recipe which i noted down from some tv shows a few years back.

The recipe seems  so easy and it was not that much of ghee i had thought of, so within a next few days, i tried it and it was so good and taste almost like the stuffing of munthiri kothu which is made from whole moong dal and quiet popular sweet  in Tirunelveli area. 

So that may be the reason for this ladoo is not popular in our area, instead of this, i think everyone prefers to make munthiri kothu. Ok, now let move on to the recipe.


Nei Urundai

Preparation Time : 10 mins | Cooking Time : 5 mins | Makes : 12 
Recipe Category: Sweets | Recipe Cuisine: Indian
Ingredients
Moong dal / Pasi Paruppu - 1/2 cup
Sugar - 1/2 cup
Ghee - 1/4 cup
Cashews(brown) - 2 tsp 
Cardamom - 2

Procedure
Heat a pan and add the moong dal and roast till nice aroma comes from it. It may take 4-6 mins on medium flame.
Let it cool down completely and add into the mixie jar and grind into fine powder. Put it in a bowl.
In the same mixie jar, add the sugar and cardamom, grind into smooth powder.
Add into the powdered moong dal and mix well until both dal and sugar combined together.
Heat the pan , add ghee and cashews, roast till it becomes golden brown.
Add into the dal mixture and mix it well with your hands and make ladoos out of it.
That's it, Tasty & easy ladoos are ready. The color of the ladoo turns a little pale when it's completely cooled down.

Related : How to make Rava Ladoo.

Notes:
  • If the grounded dal is coarse, sieve it once and use it.
  • Don't reduce the amount of ghee, it helps to hold the ladoos and also give nice aroma.
It's better for gifting too for friends and families during festive season
Continue Reading »

Thursday, August 3, 2017

Nei Soru | Ghee Rice | Ghee Rice in Pressure Cooker

Nei Soru / Ghee Rice, a simple yet very aromatic and delicious one pot rice that goes well with any non vegetarian/spicy vegetarian curry. It's one of the rice that i used to make often at home and we simply love this rice for its wonderful aroma and taste. 

Usually this rice is prepared with jeeraga samba rice/biryani rice, but in today's recipe, i have used basmati rice, both rice are good in their own way and give unique flavor to the rice. So use whichever rice you prefer.  
In my school days, when we had relatives at home or on the day after kovil kodai(Temple festival that comes once in a year) or on any special occasion, Amma used to prepare either nei soru or thengai soru(Coconut milk rice) along with mutton curry since there would be a lot of coconut  from temple festival and it was way before biryani got "Popular" in our home. 

But still I prefer nei soru/thengai pal satham paired with mutton/chicken/egg curry and raita over any biryani recipe. 

Related : How to make flavorful and grainy Ghee at home 

. 


Nei Soru/Ghee Rice

Preparation Time : 20 mins | Cooking Time : 20 mins | Serves : 2 to 3 
Recipe Category: Rice | Recipe Cuisine: Indian
Nei Soru, Ghee Rice, One pot Rice, Pressure cooker rice, Tamilnadu Nei Soru, Nei Satham, Ghee Satham Nei Soru / Ghee Rice, a simple yet very aromatic and delicious one pot rice that goes well with any non vegetarian/spicy vegetarian curry.
Ingredients
Basmati Rice - 1 cup
Ghee - 2 tbsp
Water - 1 & 1/2 cup
Ginger Garlic paste - 1 tsp
Mint - a handful
Green chili - 2
Onion(medium) - 1/2
Tomato(medium) - 1/2
Cinnamon - 1 inch piece
Cloves - 3
Cardamom - 2
Bay leaf - 1
Cashews - 5
Salt - to taste

Procedure
First rinse and soak the rice for 20 mins, chop the onions into thin slices, tomato into small pieces and slit the green chilies.Heat the pressure cooker  with ghee.
Add the whole spices(cinnamon,cloves cardamom & bay leaf) and saute it in ghee for 30 secs, add the cashew and roast till it becomes golden brown, then add the onions & chili and saute till the onions become translucent.
Add ginger garlic paste and saute till the raw smell leaves, then add the roughly chopped mint leaves & tomatoes ,saute for 1 mins, then add the water.
Add enough salt for the rice,bring into vigorous boil, drain the water from the rice and add into the boiling water.
Again bring into boil and close the pressure cooker with lid and put on weight. Cook it for 3 whistles. Once the pressure is released from pressure cooker, open it,  drizzle some ghee(optional) and gently mix it well.
Tada, Nei Soru/Ghee Rice is ready. Serve it with your favorite curry & raita. We had it with egg kurma and onion raita.
For more rice recipe, check out here 
Notes:
  • The whole flavor of the rice comes from the ghee, so use good quality ghee and  i have used home made ghee.
  • Instead of basmati rice, you can use jeeraga samba rice, that too taste good.
  • Don't reduce the amount of ghee mentioned.Otherwise the rice won't be flavorful.
  • For more flavor, add a pinch of kalpaasi also.
Continue Reading »