Showing posts with label Rice. Show all posts

Wednesday, May 1, 2024

Masala Peas Pulao | Peas Pulao

Masala Peas Pulao, a delicious and easy to make one pot rice recipe. It's one of our family favorite meals. It tastes simply delicious with some raita on the sides. 

Some days when you're in a rush and want to make a yummy meal in under 30 mins, then i would highly recommend to give this recipe a try on those days. Also, it's perfect to pack for a one day trip or lunch boxes. If you have followed me on IG, you might already know how often i make this for lunch boxes and for a day out!


Rice 

In today's recipe, i have used seeraga samba rice. I simply love the flavor of this rice and it truly elevates the taste of the final dish without much effort :-) 

However, i make the same recipe with the basmati rice and it tastes equally good. So you can use whatever rice you have or prefer. For both the rice ,the soaking time and water quantity are the same.

Peas 

For this recipe, you can use frozen, fresh or dried peas. Here in this recipe, i have used the frozen peas . If you're using the dried peas, make sure to soak the peas for 6-8 hrs and then use it in this recipe.


Serving Suggestion

This Masala Peas Pulao tastes so good on its own, honestly it doesn't need any side dishes. With simple raita and/or with some store bought chips it would make a perfect meal.  So for a day trip, i simply pack this rice with some chips for our lunch. 
Sometimes, i would love to add a boiled egg to this meal to have a balanced and nutritional platter :-)

Now let's check out on how to make this delicious Masala Peas Pulao.

Masala Peas Pulao

Preparation Time : 20 mins | Cooking Time : 20 mins | Serves : 2 
Recipe Category: Pulao | Recipe Cuisine: Indian
Masala Peas Pulao, Peas Pulao,Peas Rice Masala Peas Pulao, a delicious and easy to make one pot rice recipe.
Ingredients
Seeraga Samba Rice - 1/2 cup
Frozen peas - 1/3 cup
Onion(small) -1
Tomato(medium) - 1 
Ginger garlic paste - 2 tsp
Turmeric powder - 1/4 tsp
Red chili powder - 1/2 tsp
Coriander powder - 1 tsp
Garam Masala powder - 1/2 tsp
Salt - to taste
Coriander leaves & mint - a handful
Curry leaves - a few 
Oil - 1 tbsp
Ghee - 1 tsp
Cinnamon - 1 inch piece
Cloves - 2 
Cardamom - 1
Water - 3/4 cup

Procedure
First wash and soak the rice in the water for 20 mins. In a pressure cooker, heat the oil, and add the whole spices(cinnamon, cloves and cardamom), saute it for 30 secs. Then add the thinly sliced onions and curry leaves, saute the onions till they are translucent.


Next add the ginger garlic paste and saute till it's aromatic then add the chopped tomatoes and cook till they are mushy. Then add all the spice powder(turmeric, red chili,coriander and garam masala powder) and salt. Saute the spices in the oil for 30 secs.
Then add the peas , give a quick stir and then add the water.
Bring the water into boil, drain the water from the soaked rice and add it into the boiling water. Finally add the chopped coriander and mint leaves.
Give a good mix , close the pressure cooker with lid and cook it for 2 whistles. 
Once the pressure is released naturally, add the ghee on top of the rice and gently fluff it up. 
Delicious Masala Peas Pulao is ready to serve.

Related: How to make Brinji Rice

Notes:
  • The above quantity of spice powder is for mild spice so adjust the spice powder as per your taste.
Continue Reading »

Monday, December 16, 2019

Brinji Rice with Coconut Milk | Brinji Rice

Brinji Rice, a delicious and flavorful one pot rice made with coconut milk. In tamil, bay leaf is known as "Brinji Elai", as this rice uses bay leaf as one of the flavoring spice, it got its name as "Brinji Rice". 

In today's recipe, i have made this rice plain without any vegetables, but you can add any veggies that can be used in vegetable biryani like carrot, peas, potato & so on. I like the mild flavor of this rice, you can serve this with simple ratia and/or with any spicy curry/korma. My personal favorite to have with rice is either chicken/mutton kulambu, both taste heavenly with brinji rice. 
I packed this rice a couple of times for ST's lunch box along with simple curry. One day, after lunch he called me and said how delicious the rice was and he had a really hearty meal. Do i need to say more about this rice?? It tastes best when it rests for 1 or 2 hrs, so that the flavor becomes intense and tastes delicious. 
Amma always says that the one pot rice like Kootan choru, Ulunthu Choru & Nei Choru all taste even better when you had at night, because in the afternoon, we have it immediately once it has been prepared and the flavor doesn't  get intensified in short span of time.


I didn't realise or even paid attention to that detail before because I like to have my food(even the sweets) hot. After i started to pack lunchbox, i was more aware of this and understood how the flavor gets intense with time and this rice is one among them and tastes best for lunch box. Now let's move on to the recipe!!
Related : How to make Chettinad Mushroom Biryani


Brinji Rice with Coconut Milk

Preparation Time : 10 mins | Cooking Time : 15 mins | Serves : 2 
Recipe Category: Rice | Recipe Cuisine: Indian
Brinji Rice, Coconut milk rice, Bay leaf rice Brinji Rice, a delicious and flavorful one pot rice made with coconut milk. In tamil, bay leaf is known as "Brinji Elai", as this rice use bay leaf as one of the flavoring spice, it got its name as "Brinji Rice".
Ingredients
Basmati Rice - 1 cup
Water -1 cup
Coconut Milk - 1 cup
Ginger Garlic paste - 1 tsp
Curry leaves - 1 spring
Mint - a handful
Coriander leaves - a handful
Green chili - 2
Onion(medium) - 1/2
Tomato(medium) - 1/2
Cinnamon - 1 inch piece
Cloves - 3
Cardamom - 2
Bay leaf - 2
Turmeric powder - 1/4 tsp
Salt - to taste
Oil - 1 tsp
Ghee - 1 tsp

Procedure
Soak the basmati rice in water for 20 mins. First cut the onion into thin slices, tomato into small pieces, slit the green chili and keep other ingredients ready.
Heat the pressure cooker with oil, add cinnamon,cloves,cardamom & bay leaves, let it fry in oil for 30 secs.
Add the onions with pinch of salt, then add the curry leaves and green chili.
Saute till the onions are translucent, then add the mint, coriander leaves and ginger garlic paste.
Saute till it's aromatic, then add the tomatoes, give a quick stir and add coconut milk.
Next add the water, give a good mix, then add the turmeric powder.
Add enough salt, mix well and bring into boil.
Drain the water from the soaked rice and add into the pressure cooker, give a gentle mix and finally add the ghee. 
Close the pressure cooker with lid and cook it for 2 whistle. Let the pressure release by itself and open the pressure cooker and transfer the rice into another bowl to avoid further cooking of the rice.
Delicious Brinji Rice is ready to serve.

Notes:

  • For the given quantity of green chili, the rice has very mildly spice
  • For a cup of rice, it needs 2 cups of liquid, so you can add more or less coconut milk and use water for the remaining.
  • No need to cook the tomato until it's mushy like other pulao or biryani.
  • For more coconut flavor, you can use coconut oil instead of flavorless oil.
  • If you're using can coconut milk, make sure that it's pure coconut milk without any gum.


Continue Reading »

Monday, February 25, 2019

Samba Rice Puttu | Samba Arisi Puttu | Puttu recipe

Samba Arisi Puttu is a delicious steamed cake from the samba rice flour and coconut. Samba rice is a variety of rice grown mainly in south India, it has reddish color and distinct taste & aroma compared to regular white rice and also it's believed to be more healthier than the normal rice.

This samba rice puttu is my personal favorite puttu among all the puttu(rice puttu, rava puttu, ragi puttu) we make at home. Samba rice has that unique color and flavor, that makes the puttu more delicious and flavorful.So if you haven't tried this puttu before, do give it a try, i'm sure that you would love this unique taste and aroma.

Still we're in the process of transition into new place, so for the past few months, we have been traveling continuously and i hardly find time to cook anything. Mostly we're having the food prepared by family members and i'm quite enjoying this no cooking & cleaning time. 

Even if i cook at my mil's or mom's place, it's difficult to shoot food photos since usually i take lot of time to shoot the final phots and that's not possible when every one waits for me to have food. But today morning, somehow i had prepared everything earlier for this puttu and took the photos as quick as possible since it's been really long time since i have posted a recipe here and now tada, here i'm with the post.


Samba Rice Puttu

Preparation Time : 10 mins | Cooking Time : 7 mins | Serves : 1 
Recipe Category: Breakfast/Snacks | Recipe Cuisine: Indian
Ingredients
Samba Rice flour - 1/2 cup
Grated Coconut - 1/4 to 1/3 cup
Coconut Water/Water - as needed
Salt - 1/4 tsp
Sugar,ghee & banana - as needed for serving.

Procedure
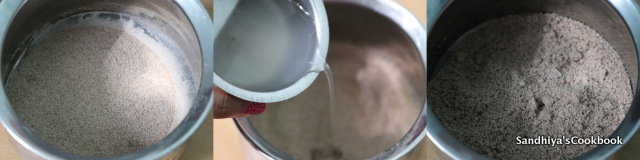
Take the samba rice flour, measure and put it in a bowl, add the salt.
Mix it all well together, then add coconut water little by little and mix it well with the flour.
The flour should be hold the shape when you press it with your fist  and again it should be crumble when you crumble it with your fingers . That's the right way to check the consistency of the flour. And also make sure that there is no lump in the flour.
Now take the Puttu Kuzhal(Puttu maker). Add the small plate with hole(it comes with puttu maker itself) in to it. First start off with the 1 or 2 tbsp of grated coconut.
Next add the flour for about 1&1/2 inch thickness.Repeat the process and finish off with grated coconut on the top. Cover the puttu maker with the lid.
Place the puttu maker in the cooker instead of weight and steam it for 5- 7 mins. Tasty Samba Rice Puttu is ready.
Drizzle some ghee on top and serve it with sugar and banana.
Notes:
  • I have used coconut water from one coconut and for the remaining i have used regular water.
  • Depends on your preference, you can more or less of grated coconut.
  • To get the perfectly shaped puttu, the amount of water used is very important. For me it takes around 1/4 cup of 1/2 cup of flour.
  • If the amount of water is less, then the puttu will not hold the shape and also it's very dry.
  • Remove the lumps , while mixing the flour.
  • Once you washed the puttu maker, wipe the inside of the puttu maker with tissue paper/kitchen towel, before adding flour. It helps to avoid the flour sticks to the maker, so that you will get perfectly shaped puttu.
  • Once you mix the flour with water, immediately steam it, if you make large quantity, do it in batch. It will avoid the flour to become dry.
  • If you dont have puttu maker, steam it in idly pot.
  • I used store bought flour, if you are using fresh home made flour,it doesn't require this much water.

Continue Reading »

Saturday, February 3, 2018

Paneer Fried Rice | Indian Cottage Cheese Fried Rice | Indo Chinese Rice Recipe

Paneer Fried Rice, a quick indo chinese rice recipe made from the Indian cottage cheese. I have tasted paneer fried rice at restaurants a couple of  times and I really liked the mild flavor of rice. As I had already mentioned in my paneer paratha recipe, I hardly cook paneer recipe at home. But last week, after prepared the paneer paratha, I left with some paneer, so without much thinking, I prepared this paneer fried rice on that weekend along with some chili gobi. The combination was so good and we really had a hearty meal on that day.
For this recipe, I have used my fried rice recipe as reference and prepared it without much changes. And also I haven't tossed the paneer in the oil before adding it into the rice. But if you like, toast the paneer(i do sometimes) slightly in the oil until it becomes golden brown and then add it to the rice.  To make delicious fried rice, there are 2 things you have to make sure to get it right, first thing is the rice, it should be properly cooked without mushy and the second thing is the soy sauce, so use good quality one, because  that's the main flavoring agent in the rice.

Paneer Fried Rice

Preparation Time : 10 mins | Cooking Time : 15 mins | Serves : 2 
Recipe Category: Rice | Recipe Cuisine: Indian
Paneer Fried Rice, Indian Cottage Cheese, Indo Chinese recipe,Indo chinese rice Paneer Fried Rice, a quick indo chinese rice recipe made from the Indian cottage cheese.
Ingredients
Cooked Basmati Rice - 3 cups
Paneer - 1 cup
*Mixed Veggies - 3/4 cup(capsicum,cabbage,carrot)
Garlic - 2 tsp(finely minced)
Green onions - 3
Sesame Oil - 1 tbsp + 1 tsp
Soy Sauce - 2 tsp
Pepper powder - 2 tsp
Salt - to taste 
* In addition to the above mentioned veggies, you can add mushroom, broccoli also

Procedure
First cook the basmati rice and let it cool completely. In the mean time,chop all the veggies(capsicum,cabbage & carrot) into small pieces ,finely minced the garlic & then chop the white part of the green onions and keep it ready.Cut the paneer into small cubes and soak it in hot water along with little salt until use.Heat the kadai with oil and then add the garlic.Saute the garlic till it becomes fragrant and then add the onions & carrot and saute it for 2 mins.Then add cabbage & capsicum and required salt for the veggie and saute till all the veggies are done. Keep the flame in high and then add soy sauce into the veggies. Drain the paneer from hot water and add into the kadai, give a good mix.Now add the cooked rice  and pepper powder. Gently give a good stir until all mix together. Finally add the finely chopped green parts of  green onions. Switch off the flame.Tasty & restaurant style Paneer Fried Rice is ready.
For more rice recipes, check out my rice recipe collection. Below picture is updated recently and the color of the rice greatly depends on the soy sauce color. Using light soy sauce for that bright white color. 

Notes:
  • I have already added salt while cooking the rice, so while sauteing, just added salt for the veggies alone.
  • Saute the veggies in high flame to get that smoky flavor.
  • Soaking the paneer in the hot water gives soft paneer
  • Adjust the soy sauce as per your liking .The amount i mentioned here gives mild flavor of soy sauce.
  • Make sure to use good quality soy sauce which is the main flavor in the rice.
  • Use Sesame oil for great flavor. 
  • The veggies should be crunchy, so don't cook till it becomes soft.
  • I personally don't like the crunchy beans, so i skip it,but if you like, add some.
  • Don't overcook the paneer, then it becomes rubbery.
  • Serve hot, it tastes best when it's hot.

Continue Reading »

Friday, February 2, 2018

Bisi Bele Bath | Sambar Satham | Rice Varieties

Bisi Bele Bath is a delicious one pot meal from the state of Karnataka,India which taste almost similar to our sambar satham. It's prepared from rice, lentil & vegetables and spice up with specially prepared spice powder. 

If you're short of time, you can use the readily available store bought bisi bele bath powder too but here in the recipe, i have prepared the spice powder on my own for better taste & flavor. 

Whenever we visit saravana bhavan here in Houston for lunch, mostly i prefer to have this bisi bele bath. Piping hot bisi bele bath with appalam is a perfect combo to try!! Bisi bele bath tends to be thick when it cools down, so i always prefer to have them as hot, that way it tastes best.

And also I have learnt from one of the tv shows, that in restaurants they have poured some piping hot sambar over the bisi bele bath & give a good mix just before serving.It helps to keep it as spoonable consistency.  

So when you prepare this bisi bele bath ahead of time, just reserve some sambar, before adding rice into it, that way, later you can pour that over the rice and serve it  just like  at a restaurant.

Now let's check out the recipe, don't think it's too complicated by looking at the long list of ingredients, it's a one healthy meal that can be prepared within 30-40 mins, if you did a little prep ahead.


Bisi Bele Bath

Preparation Time : 20 mins | Cooking Time : 25 mins | Serves : 2 
Recipe Category: Curry | Recipe Cuisine: Indian
Ingredients
Raw Rice - 1/2 cup
Toor Dal - 1/4 cup
Asafoetida powder - 1/4 tsp
Tamarind -  a gooseberry size
Pearl onion - 5
Tomato - 1 small
Potato - 1
Carrot - 1
Peas - 1/4 cup
Ghee - 1 tbsp
Curry leaves - few
Cashew - 5
Red chili - 2
Mustard & urad dal - 1/2 tsp
Salt - to taste
Jaggery - a small piece
To roast & grind
Oil - 1/2 tsp
Red chili - 3
Kashmiri chili - 2
Coriander seed - 1 tsp
Chana dal - 1 tsp
Urad dal - 1/2 tsp
Pepper corns - 1/2 tsp
Cumin seed - 1/2 tsp
Fennel seed - 1/4 tsp
Fenugreek seed - 1/4 tsp
Cinnamon - 1/2 inch stick
Cloves - 2
Grated Coconut - 2 tbsp

Procedure
First pressure cook the dal along with asafoetida powder for 3 whistles. Similarly pressure cook the rice with 1 cup of water and keep it aside. Soak the tamarind in water for 30 mins. Now for roasting the spices, heat the oil in a pan.
Add all the spices listed under "To roast & grind" except coconut and roast till it becomes aromatic. Keep it aside, then add the grated coconut and roast till it slightly changes its color.
Let all spices to cool, then put it in the mixie jar and grind into fine powder.
Chop the vegetables and keep it ready.Extract the tamarind juice from the soaked water, add the veggies into it and let it boil.
Once the veggies are half cooked, add the spice powder and the cooked dal.
Add the jaggery and salt and let it boil  for 5 mins in medium flame.Keep the cooked rice ready.
Add the cooked rice(if you plan to serve later, reserve some sambar before adding rice) and mix it well.
Now in a another pan, heat the 1 tsp of ghee, add the mustard, let it crackle, then add urad dal, cashew, curry leaves & red chili one by one. Let it all roast and add into the rice. Finally add the remaining ghee into rice and give a good stir.
That's it, Bisi Bele Bath is ready to serve. Serve hot with appalam and potato fry. Sprinkle some kara boondi on the top for more deliciousness !  

Related: How to make Ulundhu Soru/ Black Urad dal rice

Notes:
  • The chili that i have used here has very mild spice, based on the hotness of chili, add more or less as per your liking.
  • I have used kashmiri red chili for bright coloring.
  • Don't reduce the amount of ghee, it gives great flavor and taste to the rice.
  • Jaggery helps to balance the spice in the rice.

Continue Reading »