Showing posts with label Snack. Show all posts

Monday, October 17, 2022

Madras Mixture | Tamilnadu Mixture recipe

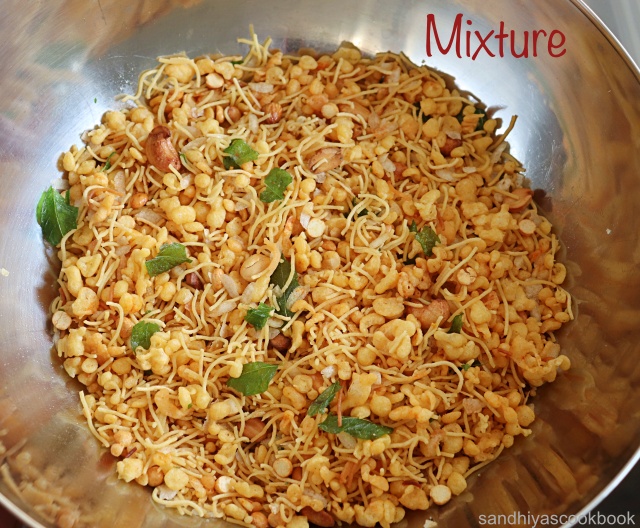
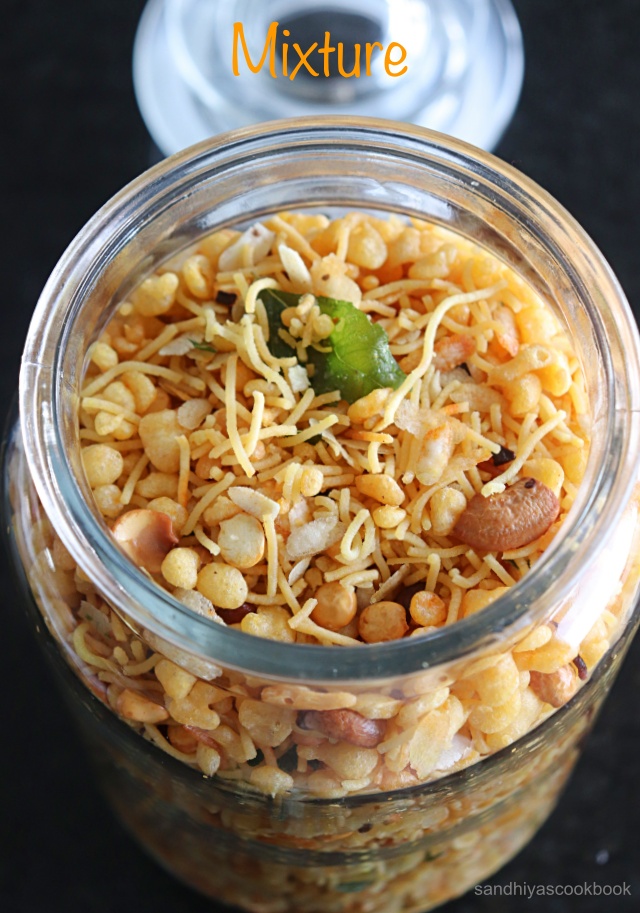
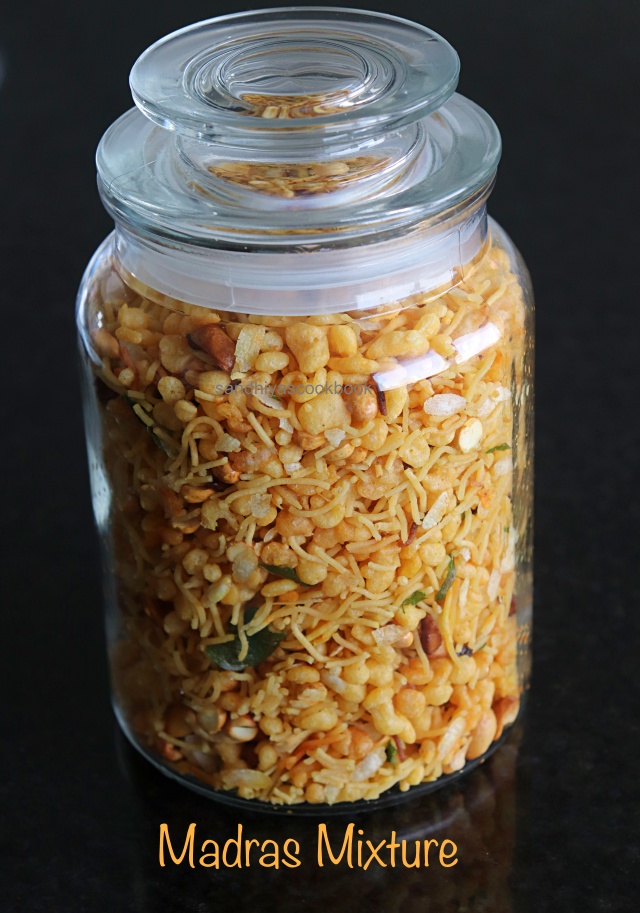
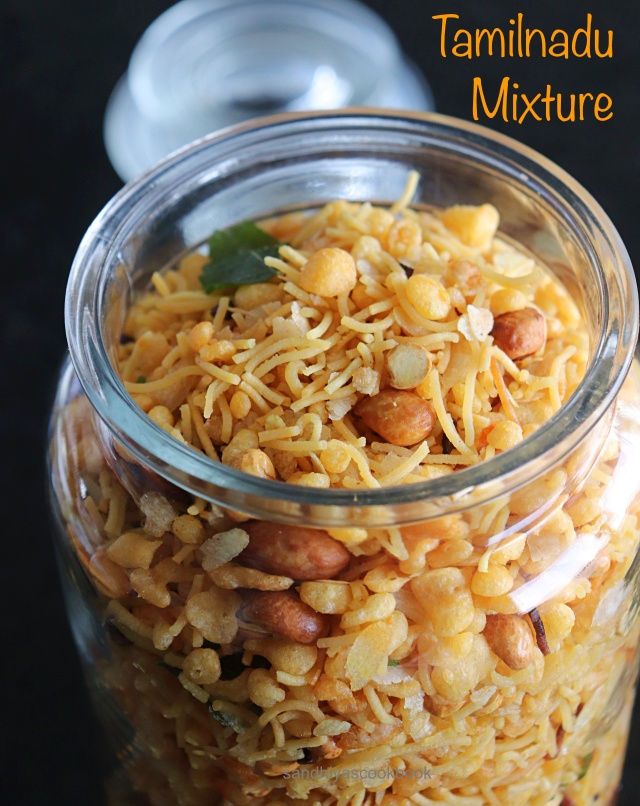
Madras mixture / Tamilnadu Mixture, a delicious South Indian savoury snack. As the name suggests itself, it has a mixture of various South Indian snacks put together ! Hence, it doesn't have any "fixed" recipe, every sweet stall/household has its own mixture recipe. 

In general, the mixture has kara boondi, omapodi, roasted aval/poha, roasted peanuts and curry leaves. In addition to that, sweet diamond cuts, seval , ribbon pakoda, kara sev, broken pieces of murukku and chips  and cashews are also added.  
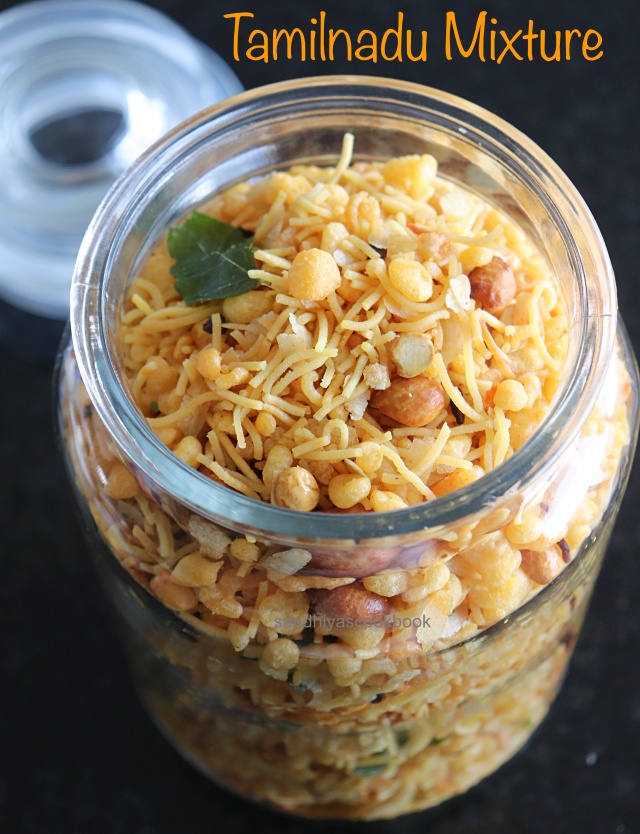
In today's post, i'm sharing the basic mixture recipe using kara boondi and omapodi/plain sev as main ingredients. As i have already said, there is no defined recipe for making the mixture, you can add more or less  ingredients as per your liking. 

What's the use of making homemade mixture without playing around with the ingredients as per your liking, right? 
As i have already shared the recipe for omapodi and kara boondi in separate posts, here i haven't shared the detailed recipe, so please look into the respective posts for those recipes. Before moving into the recipe, here are some beginners tips.
  • I would highly recommend adding the curry leaves, it gives such a nice aroma to the mixture.
  • Fry the aval/poha at last, it makes the oil cloudy.
  • You can use both skinned/un-skinned peanuts for the mixture. Both taste equally good.
  • If you're making it for the first time, i would recommend to start off with a smaller portion. So that you can make it easily without overwhelming yourself.
That's it, Now let's check out the Mixture recipe.

Madras Mixture | Tamilnadu Mixture

Preparation Time : 10 mins | Cooking Time : 30 minsServes :
Recipe Category: Snack | Recipe Cuisine: Indian
Madras mixture, Tamilnadu Mixture, Mixture recipe Madras mixture / Tamilnadu Mixture, a delicious South Indian savoury snack.
Ingredients
Omapodi - 2 cups
Kara Boondi - 2 cups
Peanuts - 1/4 cup
Roasted Chana dal / Pottukadalai - 1/4 cup
Cashews - 2 tbsp
Aval/Poha - 1/4 cup
Red chili powder - 1/2 tsp
Salt - to taste
Curry leaves - 2 spring

Procedure
First let's make some omapodi.


Let it cool and crush into small pieces.
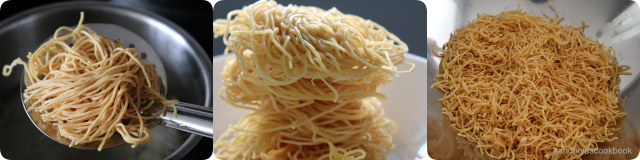
Next make kara boondi. As both omapodi and kara boondi recipes are already in my blog, i haven't shared the detailed recipe here.Next in the same oil, fry the peanuts until it's brown.
Similarly fry cashews, roasted chana dal and curry leaves one by one. 
Let them keep it in tissue paper for a while to absorb all extra oil. Finally fry aval and put it in tissue paper.
Once all are deep fried, put them all in a large bowl along with red chili powder and salt. Toss them well so that it's all mixed together well.
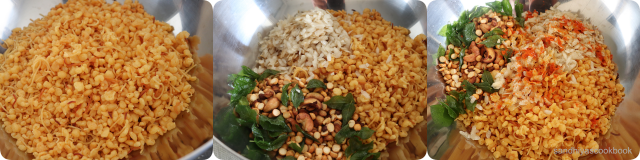
That's it, Tasty Madras Mixture is ready ! Store it in air tight container once it's completely cooled down.

Related: How to make Kai Murukku/Suthu Murukku

Notes:
  • Stay well for up to 10-15 days at room temperature
  • Adjust the chilli powder as per your liking or even you can skip it too.

Continue Reading »

Sunday, August 9, 2020

Vella Seedai | Sweet Seedai | Seedai Recipe

Vella Seedai/Sweet Seedai, a delicious and crunchy deep fried snack made from rice flour and jaggery. Though we don't have the custom of celebrating krishna jeyanthi at home, i had prepared a wide variety of snacks and sweets for last year krishna jeyanthi festival. 

This sweet seedai is one among them and that was the first time that i had tried my hands on vella seedai and really loved the flavor, mild sweet and crunchiness of the seedai. Although i make seedai/uppu seedai at home often, making vella seedai  is a very rare sight at my kitchen for various reasons !! But every time when i make this sweet seedai, i enjoy it to the core.

Now coming back to the recipe, it's so easy to make with the basic ingredients in a few minutes. So if you're looking for some easy sweet recipe for coming gokulashtami, do give this vella seedai a try.  

Here are few other famous krishna jeyanthi special recipes, if interested check it out.

And for whole collections of festive recipe, check out hereNow let's check out on how to make this sweet seedai.


Vella Seedai | Sweet Seedai

Preparation Time : 20 mins | Cooking Time : 20 minsServes :
Recipe Category: Snacks | Recipe Cuisine: Indian
Vella seedai, Sweet Seedai, Tamilnadu Sweet, Gokulashtami recipe Vella Seedai/Sweet Seedai, a delicious and crunchy deep fried snack made from rice flour and jaggery.
Ingredients
Rice flour - 1 cup
Urad dal flour - 1 tbsp
Grated Coconut - 2 tbsp
Sesame seed - 1 tsp
Butter - 2 tsp
Jaggery - 1/4 cup
Water - 1/4 cup
Oil - to fry

Procedure
Take rice flour, urad dal flour, sesame seed, coconut in a bowl. In a pan, add the jaggery and water and let it melt completely.
In the mean time, mix the dry ingredients in the bowl well and add the melted butter into it and mix it thoroughly with the flour. Once the jaggery melts completely, strain it and add into the flour.
Mix it well, then add the needed water and make a smooth and non sticky dough.
Take a small pinch of dough and roll into balls. Heat the oil for frying. 
Once the oil is heated, add the rolled seedai in batch and cook in low flame until it becomes brown on top evenly.Remove from the oil and put it on tissue paper.
Tasty and crunchy Seedai are ready. Once it's completely cooled, store it in airtight box. 
Notes:

  • No need to check for sugar syrup consistency. Once it all melted, it's good to use.
  • Crush the jaggery using hand motor & pestle / mixie before making jaggery syrup, it helps to melt easily.
  • The oil temperature should be low throughout the cooking process.
  • Add a pinch of dough into the oil, it should raise up slowly , that 's right temperature to fry this seedai.
  • If the oil is too hot,the outside would be browned easily and left with inside uncooked.
  • While frying the seedai, always stand at the safe distance from the hot oil. 
  • While rolling seedai, don't put too much pressure and don't roll too tight, it might lead to bursting of seedai while frying.
  • I have used white sesame seed here, but you can use black sesame seed also.


Continue Reading »

Wednesday, April 22, 2020

Mushroom Dumplings | Mushroom Potstickers

Mushroom Potstickers, a delicious dumplings with mushroom stuffing instead of the traditional meat stuffing. Dumplings can be boiled, pan fried, steamed or oil fried. Potstickers are actually "steam-fried" dumplings and it has the plus of both steamed and fried dumplings. 

In general, all potstickers are dumplings, but not all dumplings are potstickers, dumplings got various famous based on how it's being cooked. I have been making steamed dumplings for years now. In India and Nepal, the steamed dumplings are also known as momos, they are the most famous street food across the country.

When we were in Bangalore, at least 4 to 5  momos shop in our area within half a kilometer distance. Eating piping hot momos standing at the side of the road straight from the steamer on winter day evening is a pure bliss. Instead of pan fry the dumpling in this recipe, you can steam it as regular momos and have it with some spicy sauce. 

Ok, Now coming to potstickers, i got introduced to this when we were in Houston from BJ's restaurant. Instantly i loved it at once and it became our regular whenever we visited there and later even i had started to make them at home regularly. 

Basically, Chinese cooking needs a lot of prep work but cooking time is very minimal. Right from chopping the veggies thinly &  shaping the dumpling nicely all takes a lot of time unless you have a good vegetable chopper and expert in shaping dumplings.  

For a while , everytime time I make maida poori at home, I reserve some dough to try various dumpling shapes and now I can confidently say that I make decent dumplings.
While sitting to write this post, I remembered a lovely Chinese couple. Almost a year ago , when we were new in Canada, we shared a house with a elderly Chinese couple for a month before we got our own place. We both didn't know a common language to communicate with each other, still without any problem we communicate with sign language and make each other understand what we're saying. 

It's one of the most interesting experiences in my life. Actually the house belongs to their daughter, through her only, we booked the accommodation and we lived on one floor and her parents lived on another floor and we both shared the kitchen. 

Mostly, the elder man in the house do all the cooking, and don't know whether the men cooking in chinese culture is common or not. Once in a week, the lady of the house shapes the wontons after dinner and freezes them. OMG, she was so fast and literally shaped 100 of wontons in mins. 

I was looking at her in astonishment while preparing our dinner. For a quick dinner and breakfast, they boil a few frozen wontons in the broth and serve along with some boiled egg and stir fry veggies.

Related: How to make flower shape momos


She is one of a kind soul and likes to feed us whatever they cook as like any mother. Whenever their daughter visits the house, through her she gets to know whether we eat pork, beef and all, so that later she can share with us. 

One day she gave me a bowl of chicken soup as she knew through her daughter that we eat chicken and fish. In the soup, other than chicken, it had some other black stuff in it and wondering what it was, so asked her, she kindly took me to the pantry and showed all the ingredients that they used in the soup to make us comfortable and eat!! How wonderful is it, right?? 

Like the saying "One person is enough to change your perspective about something ", they did for us about the Chinese culture.  I have so many good memories from that one month stay, if i had started to write all, this post would have gone too long, so let me stop me here and head over to check the recipe of  mushroom potstickers. 


Mushroom Dumplings | Mushroom Potstickers

Preparation Time : 30 mins | Cooking Time : 15 minsMakes :
Recipe Category: Dumplings | Recipe Cuisine: Asian
keywords description.
Ingredients
For stuffing
Mushroom(finely chopped) - 2 cup
Carrot(finely chopped) - 1/2 cup
Spring onion - 3 
Garlic - 2 
Soy sauce - 1 tbsp
Oil - 2 tsp
Salt -to taste
Pepper powder - to taste
For outer cover
All purpose flour - 1/2 cup
Salt - 1/4 tsp
Oil - 1/2 tsp
Water - as needed 

Procedure
First let's prepare the dough, add flour, salt & oil in a bowl, mix it well.
Then add water and make a stiff dough . Cover it with lid and set it aside for 30 mins.
In the mean time, let's prepare the filling. Chop all the veggies finely and keep it ready. Heat the oil in a pan. 
Add garlic and white part of the green onions and saute till they are aromatic. Next add the carrot & saute it for 2-3 mins. 
Once the carrots are half cooked, add the mushroom & salt and saute.
Mushrooms tend to leave lot of water, cook till all the moisture evaporates and the veggies are cooked, add the soy sauce and mix it well.
Finally add the pepper powder and green parts of spring onion. Mix it well and switch off the flame. Let the stuffing to cool completely.
In the mean time, let's roll the dough, roll the dough into log and cut into eight equal parts and roll them into smooth balls.
Take a dough and roll into thin sheets, do the same for all the dough.
Add around a tbsp of stuffing at the center of a sheet, take the center of the dough from both sides and pinch together.
Now starting from the center, make a small pleat from the front side of the dough and seal it  together with the back side of the dough, do till it reaches the end.
Do the same way on the other side too.
Similarly shape all the dumplings. Heat 1 tbsp of oil in a pan, add the dumplings.
Cook them without disturbing until the bottom of the dumplings are golden brown. Next add water in to the pan till the dumplings are half immersed in the water. 
Cover the dumpling and cook till all the water is absorbed by dumplings and it's well cooked. 
That's it, mushroom dumplings are ready.  Serve it with some spicy sauce.

Related: How to make Roasted Butternut Squash Soup

Notes:
  • Make sure to cut the veggies as fine as possible.
  • I have used brown mushroom here, but you can use white mushroom also.
  • Soy sauce has already salt in it, so be careful while adding salt.
  • Make outer layer as thin as possible for delicious dumplings.
  • Serve hot for best taste.
  • I like to serve it with some hot sauce and soup for complete meal.


Continue Reading »

Tuesday, August 20, 2019

Pepper Thattai | Milagu Thattai | Snacks

Milagu Thattai, a delicious savory snack made from rice flour with wonderful pepper flavor. I have been thinking of posting this recipe here for very long time now. 

As Krishna Jeyanthi/Gokulashtami is just around the corner and thattai is one of the popular snack prepared for this festival, thought of, this might be the right time to post here and made them last evening just to post here and of course we enjoy eating them too 😊. 
In our home ,we grew up eating varieties of home made snacks like murukku and seedai, but thattai was not in the picture when i grew up, later when i was chennai for job, i got tasted the A2B's pepper thattai for the first time and instantly love the flavor. 

Ever since i always prefer to buy the pepper thattai whenever visit A2B shop. After moving to aboard, i started to make them at home, one of the difficulties of living far away from home town, whenever you're craving for something from your home town, the only choice you have is make it on your own. 

No regrets at all, actually i see that as the opportunity to learn on how to make them otherwise i would never make them on my own. Ok, enough with my stories, coming to the recipe, today i have used home made rice flour/pacharisi maavu, but you can use the store brought rice flour too for this recipe, i had used them in the past and it worked fine. Now let's check out how to make this flavorful pepper thattai.

Pepper Thattai | Milagu Thattai

Preparation Time : 15 mins | Cooking Time : 20 minsMakes : 20 
Recipe Category: Snacks | Recipe Cuisine: Indian
Pepper Thattai, Milagu Thattai, Thattai, Easy Thattai Recipe Milagu Thattai, a delicious savory snack made from rice flour with wonderful pepper flavor.
Ingredients
Rice flour - 1 cup
Roasted chana dal flour/Pottukadalai maavu - 3 tbsp
Chana dal - 2 tsp
Peppercorns - 1 tsp
Asafoetida powder - 1/4 tsp
Curry leaves -  1 spring
Butter - 1 tsp
Salt - as needed
Oil - for frying

Procedure
Soak the chana dal in water for 10 mins. In a bowl, take the rice flour & roasted gram flour.
Add the peppercorns into the hand motor & pestle and crushed them into coarse powder and add into the flour along with salt.
Finely chop the curry leaves and add into the flour mixture along with asafoetida powder, mix it all well together, then add the melted butter and give a good mix.
Add the soaked chana dal and the needed water and make a dough. Divide the dough into small lemon sized ball.
Take a zip lock bag, cut the sealed edges and make it open, grease it with oil and  place a dough on one side of the bag and cover the top with the other side of the bag.
Using a flat bottom bowl and press the dough to flatten it out evenly. Prick on the top using fork.
Heat the oil for frying and add the pressed dough.
Let it cook in medium flame. Gently flip it for couple of times while frying.
When the "shh" sound stops and the thattai floats on the top without any bubbles, remove from the oil and place it on tissue paper. Do the same for the remaining dough.
Tasty and crispy Pepper Thattai is ready. Let it cool down completely and store them in air tight container to maintain the crispiness. 

Related : How to make Seedai

Notes:
  • Instead of hand motor & pestle, you can using mixie to crush the peppercorns.
  • Prick the top using fork helps to avoid puff up while frying.
  • The given quantity of pepper is for mild spice. Add more or less as per your liking.
  • Instead of zip lock bag, you can use any polythene bag for shaping thattai.
  • To make roasted gram flour, add the roasted gram in the mixie and grind into fine powder.If need sieve it once otherwise use them as it is.
Continue Reading »