Showing posts with label Jaggery. Show all posts

Tuesday, August 29, 2023

Thengai Payasam | Arisi Thengai Payasam

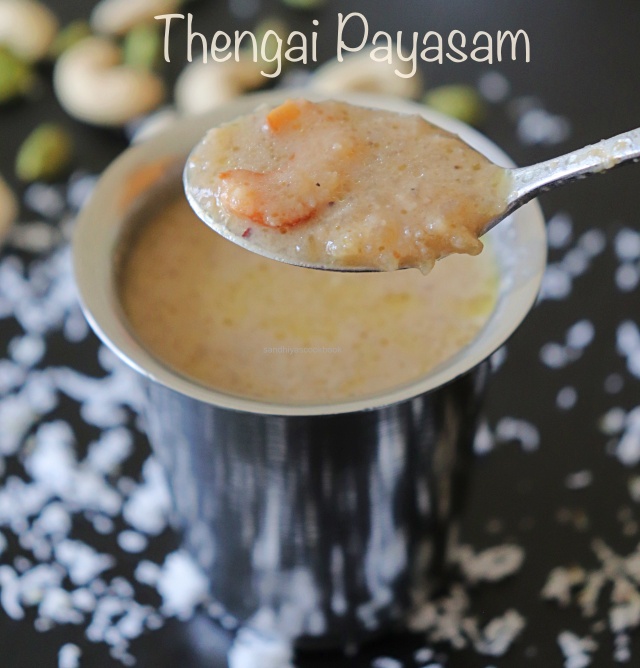
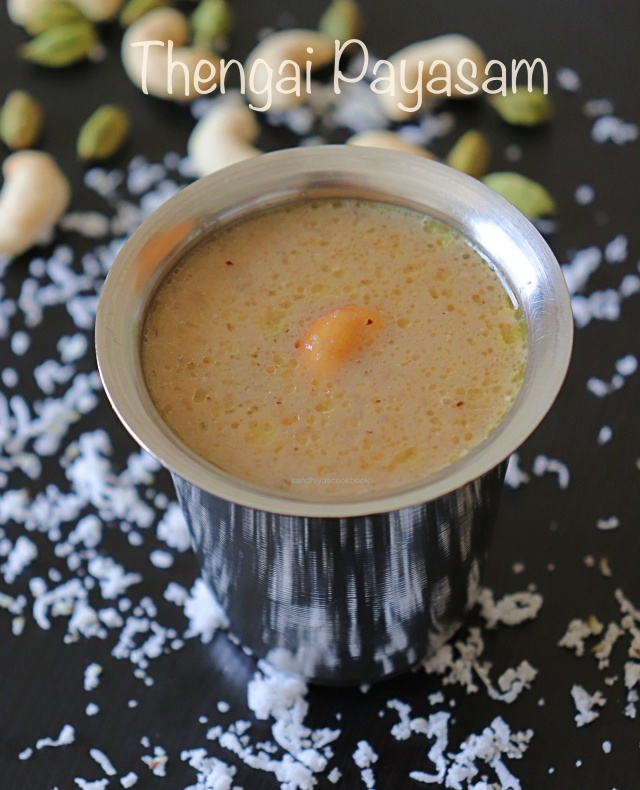
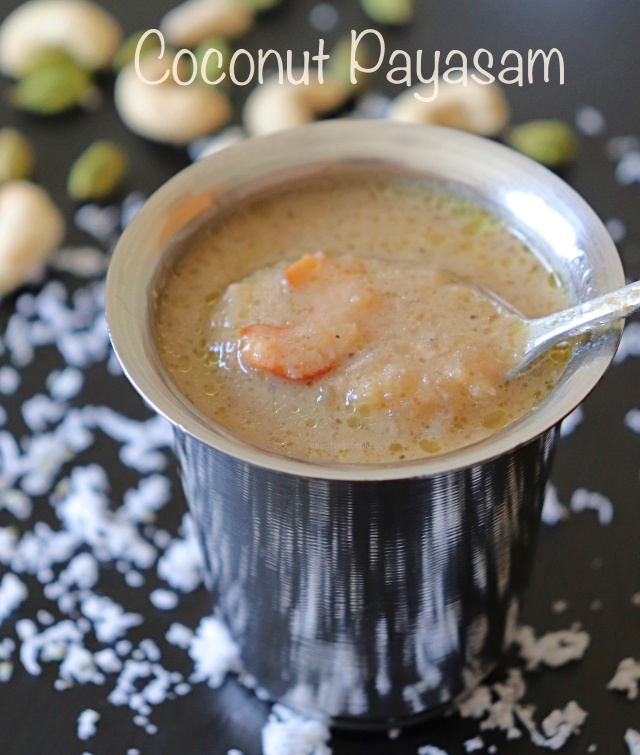
Thengai Payasam, a delicious sweet recipe prepared with coconut and a little bit of rice. It's one of the payasam that i have learned recently and love it very much. 

When i came across this recipe online, i instantly knew that i would love this payasam because i'm such a huge fan of coconut based dishes. As expected, i love this payasam. Though the recipe has very basic ingredients but somehow they all work together and make such a spoon licking delicious payasam.

If you love coconut  flavor as like me or simply you want a different payasam recipe to satisfy your sweet cravings, then i would highly recommend to give a try on this amazing Thengai Payasam.


Coconut

For this payasam, i have used the fresh coconut. But you can use the frozen grated coconut that are available in the market. Whatever you are using, make sure that the coconut is fresh because that's key for the taste and the flavor in this payasam. 

Rice 

Adding rice gives the thicker texture to the payasam. Basmati rice flavor really elevates the flavor and taste of the payasam.  But i tried this payasam with regular cooking rice too in the past and it tastes equally good. 

Jaggery 

The color of the payasam solely depends on the jaggery color. Use paagu vellam or yellow colored jaggery for the vibrant color payasam. I have used brown colored jaggery so the color is a bit dull.

Like many payasam, this one too tends to thicken when it's cooled down, so switch off the flame when it's a bit runny than the required consistency.

Ok, now let's check out on how to make this delicious payasam.


Thengai Payasam | Arisi Thengai Payasam

Preparation Time : 5 mins | Cooking Time : 20 minsServes :
Recipe Category: Sweet | Recipe Cuisine: Indian
Thengai Payasam, Coconut Payasam, Arisi Thengai Payasam Thengai Payasam, a delicious sweet recipe prepared with coconut and a little bit of rice.
Ingredients
Grated Coconut - 1/4 cup
Basmati Rice - 1 tbsp
Jaggery - 1/4 cup
Milk - 1/4 cup
Water - 1 cup
Cardamom powder - 1/4 tsp
Ghee - 1 tspCashew - 5 

Procedure
Heat the pan, add the coconut and rice, roast till they are aromatic. Let it cool a bit.


Add it in the mixie jar and grind into coarse mixture. Next in a sauce pan, bring the water into boil and then add the coarse coconut-rice mixture. Let it cook till the rice is soft.
In the mean time, in an another sauce pan, add the jaggery and a couple of tbsp of water, heat it until the jaggery melts completely. Strain the jaggery syrup and keep it ready.
Once the rice is well cooked, add the jaggery syrup and boil it for a couple of minutes.
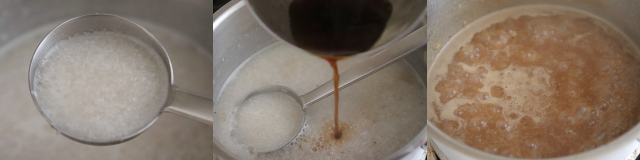
 Next add the milk and give a quick stir. In an another pan, fry the cashew in ghee .
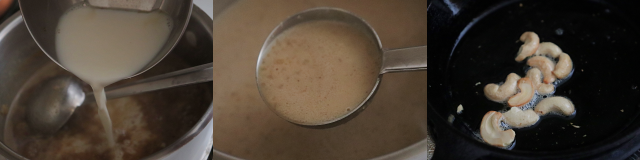
Finally add the cardamom powder, fried cashew, give a gentle mix and switch off the flame.
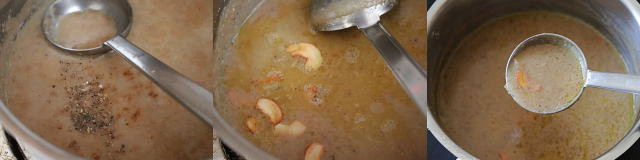
Delicious Thengai Payasam is ready.

Related:How to make Paruppu Payasam

Notes:
  • I have used Basmati rice in this payasam, but any cooking rice works fo this recipe.
  • Instead of dairy milk, coconut milk can also be used.

Continue Reading »

Tuesday, February 2, 2021

Mixed Nuts Chikki | Dried Nuts Brittle

Mixed Nuts Chikki, a delicious & crunchy Indian styled brittle with mix of nuts and jaggery. Making chikki at home is super easy provided that the jaggery/sugar syrup consistency is perfect. Jaggery syrup consistency can make or break this recipe easily, so like any chikki making, you should be very attentive while making the syrup and extra caution when the syrup reaches its desired consistency. I'm not saying this to scare you, it's actually a caution warning, so you can make this chikki perfectly at your first attempt itself. 

Over the holidays, I bought a couple of bags of assorted shelled nuts and I kept it as it is without removing the shells for a month. Finally two weeks back, with the help of hand mortar & pestle, successfully removed all the shells(you might know this if you have followed me on IG where i shared this in story). Whenever i have a lot of dried nuts at home, i would usually make this Dates Nuts Ladoo which is sugar free, super easy to make and taste delicious. But this time, I wanted  to try something different and made this chikki. It turned out super good and makes a perfect after meal snack/sweet. 

Why do my chikki not harden ? 
Jaggery syrup consistency is the key to get the perfectly crunchy chikki. Make sure that the jaggery reaches hard ball stages before adding the nuts. 

Why does my chikki lose its crunchiness after a while ?
Make sure to store it in a airtight container for retain its crunchiness for a longer time. It stays well for weeks at room temperature.

Why do my chikki chewy? 
The jaggery syrup doesn't reach the required consistency. Again, make sure to check the syrup consistency and add the nuts.

Why doesn't my chikki hold the shape?
If the jaggery syrup consistency passes the stage of hardball then you can't spread the mixture and cut. 

What are the nuts I can use in this recipe?
You can add any nuts as you like . Peanuts, cashews, pistachios  and pecans , all taste good for this chikki. 

Are the seeds necessary for this chikki?
I personally like to add sesame and flax seeds in my chikki. If you don't like them you can skip it. 

What are the substitute for jaggery? 
Traditionally indian chikkis are made with jaggery ! Palm jaggery is a good alternate and gives nice flavor too. Sugar also works but i haven't tried it so far ! 

Hope, I have answered most of the questions that might have arisen while making chikki. If you have any other questions, leave it in the comment, and I will try to answer to the best of my knowledge.  
Lastly, many chikki recipes online call for equal amounts of jaggery and nuts. Personally I find that too sweet so I have been using 1/2 cup of tightly packed jaggery for a cup of nuts for years now and the jaggery syrup is just enough to hold the nuts and make an awesome treat without overpowering sweet. If you're a person who loves chikki but find the store bought chikkis are too sweet then i would highly recommend to give this ratio a try and i'm sure that you will absolutely love it. Now let's check out on how to make this mixed nuts chikki.  

Mixed Nuts Chikki | Dried Nuts Brittle

Preparation Time : 5 mins | Cooking Time : 15 minsServes :12 small pieces 
Recipe Category: Snacks | Recipe Cuisine: Indian
Mixed Nuts Chikki, Dried Nuts Brittle, Indian Chikki, Almond Chikki, Walnut chikki, Snacks, Sweet Mixed Nuts Chikki, a delicious & crunchy Indian styled brittle with mix of nuts and jaggery.
Ingredients
Almonds - 1/2 cup
Walnuts - 1/2 cup
Sesame Seed - 1 tbsp
Flax Seed - 2 tbsp
Jaggery - 1/2 cup(tightly packed)
Water - 1/4 cup
Cardamom powder - 1/2 tsp

Procedure
Heat a pan and add the almonds and walnuts, roast them till they are aromatic.
Next add the sesame seeds and flax seeds, roast till the flax seeds are started to pop.
Transfer into an another plate. In the same pan add the jaggery and water. Let the jaggery melts completely.
Then keep the flame in medium and let it boil till the jaggery syrup reaches hard ball consistency. Pour a few drops of  jaggery syrup into the cold water, the syrup settles at the bottom and you can able to roll the syrup as ball. The jaggery ball should be  hard and brittle, that's a correct stage.
Keep the flame in lowest possible immediately and add the roasted nuts and mix it well until all the nuts coated with jaggery syrup. Then transfer the mixture on to the parchment paper.
Spread it gently, cover it with another parchment paper and roll it with a rolling pin for a even layer.
Give it a rest for 3-4 mins and then cut into desired shape.  
Tasty and crunchy Mixed Nuts Chikki is ready. Let it cool completely and store it in a airtight container. It stays well for weeks in room temperature.

Pressing it with rolling pin gives the chikki glossy look on one side(because the syrup settled on one side) and rusty look on another side.  Look at the pic below  :-) 
Notes:
  • You can use any kinds of mixed nuts as per your liking. 
  • Make sure to sure good quality of jaggery which is used making syrup or pagu vellam.
  • Instead of jaggery, you can use palm jaggery too. 

Continue Reading »

Sunday, August 9, 2020

Vella Seedai | Sweet Seedai | Seedai Recipe

Vella Seedai/Sweet Seedai, a delicious and crunchy deep fried snack made from rice flour and jaggery. Though we don't have the custom of celebrating krishna jeyanthi at home, i had prepared a wide variety of snacks and sweets for last year krishna jeyanthi festival. 

This sweet seedai is one among them and that was the first time that i had tried my hands on vella seedai and really loved the flavor, mild sweet and crunchiness of the seedai. Although i make seedai/uppu seedai at home often, making vella seedai  is a very rare sight at my kitchen for various reasons !! But every time when i make this sweet seedai, i enjoy it to the core.

Now coming back to the recipe, it's so easy to make with the basic ingredients in a few minutes. So if you're looking for some easy sweet recipe for coming gokulashtami, do give this vella seedai a try.  

Here are few other famous krishna jeyanthi special recipes, if interested check it out.

And for whole collections of festive recipe, check out hereNow let's check out on how to make this sweet seedai.


Vella Seedai | Sweet Seedai

Preparation Time : 20 mins | Cooking Time : 20 minsServes :
Recipe Category: Snacks | Recipe Cuisine: Indian
Vella seedai, Sweet Seedai, Tamilnadu Sweet, Gokulashtami recipe Vella Seedai/Sweet Seedai, a delicious and crunchy deep fried snack made from rice flour and jaggery.
Ingredients
Rice flour - 1 cup
Urad dal flour - 1 tbsp
Grated Coconut - 2 tbsp
Sesame seed - 1 tsp
Butter - 2 tsp
Jaggery - 1/4 cup
Water - 1/4 cup
Oil - to fry

Procedure
Take rice flour, urad dal flour, sesame seed, coconut in a bowl. In a pan, add the jaggery and water and let it melt completely.
In the mean time, mix the dry ingredients in the bowl well and add the melted butter into it and mix it thoroughly with the flour. Once the jaggery melts completely, strain it and add into the flour.
Mix it well, then add the needed water and make a smooth and non sticky dough.
Take a small pinch of dough and roll into balls. Heat the oil for frying. 
Once the oil is heated, add the rolled seedai in batch and cook in low flame until it becomes brown on top evenly.Remove from the oil and put it on tissue paper.
Tasty and crunchy Seedai are ready. Once it's completely cooled, store it in airtight box. 
Notes:

  • No need to check for sugar syrup consistency. Once it all melted, it's good to use.
  • Crush the jaggery using hand motor & pestle / mixie before making jaggery syrup, it helps to melt easily.
  • The oil temperature should be low throughout the cooking process.
  • Add a pinch of dough into the oil, it should raise up slowly , that 's right temperature to fry this seedai.
  • If the oil is too hot,the outside would be browned easily and left with inside uncooked.
  • While frying the seedai, always stand at the safe distance from the hot oil. 
  • While rolling seedai, don't put too much pressure and don't roll too tight, it might lead to bursting of seedai while frying.
  • I have used white sesame seed here, but you can use black sesame seed also.


Continue Reading »

Friday, July 3, 2020

Nei Payasam | Aravana Payasam

Nei Payasam, a traditional sweet of South India made from rice, jaggery and ghee. It's one of the common sweets served in many temples across South India. Nei Payasam is actually sakkarai pongal without dal and the term "Nei payasam" is quite commonly used in Kerala cuisine more than Tamil cuisine.

In our home, we always make sakkarai pongal without dal and still we used to call it  "Sakkarai pongal" . So I guess the names are easily interchangeable in South Tamilnadu.   

When i was new to the blogging world, really wondered about all the sakkarai pongal recipe available online because each recipe would call for dal, so that time when i asked Amma why we didn't use dal in sakkarai pongal in our family, her answer was "adding dal would make them spoil easily". 

Guess, may be in those days, sakkarai pongal was made only for pongal & other temple festivals in large quantities. So in order to keep it good for a longer time, dal would be omitted and in later days dal was added in the sakkarai pongal recipe in some parts of Tamilnadu. 

Still remember that the leftover sakkarai pongal made on pongal festival was consumed by the elders in the family on the next day and used to say that the taste gets better on the next day. But in those days, I would run away from the leftover foods and haven't had the experience of tasting it. 
Through blogging and food as a medium I have learnt a lot about other cultures. Most of the food that i grew up eating is easily tagged under "Kerala Cuisine" now and even i can see how much our family cooking is so similar to kerala cuisine more than tamilnadu cuisine based on the common overview of cuisine. 

But people have their way of cooking even before the state separation, right? So all the categories we have are not comprehensive, it's just to give the idea of what most people in that region eat, that's all.

Coming back to the recipe, kerala raw rice/  unakalari rice is commonly used for Nei Payasam. I have had a small amount of leftover kerala raw rice from the pongal purchase and used that for this recipe. Back home also, Amma uses the same rice for making both savory and sweet pongal on Pongal festival.

It gives nice texture and flavor to the payasam. And for that vibrant color of payasam, I have used an equal amount of dark and light colored jaggery. Now let's check out how to make this lip smacking Nei payasam.

Nei Payasam | Aravana Payasam

Preparation Time : 5 mins | Cooking Time : 25 minsServes :
Recipe Category: Sweet | Recipe Cuisine: Indian
Nei Payasam, Sweet, Tamilnadu,Traditional,Kerala Cuisine,Tamilnadu Cuisine,Aravana Payasam Nei Payasam, a traditional sweet of South India made from rice, jaggery and ghee. It's one of the common sweets served in many temples across South Tamilnadu.
Ingredients
Unakalari Rice / Kerala Raw Rice - 1/2 cup
Water - 3/4 cup + 1/2 cup
Jaggery - 1/2 cup(heaped)
Cardamon powder - 1/2 tsp
Ghee - 2 tbsp
Coconut bits - 1 tbsp
Cashew - 1 tsp

Procedure
In a pressure cooker , add the washed rice and add 3/4 cup of water and cook it for 3 whistle.
The cooked rice should be soft and not mushy. In a kadai add the jaggery & water and bring into boil.
Once the jaggery melts completely, strain it and add again into the kadai along with cooked rice . Mix it all well.
Cook till it became thick and then add the cardamom powder and half of the ghee.
In an another pan, heat the remaining ghee & add the coconut bits and cashews.
Roast till they are golden brown and add into the payasam. Mix it well.
Delicious Nei Payasam is ready.

Related: How to make Javvarisi Semiya Payasam 


Notes:
  • Instead of kerala raw rice, you can use the regular raw rice too
  • I have used equal amount of dark and light colored jaggery.
  • Adding coconut bits truly enhance the taste, so highly recommend to add it.
  • Instead of coconut bits, you can use grated coconut also.


Continue Reading »

Thursday, April 2, 2020

Karupatti Kuzhi Paniyaram | Sweet Paniyaram Using Dosa Batter

Karupatti Kuzhi Paniyaram, a delicious and quick to make sweet/snack with dosa batter. Traditionally,  separate batter is prepared to make the kuzhi paniyaram, but here in this recipe, we 're going to use the regular dosa batter. Still it tastes as awesome as the traditional one. 

More than kara kuzhi paniyaram, this sweet version of kuzhi paniyaram is my favorite. Amma makes this often for breakfast in addition to dosa and we grew up eating this alone for breakfast in the weekends, it was like our kind of donut breakfast. 

But now a days, i'm not making this often mainly because of the rare availability of karupatti in the places that i have been living for the past few years. Whenever i have seen them in grocery store, immediately i would grab them for making this karupatti paniyaram and karupatti coffee.

Sometime the flavor and taste of the karuppati that are available here would slightly differ from taste and flavor that i'm used to, so making this paniyaram is a very rare sight at my kitchen now a days.

A few months back, bought the karupatti from the local indian store and it's flavor and taste are so much like the one that i'm used to, so i have been using that in ration and try to keep it as long as i can :-), already made this paniyaram twice in the last one month.

 If you haven't tried this sweet version of paniyaram do give it a try, no need to make any special batter, dosa batter simply works fine, make sure that the batter is thick. Now let's check out the recipe.


Karupatti Kuzhi Paniyaram

Preparation Time : 5 mins | Cooking Time : 20 minsServes :
Recipe Category: Curry | Recipe Cuisine: Indian
Karupattai Kuzhi Paniyaram, Sweet Kuzhi Paniyaram,Kuzhi Paniyaram, Jaggery Paniyaram,Palm Kuzhi Paniyaram,Chettinad Kuzhi Paniyaram Karupatti Kuzhi Paniyaram, a delicious and quick to make sweet paniyaram with dosa batter. Traditionally, separate batter is prepared to make the kuzhi paniyaram, but here in this recipe, we 're going to use the regular dosa batter.
Ingredients
Dosa Batter - 1 cup
Karupatti/Palm Jaggery - 1/2 cup
Water - 2 tbsp
Grated Coconut - 1 tbsp
Cardamom powder - 1/4 tsp
Oil/ghee - for frying
* See the notes section at the end for all tips to get perfect fluffy paniyaram

Procedure
Take the dosa batter from the refrigerator(if you have to) and let it come to room temperature. In a sauce pan, add the karupatti(you can use regular jaggery also here) and water and heat it in low flame.
Let the karupatti melt and then the strain the karupati syrup in to the dosa batter, next add grated coconut and cardamom powder.
Mix it all well together. Heat the paniyaram pan with little oil in each hole.
Pour the batter in each hole and cover cook(optional) it for few mins.
And then gently flip into the other side with small wooden stick/skewer and cook till it's golden brown. Remove on to the plate.
Tasty Karupatti Paniyaram is ready. 

Related: How to make Karupatti Coffee 


Notes:
  • Don't add more water for making karupatti syrup, it will make the batter dilute.
  • Instead of palm jaggery, regular jaggery can also be used
  • Cook it in low flame, otherwise it's easily get burnt in the bottom because of the sugar in it.
  • No need to check for any syrup consistency here, just let it melt is enough.
  • Crush the karuppati in hand motor and pestle and then add into sauce pan for easy melting.
  • Personally i like to use sesame oil for this paniyaram more than ghee. Use ghee if you prefer that flavor.
  • Instead of grated coconut, you can used coconut bits also if prefer some crunchiness in between.
  • Serve it hot or cold, it tastes good in either way. But i prefer to have it straight from the stove.
Continue Reading »